Grout. Such a simple thing. A bit of cement based filler, sometimes mixed with sand, and a little bit of water. It’s a recipe that’s been around for thousands of years in an essentially unchanged format. It’s rather amazing how much something that is so simple can so easily change the look and feeling of an entire room’s tile install.

We last covered the two day effort we invested to virtually transform our kitchen with a simple running bond subway tile backsplash, and we really felt it was looking great. The tiles were even, level, consistent, and had a nice 1/16” spacing. Taking a step back showed us just how far we had come in our quick kitchen upgrade efforts, but the unfinished look from the lack of grout showed us just how far we had left to go.

I know it may be a bit difficult to see the lack of grout in the photo above, so here's another shot that shows it a bit better. I assure you, it was somewhat glaring in person.

No sooner than the thinset had passed its recommended cure time than we turned our attention to grouting. However, just getting to the point where we had the grout was a bit of a challenge.

I mentioned in the tiling post that I have a particular brand of cement based grout that I like to use -- Mapei’s Keracolor. This came highly recommended from professional tile setters, and I’ve even used the epoxy version as well (for our guest bath). Here's a little bit of info about me and my personality. I’m one of those people who tends to stick to brands that I like and I have a really hard time switching to something I don't know. The big problem with this aspect of my personality and our hunt for grout is the fact you can only find this particular brand of grout at Lowes.

The Keracolor grout comes in a whole series of colors, and Wendy, on the night we purchased the tile using our London Fog paint chip, picked out the perfect color of grout for our backsplash aptly called “Warm Gray.” Since we were doing 1/16” grout lines, we needed to use the unsanded style grout. When your grout joints are under 1/8”, you must used unsanded grout, otherwise your grout won’t be able to really get between the tiles. We started looking through the aisle for the Warm Gray and quickly found it, but the problem was that we only found the sanded version. After talking with an employee, our enthusiasm quickly waned. Apparently Lowes doesn't stock the unsanded grout in Warm Gray.

Sadly for us, there was simply no other color option, it had to be unsanded, it had to be Warm Gray, and it had to be Keracolor. I wasn’t about to let my brand loyalty stray, and Lowes special order was just too slow and too expensive (about 225% of the cost in store), so we found an online supplier and ordered a 10lb bag of unsanded Karacolor in Warm Gray. The grout arrived about four days later, just after we wrapped up the backer board and tile installation. 


Continue Reading Full Post
Comments 33

The upgrades we’ve been performing on our kitchen, though not entirely cosmetic, have focused primarily on the various changes we can make to bring the area more inline with the rest of our home. Through building additional counter and storage space, and upgrading our counters to butcher block, we had taken a previously tired space and breathed in new life, but it still seemed something was missing.

The visual interest that a tile backsplash can bring to a kitchen was sorely lacking and incredibly obvious. This was only made more apparent once we finished our butcher block counters. Though we knew it would take a fairly significant level of effort to complete, we also knew that it was something we’d absolutely need to do.

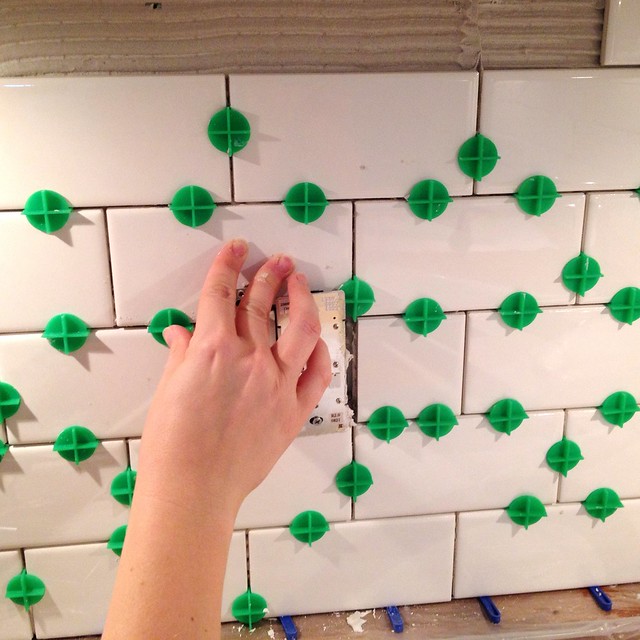
After significant debate, we finally landed on installing a 3” x 6” subway tile in a running bond style. This decision removed a huge weight from our shoulders as it meant a tile install that would be far more straightforward and involve fewer cuts than the more complex herringbone pattern we were also considering. With that decision and our completion of the Hardibacker install, Wendy and I were ready to move forward and begin tiling.

Before we begin our recap of this portion of the project, we can both tell you that television is a lying fool! If you watch HGTV, DIY Network, or any show where the homeowner works to "spruce up their place" and it includes fun and easy tiling...it's a load of crap. Tiling is a skill that's pretty easy to learn, but it's still something we find really stressful. The whole process is time consuming, you are constantly racing against the clock, you're typically having to make small and intricate cuts, what you do is almost immovable without significant effort just a few minutes after you put the tile in place, and when you're done at the end of the day, your hands are cracked, dry, and beaten. With that being said, it's totally DIY-able. We're just saying that you shouldn't be fooled by the television shows into thinking it's this quick, pain free, and easy process -- you need to know what to expect heading into it.

We kicked off the job with a little bit of prep work including tile saw set up, gathering supplies (sponges, buckets, 1/4" and 1/8” v-notch trowels, and taping knives), covering the counters with plastic to protect them from the thinset and water, and establishing a guide line to begin tiling from on the far right side of our counters.

Our plan was to work from right to left around the entire tileable area in a counter clockwise manner. This would allow us to start with the easy area and establish a good edge, and then finish in the harder area behind the stove and fridge.

If the first steps of any good tile job is the prep, the second is typically the mixing of the thinset. Though I’m by no means even close to a professional tile setter, I still have my brand preferences of thinset and grout based on previous experience. Personally, I like VersaBond for thinset, and Mapei’s Keracolor for grout (we’ll talk more about that when we get to the grouting phase). The thinset is a lightly modified thinset that stays workable for an adequate amount of time, but cures fully even in difficult curing applications. You can typically find the VersaBond at The Home Depot, and Keracolor grout at Lowes (which is a bit of a pain because they aren’t at both places).

Wendy and I have tiled a couple different areas of our house, and we’ve learned pretty much all we know using the excellent references and professionals that are willing to give free advice on the John Bridge tile community and forums. If you’re ever planning to undertake a DIY tiling job, or a bathroom job that includes tile or stone, be sure to check out these forums. They are invaluable with how much they are willing help out the novice DIYer with grand goals. We liked what we saw so much that we bought John Bridge’s book, Tile Your World. It’s an excellent reference for the aspiring beginner to advanced tile setter.

Okay, back to the thinset. There’s a bit of a trick to mixing up the thinset to be most effective, and it has to do with consistency. While the package tells us how much water to add to a full bag of thinset, we knew we’d only be mixing up smaller amounts (because we really aren’t fast enough to work with full bags, nor did the space require it). When this occurs, the best thing to do is break out the calculator and unit converter to determine how many cups of water we need per pound of mix, then get a small food scale to let us know just how many pounds of thinset we are mixing.


Continue Reading Full Post
Comments 19

It's been a little while since our last Open Housing post, what with the crazy work we've been doing on our kitchen of late. But we'll still take a break from all of that work to venture into open house or two in the area. Today we have an interesting place to review for you in today's Open Housing, and it's a little bit out of our normal Old Town comfort zone. Today's house is located just next door to Old Town Alexandria, in the quiet and quaint Del Ray neighborhood of Alexandria.

Those familiar with the area, or those familiar with the blog DIYDelRay.com, probably know where I'm talking about. Just a little bit north of Old Town, the best way I can describe Del Ray is as a family friendly, slightly sleepy, and decidedly less urban neighborhood of eclectic homes, good food, and a small town vibe. The city's tagline is "Where Main St. still exists," and I'd say they're spot on.

We have a good friend who has been looking to buy a house in Old Town, Rosemont, or Del Ray for the last few months. Her search has taken her through many homes over this period, from fixer uppers to the totally renovated, but she's looking for just the right home. A little while ago she emailed us a listing that she had seen for a new-to-the-market house that was being held open. Thinking it might be the place for her, and wanting our opinion on the home's potential and current quality, she invited us along to provide our honest review.

The description of the home was intriguing, to say the least.

...This former home of Grammy award winner, Mary Chapin Carpenter boasts soaring ceilings, gorgeous hardwood floors and an eclectic spirit. 4 bedrooms + office, 2 full baths.

Our interest was piqued, so we ventured the few miles from our house to take a look at the little blue farm house just a few blocks from Del Ray's Mount Vernon Ave (their Main Street).


Continue Reading Full Post
Comments 8

Our kitchen renovation journey has taken us from within the bustling walls of IKEA to the sales floor of our local h.h. gregg, all in the name of a budget friendly but long overdue kitchen update. We should probably stop calling this kitchen update “temporary.” The level of effort, cost, and extent of the various changes we’ve been making tend to suggest this is far more of an “act 1,” or perhaps a “forward.” As temporary as it may ultimately prove to be, the changes we’re making have been thorough, detailed, and done to the best of our ability, and there’s nothing too temporary about that approach.

Following our butcher block counter top install, we had two very important tasks related to the backsplash. The first was to give ourselves a solid surface to which we could apply the tile. The second was to actually settle the debate between the style of tile application we wanted to use -- herringbone, running bond, or mini running bond (yes, the mini was back on the table).

After we completed our removal of the old counter tops, we saw something somewhat unexpected behind the old green laminate’s low backsplash. The small area of counter backsplash that rises above the counter seems to have been skim coated (or should I say “thick” coated) into place. This left a rather large and noticeable gap of 1/8” to 1/4” ridge in the plaster that differentiated the upper portion of the wall to the area immediately behind the old lower backsplash.

We had planned on doing some sort of a tile backsplash all along, but this, and the fact that the walls were very uneven, sealed the deal on our next step in the process -- we needed to install a backer board.

When installing tile on a floor, a suitable backer board or isolation membrane is always absolutely necessary. The same goes for tiling in a shower -- you should use either backer board or an appropriate waterproofing membrane over your surface (even drywall is appropriate if you use the right waterproofing). But for a tile backsplash, if your wall is good and plumb, without any major ridges or problems, you don’t always need to use a backer board, often you can just apply thinset to the walls and put your tiles in place.

Though we had hoped to be able to put our tiles right on the wall, the wall had other ideas. We headed out to Lowes and picked up three sheets of 3’ x 5’ Hardibacker in 1/4” thickness. This thickness would allow us to apply the backer board directly to the wall, providing an even and predictable surface for us to apply the tile, and would do so without adding significant thickness to the wall and thus sacrificing counter space.

Our wall area beneath the cabinets and above the counters is just a hair shy of 18” tall. This height, along with the roughly 7'-8’ lengths, lends itself quite nicely to the 3’ x 5’ sizing of the Hardibacker. We were able to more or less cut the sheets in half to provide us with nearly perfect sizing to apply the sheets to the wall.

We also picked up a box of cement board screws along with mesh seam tape to bridge the seams.


Continue Reading Full Post
Comments 17

Over the long Labor Day weekend, laying low while Lulu and Mel recovered from surgery, I fell victim to the Sunday circular. With a little extra time on my hands, I was lured in by the colored newsprint advertising extreme discounts on kitchen appliances. You know, appliances we had NO intention of buying just days earlier as we planned out our "quick kitchen spruce up 2.0."

After two days of research and gently introducing the idea to Alex, we found ourselves getting into the car for a trip to h.h. gregg. We had debated the issue a bit over the weekend, and finally came to the conclusion that even though it's a luxury, our appliances' days were numbered and it might just be time to look at purchasing new ones. The range and dishwasher are about to celebrate their 30th birthdays, and the fridge, although much newer, was clearly an entry level bare bones model when it was purchased 15 or so years ago. 

The dishwasher wasn't doing much washing these days, and the stove cooked unevenly and had a bad habit of randomly shutting off. I was concerned that they might give out at any time -- likely planning their demise for a day when we were entertaining house guests or friends -- or even worse, the relics could even be considered a fire hazard (I may be grasping here, but let's go for it). 

With open minds, detailed notes on prices and product numbers, and a budget of $2500 or less, we started our quest. We knew we were limited to specific dimensions, especially for the refrigerator and dishwasher, to work with our existing cabinetry. We also knew that we needed to stick with an electric range, to avoid the time consuming and costly step of adding a gas line. After all, we have big plans down the line to relocate the kitchen to the room that we currently use as our family room, so we want to minimize the work and costs as much as possible. (That might be hard to believe, as this post focuses on the purchase of new appliances!) 

We did a little browsing on our own before a salesperson offered to help us. We then spent the next hour and a half reviewing all of our options, and decided upon the following:


Continue Reading Full Post
Comments 15
  • Search

  • Login
  • Follow
  • Advertising

If you're looking for information on advertising and sponsorships, head on over to our sponsorships page. You can purchase site sponsorships in a few easy clicks. 

Toolbox Tuesday
Open Housing
  • We're Featured!

Old Town Home has been featured in the following places and publications:

The Washington Post
 
Washingtonian Magazine
 
Domino
 
Old House Journal
 
 
Apartment Therapy House Tour
 
Washington Post Express Feature
 
Home & Garden Blogs
 
© 2026 OldTownHome.com. - Privacy Policy
Login Below
or
Sign in with Facebook
Connect

Unexpected Error

Your submission caused an unexpected error. You can try your request again, but if you continue to experience problems, please contact the administrator.

Working...

Working...