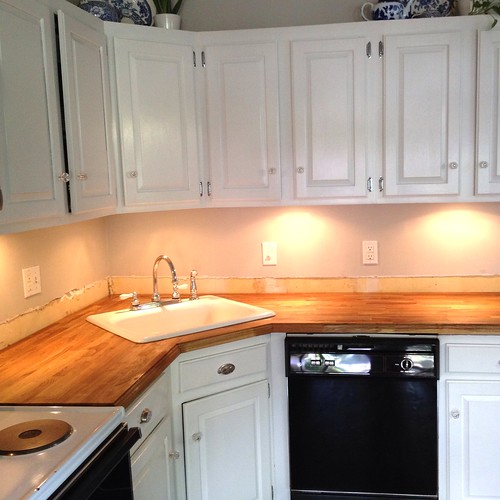
Well, maybe we ask that you don't stick a fork in our new counters. We're still basking in the glow of their newness, and aren't quite ready for wear and tear just yet. If you stopped by yesterday, we left off covering our ongoing butcher block install and related “quick fix” kitchen upgrades, and took you through the process of how we successfully brought our crap cabinets to level and were able to cut a consistent 45 degree angle and join the two largest pieces of butcher block together. It wasn’t the easiest thing in the world by any stretch of the DIY imagination, but we're happy with the results.

Wendy and I were actually discussing the whole ordeal over the weekend, and about how “DIY friendly” a butcher block countertop is. Our assessment is that, well, it depends.

We'd classify it to be a beginner level DIY project if you’re just replacing an existing counter top or adding a new one with a single piece of butcher block that is about the right size. Like our "wine bar," it's easy when you don’t have to alter it all that much. A little trim, some sanding, and oiling and you’re good to go.

On the other hand, it’s more of an intermediate level of effort if you need to do anything complex with the butcher block. This includes significant trimming, scribing, joining multiple pieces, routing the edge, etc. It’s still very doable, obviously, but it’s not quite as easy as just slapping a piece in place.

And finally, it's our feeling that that it should be considered an advanced DIY level project when you’re trying to do all of the above and you’re also dealing with significantly out of level and poorly built cabinets.

No, we’re not just patting ourselves on the back here and talking about how hard the project is, but we are being realists. We feel like, though it was looking great, the whole process was turning out to be a whole lot more difficult and involved than we thought it was going to be. And that brings us to the final few items before we could officially put a check next to “Install Butcher Block” on our kitchen work list.

To give the new counter tops the diagonal piece that would sit in front of the sink we needed to employ a little bit of wood working trickery. We had plenty of remnant pieces of butcher block from the trimming of the other pieces, so I selected a piece that I could easily cut into a nice triangle. My plan was to then put the same edge detail on the front (hypotenuse) of that triangle, then cope the back sides of the triangle (its catheti) to match the edge of the two pieces of counter we were installing it against.

Easy enough, right? Yeah, it took me almost the whole evening to knock this piece out. If you’re not following my explanation, that’s ok, I’ve got some photos to help.

Remember the router bit we’re using for the front edge of the counters? If you notice, it’s actually perfectly symmetrical and fits within itself. If you flip it upside down it's actually the perfect mirror image. 

This means that all I have to do is to flip the triangle piece of wood over and slowly take off enough material to make the back side of the cut a perfect cope of the front. Like routing the front edge, it’s best to take off a little at a time, making several passes to get the desired amount of wood removed.

Starting low and slowly raising the router bit in the table, you can eventually achieve the perfect complement to the front edge cut.


About 1/2 way there.

I think this was a case of "measure 45,729 times and cut a little at a time until it's just right." I must have made 100 trips up and down the stairs to test fit this piece. One final thing I did was to trim the very back corner off of the piece I was fitting. This would end up under the sink anyhow, and I just didn't want the corner getting in the way of a perfect fit.


Continue Reading Full Post
Comments 37

Well, here we are, several weeks into a “temporary” kitchen upgrade that is starting to feel a whole lot more like a “major overhaul.” It all started so simply with a bargain rug purchase and new window treatments, shortly followed by a fresh coat of paint that then spiraled into new butcher block counter tops, the creation of a wine bar, planned backsplash installation, and...ahem...maybe even all new appliances

We're even having trouble keeping up with our new and frequently changing plans, and honestly I'm still surprised at how easily we decided to just go for it. We’ve been toiling away on the kitchen work each weekend and in the evenings after work, and I'm happy to be able to say today that one of the major items has been officially checked off our list -- leveling and supporting the kitchen cabinets for the new counters.

After nearly completing our wine bar area, we moved our butcher block counter top install onto the next phase of replacing the existing counter top area. If this were a television show we would have thrown caution to the wind, grabbed a sledge hammer, and started to go to town on our ugly and dated counters. Unfortunately, this is not a television show, so we started with the super glamorous task of measuring EVERYTHING!

I measured the length, depth, width, location of the sink in relation to the wall, location of the sink in relation to the edge, and just about any other measurement I could think we might need. Since we were replacing our old counters with a new material in nearly the same configuration, these measurements were invaluable.

With all of our measurements recorded, as most good home improvement projects typically begin, we kicked things off with a little gentle demolition. Our true interest was in keeping the cabinets in place, no matter how horrible they may be. So we carefully unscrewed the cabinets from the old counter tops at all of the points of connection.

After cutting though the thick bead of caulk that joined the old counter tops to the house, and a little bit of wiggling and shimmying, we were able to more or less lean the whole counter top out of its old position and carry it outside.

Though the wine bar offered a rather quick and simple solution using a single 6’ length of butcher block, the main counter top area of the kitchen presented a far more difficult layout. The combination of the corner sink, the 90 degree angle, and the small diagonal piece in front of the sink, meant there’d be no way we could just throw a few pieces of butcher block down and call it a day.


Continue Reading Full Post
Comments 14
We've been hard at work on the kitchen, and will have quite a bit more to share with you next week. We really can't wait. Our fur babies have also been on the mend and are doing quite well. Thank you to everyone that has expressed concern for their well being. We're still waiting on the pathology results from their tumor removals, but they are healing up nicely from the surgery. But trust me, Mel is still uber grumpy.

Today I'm going to share my basic review of a new toy I just bought. I have a particular penchant for technology toys. This may be incredibly obvious from our various posts about such items as whole house audio solutions and DIY server racks, but techie toys often make me as giddy as a school girl. I'm not sure where or when this tech obsession began, but my career as a software developer and my hobby as a DIY renovator have fueled these flames for years.

One of the tech items that I'm particularly fond of is my TiVo. No, I'm not talking about a cable company DVR, I'm talking about the one and only, always imitated, never duplicated, TiVo brand hardware that I've been a loyal user of since early 2001. You know, the one with the little television icon that has antenna ears?

Now I'm sure this might sound like some sort of a sponsored post, but let me assure you, it's not. I'm just a little geeked about this new toy and wanted to give you my impression in case you're interested in one.

A few weeks ago, a fellow TiVo evangelist and friend of mine sent me a link to an odd web page. The page allowed me to "enter to win a chance to purchase a TiVo Stream." Enter to win a chance to purchase...really? I didn't much like the terms here, I'd much rather just win the item rather than pay for it, but I went ahead and put my email address in, primarily because I was intrigued by the idea of this new product.

So what is this elusive Stream that they were able to generate enough buzz about that I put in an email address? It's a small piece of hardware that sits on your home's network and allows you to stream live and recorded shows from your TiVo to your iPhone, iPad, or iPod Touch. In other words, it turns your mobile devices into another TV in your house.

I've long wanted the ability to watch a live TV show on my iPad, or easily transfer shows from my TiVo to my mobile device, but thus far, it's been either impossible or cumbersome. Sure, a Slingbox is an option, but you're limited to watching what is currently on the TV, and you can't record and take it with you. So if you'd like to watch the Nationals game in the office, but someone is watching HGTV 24x7 on the TV, you're stuck watching HGTV on the Slingplayer. (Ahem, not that this has ever happened in our house.) And if you want to transfer shows from the TiVo to your mobile device, it's a but of a process that involves transferring and putting the shows in iTunes, then syncing it to your mobile device. It's not a great solution.


Continue Reading Full Post
Comments 14

It's time to come clean here at Old Town Home, and to be honest, I'm only doing so because my partner in crime busted me this weekend. You see, while working on the installation of our new IKEA butcher block counter tops, Alex needed to empty the majority of our kitchen cabinets, including the large area under the sink. And boy was he surprised.

But let me back up for a minute. In January, we had a bit of a public outing regarding a hoarding situation in our house. My vice: the collection of nearly 100 paper shopping bags, stored jammed behind our white hutch. (Even Lulu is embarrassed by my behavior.)

My husband's: hoarding of scraps of wood, that have slowly taken over our basement making it difficult to use as a wood shop, and laundry/storage area.


Continue Reading Full Post
Comments 28

Today we wanted to give you all a brief tutorial on creating a decorative edge on the old fashioned butcher block counters. It's a quick, cheap, and easy way to spruce up your project, and it's something you can do yourself without much difficulty.

If this is your first time on the site, be sure to check out the whole kitchen reveal, including our butcher block installation throughout our kitchen.

Thanks to a few of our blog commenters and their suggestions, Wendy's eagerness to spruce up our kitchen, and a tiny bit of good old fashioned reciprocal Instagram peer pressure from Just Over the River, we decided to pursue IKEA butcher block counters as our upgraded kitchen counter top of choice. Though this change of counter surface wasn't even a blip on our DIY radar earlier in the year, once we started to look into the option we noticed just how affordable and "easy" of an upgrade it could be. But as I pointed out when we talked about our wine bar aspect of the project, the plain Jane square edge of the IKEA stock block left something to be desired in my opinion.

Rather than leave the edge of the counter the stock rounded corner with square edge, we decided we could dress it up a little with a bit of wood working magic. We drew our inspiration from this photo that I found on Pinterest and sent to Wendy.

Sure, that kitchen's counter top is probably a hulking 2"-3" thick at the edge, but you get the idea. The concept was hatched, I knew what had to be done, and I knew just how to do it. Here's a look at what we were starting with. 


Continue Reading Full Post
Comments 12
  • Search

  • Login
  • Follow
  • Advertising

If you're looking for information on advertising and sponsorships, head on over to our sponsorships page. You can purchase site sponsorships in a few easy clicks. 

Toolbox Tuesday
Open Housing
  • We're Featured!

Old Town Home has been featured in the following places and publications:

The Washington Post
 
Washingtonian Magazine
 
Domino
 
Old House Journal
 
 
Apartment Therapy House Tour
 
Washington Post Express Feature
 
Home & Garden Blogs
 
© 2026 OldTownHome.com. - Privacy Policy
Login Below
or
Sign in with Facebook
Connect

Unexpected Error

Your submission caused an unexpected error. You can try your request again, but if you continue to experience problems, please contact the administrator.

Working...

Working...