Well, here we are, several weeks into a “temporary” kitchen upgrade that is starting to feel a whole lot more like a “major overhaul.” It all started so simply with a bargain rug purchase and new window treatments, shortly followed by a fresh coat of paint that then spiraled into new butcher block counter tops, the creation of a wine bar, planned backsplash installation, and...ahem...maybe even all new appliances.
We're even having trouble keeping up with our new and frequently changing plans, and honestly I'm still surprised at how easily we decided to just go for it. We’ve been toiling away on the kitchen work each weekend and in the evenings after work, and I'm happy to be able to say today that one of the major items has been officially checked off our list -- leveling and supporting the kitchen cabinets for the new counters.
After nearly completing our wine bar area, we moved our butcher block counter top install onto the next phase of replacing the existing counter top area. If this were a television show we would have thrown caution to the wind, grabbed a sledge hammer, and started to go to town on our ugly and dated counters. Unfortunately, this is not a television show, so we started with the super glamorous task of measuring EVERYTHING!
I measured the length, depth, width, location of the sink in relation to the wall, location of the sink in relation to the edge, and just about any other measurement I could think we might need. Since we were replacing our old counters with a new material in nearly the same configuration, these measurements were invaluable.
With all of our measurements recorded, as most good home improvement projects typically begin, we kicked things off with a little gentle demolition. Our true interest was in keeping the cabinets in place, no matter how horrible they may be. So we carefully unscrewed the cabinets from the old counter tops at all of the points of connection.
After cutting though the thick bead of caulk that joined the old counter tops to the house, and a little bit of wiggling and shimmying, we were able to more or less lean the whole counter top out of its old position and carry it outside.
Though the wine bar offered a rather quick and simple solution using a single 6’ length of butcher block, the main counter top area of the kitchen presented a far more difficult layout. The combination of the corner sink, the 90 degree angle, and the small diagonal piece in front of the sink, meant there’d be no way we could just throw a few pieces of butcher block down and call it a day.
If you remember back to a post when we quickly discussed a margarita-inspired napkin and sweetener packet layout of our current counter top configuration, that somewhat blurry photo, accompanied by its somewhat blurry conversation, was the catalyst for what would become our butcher block replacement initiative.
From the hastily laid out napkins, we knew we would use two long lengths of butcher block, joined at a mitered 90 degree angle, then we would place a small length of diagonal butcher block (the sweetener packet in the photo) across the front of the area where the sink resides.
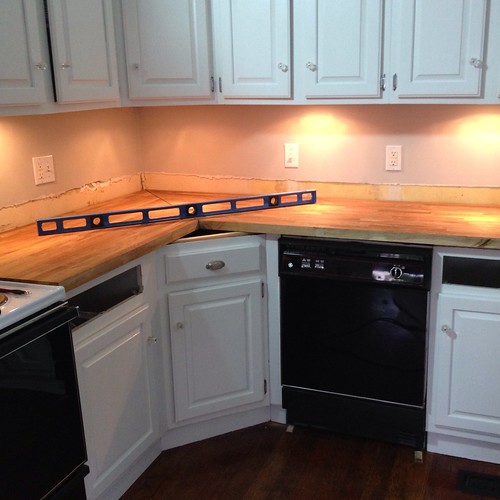
With the old counter top out of the way, and our concept of how we wanted to build the new counter, we were well on our way…that is until we put a level on the cabinets.
ACK! How had the old counters even been supported? It was a disaster. The right cabinet was a half inch lower than the pencil line drawn for a level surface, and it also sloped down on the right taking it further out of level.
The left small cabinet leaned forward and was a full ¾” lower than the other cabinets. And worst of all, the entire middle cabinet under the sink was a full ¾” out of level from the back to the front and was completely lacking any type of support. It’s a wonder the old counter top ever stayed in its place, but now its obvious why it all looked so horribly out of level…because it was.
My first step was to bring the right cabinet to level and the correct height. After unscrewing it from the wall, we were met with a rather dirty surprise beneath. This is what the accumulation of dust and dirt from a kitchen looks like after about 30 years.
We were able to establish a good level surface with a bit of shimming and maneuvering. Once level, I was able to make a frame for the top of the cabinet that brought it up to the correct line for the cabinets. We had stared at this out of level cabinet for nearly a full decade, always wondering why someone would have installed it this way. Now, probably 30 years since it was incorrectly installed, we were finally fixing what had been done.
The center cabinet beneath the sink proved to be a bit more difficult. It appeared as if the right side of the cabinet box had been removed prior to install. This right side should have offered the counter top the necessary amount of support, but without it, the counter rested on the front of the cabinet, which was sitting on nothing due to the toe kick overhang. Over the years the front of the cabinet had slowly fallen.
To remedy the ugly situation I cut a few holes in the bottom of the cabinet so I could hit solid floor rather than 1/4" plywood…
…then I built a brace of sorts to install where the side support had originally been removed.
I was able to attach this brace to the back cleat board as well as to the front of the cabinet, bringing the front of the cabinet up a little bit closer to where it should have been.
I then did a similar brace for the left and attached a few final cross braces from the right side to the left. We could then use these cross braces to screw into the butcher block and support the potentially fragile area beneath the sink.
The final step to level the cabinets was to bring the leftmost cabinet that had always sat somewhat low to everything else up to a proper height. This cabinet is freestanding, so it was easy to remove and take care of things. I flipped the cabinet on its top and began working on another frame for the bottom. This frame added a little height to the back, a little more height to the front, and then a new toe kick to disguise the large gap that had been added.
With the cabinets all finally level, we were able to start cutting and installing the butcher block. I don’t know what it was about this project, but after a long and dry summer, it seemed like it rained every day we needed to work on the counter tops outside. We were constantly racing against the rain, and we kept losing the race. I don’t know how many times we got interrupted, but I know it sure made the project take a lot longer.
Using my overly complex set of measurements, we started by cutting the longest piece of butcher block that would sit on the right side of the sink. Due to the manner in which we planned on installing, we would need to cut a little bit off of the front of the block to remove the subtle rounded edge. It was only about 1/8”, but if we hadn’t done this we would have ended up with a clearly visible seam in the final results.
We also needed to cut a 45 degree angle at the very left that would allow us to join the right piece with the left. We were using our 6” circular saw for these cuts, but this ended up far more difficult than I initial thought.
Since the butcher block counters are oak, they are very, very hard. This means the saw blade has a difficult time staying completely perpendicular to the cut, even if you have a good guide. When cutting with the grain of the wood, it’s not too bad, but when you want to cut across and against the grain, the saw blade starts to bend and wander a bit. This isn’t an issue with the table saw, but working with the butcher block on the table saw just isn’t really an option. I also suppose a better circular saw would do a better job, but we didn’t have that on hand (Christmas wish list idea there?).
After cutting the right piece to length and then repeating the same steps on the left piece, the moment of truth showed just how bad the cut was, even though I had even tried to clean it up with an additional pass taking off little material.
Do you see the large gap at the top of the joint? Yeah, might be good enough for some, but there’s no way I was going to let that fly.
I thought about how to make a better and more consistent cut, then I got an idea. Since the cut was close to being good, but it just needed a little taken off to make it a true cut, I could use the router with a straight cutting bit along with a guide set to a perfect 45 degrees. I set up the router as we waited for it to stop raining, and we finally got a break in the weather as it got very late and dark.
A few passes with the router and our previously ugly joint had been made into something nearly perfect. Just look at how good and consistent the result was.
As you can see, we also put the decorative edge on the various pieces we cut so that it would match the wine bar.
To join the two pieces together in a permanent manner, I used our biscuit joiner and set it up to place biscuits on both the top and bottom of the cut. (The photo is pre bottom biscuits.)
Since we didn’t have enough sawhorses or a workspace that was level enough to put the two pieces together and clamp them, we had to do it all in place. I was worried I wouldn’t be able to properly clamp the two pieces together with the angle and limited room, so I ended up screwing several blocks into the butcher block where the sink would go.
These blocks would then allow me to use my various clamps to really pull the two pieces together as one. Once everything was all set and ready to go, we applied a liberal amount of wood glue to the biscuit slots and the flat surfaces, then clamped the whole thing together for the evening.
After a full night’s cure, the counter top was really taking shape. We were able to test fit it and see that everything was looking good. We're far from complete and still have the small cross piece to install, as well as the need to cut the hole for the sink, but that will have to wait until we have an evening or two after work.
At this point, what had begun thanks to a comment on our blog is starting to become a reality. As is usual, Wendy feels it's taking longer than it should have, I feel like it's moving pretty fast, the weather isn't cooperating, we uncovered many difficulties we hadn’t expected, and our weekend project has stretched well into the weeks beyond. But I feel really good that we are correcting long standing problems with our kitchen and giving it a long overdue, though still intended to be temporary, set of upgrades.
What do you think of the work thus far? Even though the counters aren't 100 percent completed, we both feel like it's already really dressing up the kitchen. The wood looks great with the cabinets and the gray walls. The only problem is just how horrible the wall behind the counter is looking. If anything, we're now completely sold on the need to install a tile backsplash!