With Valentine’s Day just around the corner, we’re in the mood to do a little celebrating. My desire to celebrate Valentine's Day got me thinking….what can you do to create something special for your honey without breaking the bank? Well, this is a DIY blog after all, so we thought we'd put together a tutorial so that you can create a little something to show someone special how much you love them.
Thanks to our friends at La Cuisine, a destination kitchen and cookware shop here in Old Town, we received a demonstration on how to make a professional looking sweet treat for your sweetie this Valentine’s season. They're also giving one lucky reader a $50 gift certificate to use online or in store, perfect to stock your pantry with Valentines must haves. (Keep reading for details.)
It all started last week when Alex and I headed down to the store where Val Lishack, known by friends and colleagues as the “Hungarian Hurricane,” put together an informative demo on cookie decorating. Val has logged many years as a pastry chef, and she graciously shared some of her culinary skills to demonstrate how one simple butter cookie can be transformed into a multitude of Valentine's Day goodies. Here she is in action:
If you're interested in trying this out at home, here's a list of ingredients and tools Val recommends that will allow you to decorate the cookies in the styles seen in this post.
- Heart shaped cookie cutter
- Meringue powder
- Fondant and icing sugar (can be substituted with well sifted powdered sugar)
- Disposable pastry bags
- Coupler and tips for pastry bags
- Squeeze bottles for dyed icing
- Red food coloring
- Green food coloring
- Gloves to keep the dyed icing from staining your hands (optional)
- Sparkling sugar (optional)
Once you have all of your supplies you're ready to get started. Using your favorite (or any basic) butter or sugar cookie recipe, bake off a batch of heart shaped cookies using the heart shaped cookie cutter. When your cookies are out of the oven, set them aside to cool fully (and resist to urge to eat all of them). If you try to apply the icing before the cookies have sufficiently cooled, you'll end up with a big mess on your hands since the heat of the cookie will wreak havoc on your designs.
To begin the process, Val first took us through the basics of flood decorating, a simple and easy technique used to make beautiful and professional looking cookies. This method does what it's name describes -- it floods the surface of the cookie with icing, so once you apply this icing to the cookie it will run and even out until it hits a barrier. The flood decorating approach was the basis for each of Val's designs, so if you master this relatively simple aspect of cookie decorating, you're well on your way to looking like a pro.
To accomplish the flood, you'll need to mix up two batches of royal icing - one a bit stiffer for the outline icing and one thinner to flow across the cookie - using the meringue powder, the fondant and icing sugar, and water. Simply follow the directions on the package for an exact ratio, and remember, it's always easier to add a little water at a time until you get the desired consistency. Here's a comparison photo that really show's the consistency differences between the two types of icing.
Next up, you'll want to divide up your icing batches, both the stiffer outline icing and the thinner flood icing, into the number of colors you want of each. Using the food coloring, dye your batches to the desired color(s). In this case, Val used red, green, pink, and white border and decoration icing, and had batches of red flood icing for the cookie's field.
Now it's time to pour your icing into squeeze bottles and/or pastry bags. In this case, Val used the squeeze bottles for the red border and flood icing, and the pastry bags topped off with a decorating tip and coupler were filled with the green and pink icing. Squeeze bottles seem a bit easier to use for the novice decorator, but the pastry bags with tips give you greater control and options for various decorating techniques. So in other words, pick what you feel most comfortable with.
With the cookies cooled and the icing made, now comes the fun part -- transforming your cookies into masterpieces!
To tackle the most basic design, you'll want to outline the outside edge of your cookie with the stiffer icing. This outline gives your flood icing something to stop against when it levels out. Without it, the next step would just be a big mess.
After allowing the outline icing to set for a minute or so, flood in the outlined area with the thinner icing. Using your squeeze bottle, you can do this by making back and forth strokes while applying even pressure to the bottle. The icing should then flow evenly over the surface of the cookie up to the border you've applied, leaving a smooth and even surface.
Here's a recap of what your cookie will look like when cooled, outlined, and finally after having the flood icing applied to it.
The beauty of this technique? You can present your cookies as is, or you can further embellish them for a unique and personalized look. Think of it as a beautifully presented blank canvas.
Note: For some of the designs seen below (polka dots, sanding sugar, and drag method), you'll start immediately before the flood icing sets. For others like the rose pattern and white "squiggle" (no, that's not a technical term), allow your freshly flooded cookies to dry for 30 minutes before attempting any designs.
Val's steady hand and creative approach to cookie decorating was a treat to watch.
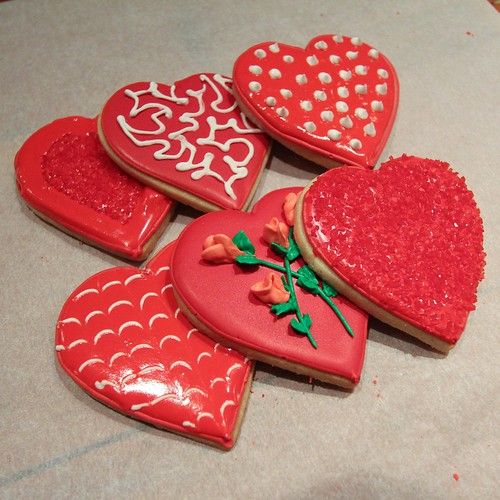
Just look at what she ended up with when all was said and done.
I don't know about you, but we seriously <3 these cookies. How sweet would it be to give or get such a beautiful homemade treat this Valentine's Day? What's your personal favorite? I think mine is the twinkling cookies embellished with sparkling sugar (upper left and lower right).
Thank you again to owner Nancy Pollard and cookie diva extraordinaire Val Lishack for bringing a little love to all of us at Old Town Home this Valentine's day. Interested in an opportunity to win a $50 shopping spree at La Cuisine? Enter now so you can pick up the essentials you might need for your Valentines Cookies or any other culinary project. Don't delay -- the contest ends February 7.