One of the aspects of DIY home projects I feel I've become particularly adept at in recent years is my ability to build out of necessity. When in a pinch, such as when we have company coming in from out of town, or when we've been invited to put our house on a Christmas Designer home tour (oh, you say we've mentioned this particular scenario recently...weird), sometimes you've just got to "git 'r done." Well, we've been doing a lot of that lately, so I guess it's a good thing I'm feeling confident in my abilities.
Our old wicker bench in the sun porch of years past was a nostalgia piece of furniture. We purchased it almost immediately upon our arrival in DC and placed it on our apartment's balcony. Since then it's been a versatile piece and a constant in our lives. Mel has used it extensively, as has Lulu. And Ollie? Well, Ollie chewed it all to hell leaving the front rather ragged, but I'll say he loved it too. (He also liked to pulled the shoes out of the baskets under the bench.)
For all of its sentimental reminders, it was definitely past its prime, and it was also far from looking particularly good. That's why we'll go ahead and use "nostalgia" as the excuse for why we kept it in our sun porch for nearly a decade.
With the recent purchase of new chairs for the sun porch, it was finally time to bid a fond farewell to this ragged piece of furniture. My father in law and I recently took this wicker bench to its new temporary home at a local charity.
Though we had mixed emotions seeing something that had been with us for a dozen years suddenly be gone, we had a very real and difficult issue to do with that had nothing to do with emotion or nostalgia. That wicker bench, in all of its battered appearance, did a wonderful job hiding/housing our shoe collection in two wicker baskets we'd slide below the bench. Now with the bench moving on to greener pastures, we were left with the baskets and shoes in a pile in the corner of the room, something my wife informs me is totally unacceptable.
Every time I'd enter the room I'd glance down and see them staring back at me. I could almost hear them screaming out, "Aaaggghhh, look at me, I'm a monster!!!! Nooooo, look away!!!" (Those shoe baskets are super dramatic, I tell you.)
With our white hutch now in the sun porch, Wendy had been lobbying for the ability to store our shoes in the left side of the lower cabinet. The space is rather large, was currently underutilized, and is just begging to assume a bigger role in tackling our home's organization issues.
I agreed with Wendy that this area would make good shoe storage, but it wouldn't be able to fill the role without a proper shelf of sorts.
To start working on the storage solution, I ran out to Lowes and picked up the straightest piece of 1" x 12" clear pine they had in stock (which means it was cupped and slightly warped). I had a plan to put my skills of "build out of necessity" into action and started my plan of attack.
We first measured the height and width of the opening to determine max size of the insert. I wanted to build this as a single item that could simply slide into place without having to screw it to the hutch's interior.
We also measured the heights of our most frequently worn shoes in order to establish the height of each shelf.
In our case we needed it to be 17-1/4" tall and 17" wide, with each opening for shoes averaging to about 5" tall.
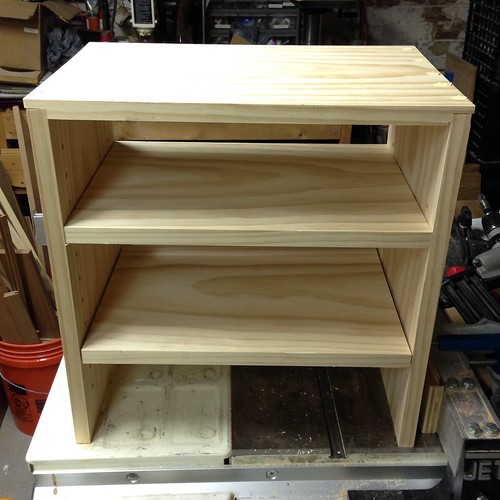
I took to the basement and began cutting the various pieces for the project. I cut the two sides and the top to 17" even, then cut a rabbet at the edge of each side of the top leaving 1/4" of material. To allow for a little bit of adjustment and change (if needed), I used my adjustable shelf jig and self centering drill bit to cut shelf support holes.
This jig and the accompanying drill bits have been particularly handy on many projects over the years, including when I built the custom cherry desk in our office and when I built adjustable shelves in Wendy's shoe closet. (We'll be posting a lot of detail and photos on our master bedroom closet project soon, I promise.)
To attach the pieces together I just used a little wood glue, a carpenter's square for support, and 1-1/4" brad nails from my finish nailer. I also cut a few pieces of 1/2" x2" and attached them to the lower back of the box to offer a little additional structure and support.
The final pieces to cut were the shelves for the shoes. My first measurement was a little off and I cut the shelf slightly short. It still fits, it just has a little more sloppy wiggle room. Normally this would drive me crazy, but since this is utilitarian storage that will always be concealed inside the hutch, I let the slightly short shelf as is. The second shelf I cut fits perfectly.
After a little wood filler in the top nail holes and a good overall sanding with the orbital sander, we had ourselves new shoe storage. I slid the shelves into place and loaded it up with our eight pairs of shoes.
The shoe-filled baskets no longer clutter the floor, and this little project built out of necessity took only about one hour from start to finish and cost roughly $20 in materials. Now we have a functional and useful solution for storing shoes that fits our particular needs. Not too shabby.
Do you ever find yourself needing to quickly throw something together in order to meet a need? Are you confident in your ability to tackle tasks like that or do you find yourself more hesitant and instead looking for a ready made solution you can purchase? Is there a messy catch all area of your home that's crying out for a little organization? If so, we'd love to hear about it.