Though we only really started our kitchen makeover a little over a month ago, it feels like we've been working on it forever. We were really moving along quite nicely for a little while, making a whole lot of progress in a very short amount of time, then we had a pesky vacation to deal with. Oh the horrors. (Okay, maybe it was a wonderful and enjoyable vacation that I'm wonderfully glad we went on, but it did put a hiccup in our kitchen work.)
Now that we're back in the good ole U, S of A., we need to recommit ourselves to wrapping up the kitchen and moving onto the sun porch. But let me tell you, with beautiful weather outside, a contending baseball team to watch, and the need to also get caught up on work/life/everything else, carving out time to work on the kitchen has been a little...difficult.
Though difficult, I'm glad to report that "operation wine bar" is back on track with the construction of a few quick and easy shelves. Wait, you thought that project was done? You thought it was already thoroughly beautiful and didn't need anything else at all? Oh, that's very kind of you, really. (I know you're probably not actually thinking/saying that, but I'll go ahead and roll with it and assume you are.)
If you'll notice, to the right of the window there is a large void in the room. It may not be totally apparent how glaring this void is in person, but its bad. It's also a bit compounded because we're so used to the tall white hutch occupying that portion of the kitchen, and now that its moved, it's absence is quite noticeable in the height department.
Rather than hang a picture of pool playing dogs...
...Or a portrait paying homage to my hero Norm Abram...
...Wendy decided that a few open shelves would be perfect to round out our wine bar. They would offer the height and visual appeal that we're used to, without making the area feel closed in. Best of all, we could make them quite useful by placing a few items on them that would otherwise take up valuable storage in other cabinets. That's what I like to call a win win.
Okay, shelves it is, but where do we buy them? Buy them? Pishaw, we build them!
Building a custom shelf is one of those things that everyone from the most beginner to the most advanced DIYer can do and do well. I'm very confident in this statement because a shelf can be as simple as a single piece of wood attached to a few brackets, or as complex as you can possibly imagine. For our build, Wendy and I wanted to go for "moderately decorative, very functional, and relatively quick & easy."
The first step was to establish the rough location, depth, and length of the shelves. This would help me to determine just how much wood to buy. Wendy and I measured the area, looked at the height of the window, and determined the obstacles that stood in our way (light switches and an outlet). Based on this information, we determined we need three shelves, each three feet long. Additionally, to give us adequate shelf storage, we'd need them to be about one foot deep. This means I'd be primarily looking for wood in about the 1" x 12" range, but either a good plywood or solid wood would do.
Next up, we needed to establish the style of the shelves, which would tell me what kind of wood to buy. Though we could have continued the butcher block oak look and constructed the shelves of red oak, Wendy felt the counters were enough natural wood, and these shelves should be painted white to match the cabinets. Though it adds an extra step, it's not a major one, so that sounded just fine to me. Since the wood would all be painted we could use a good soft wood that should accept paint nicely, like poplar or a nice clear pine. In this instance, I found clear pine in 1" x 12" boards (which is actually 3/4" x 11-1/4") at our big box. Though a good quality plywood is more dimensionally sound (won't warp over time), the solid pine is far easier to deal with from the "stick it in the car and go" standpoint, which is always a plus. I also picked up several 1/2" x 2" boards in pine that I planned to use for a border band.
The one other style element with this build revolved around the brackets. Wendy did a whole bunch of research on brackets to ensure we were making a well informed and smart choice. Initially we started to look for antique cast iron brackets that might work. Unfortunately, the majority of brackets we found that fit the bill tended to be very expensive or far too small for our purposes.
Wendy also looked into antique corbels, similar to the ones we restored a few years ago. Sadly, there are few cool ones to be had that work in the size we need. Typically, the style we're looking for tend to be about three or four times larger than we needed. Though I really wanted to go this route, I had to remind myself that this project is temporary, quick, and "easy," so I had to let it go.
Our final option and ultimate decision was to go with some of the stock and simple shelf brackets I found at Home Depot. Not the most ideal situation, but it was workable. The only problem, we needed six, and I only saw three at the store.
After digging through boxes, crawling around on the floor of the store to look under shelves, and looking at surrounding shelves, I was able to find six, but most were filthy dirty and missing the screws and anchors. Originally priced about $10 per bracket, I showed the cashier the missing parts as overall shape of the brackets and he gladly knocked off 50%. Not too shabby, I guess I can negotiate when Wendy's not around.
What we were left with was a whole bunch of wood just waiting to become shelves.
The build plan was simple. I was going to use the stock 1" x 12" cut to length, then place a band using the 1/2" x 2" boards around the edge of the shelves to make them look more substantial. I then planned on attaching the brackets to the shelves by screwing down through the tops of the shelves and into the brackets.
I got started on the assembly of the top two shelves by cutting the front bands of 1/2" x 2". I had purchased several 36" lengths of this wood, so this was my limiting factor. I squared the edges of the wood using the miter saw, which is a very important step whenever working with stock lumber since it typically comes with rough edges that are often not square.
Then I moved into cutting the 45 degree edges for mitered corners. Oh how I love my laser guided compound sliding miter saw.
I could have just used a standard lap joint and nailed the pieces together, but I figured the mitered edge was easy enough and would look a lot better in the end.
Next, I also squared the edges of the large 1"x12" boards and cut the length of halves out of them. I used the 1/2"x2"s I had pre cut in the last step to determine my actual shelf length, then cut the pieces or the shelves. Since the measurements may have been ever so slightly different, and I wanted to cut all of my pieces of wood at once, I made sure to label which cut pierces went with other cut pieces to help with assembly.
Once everything was cut to length I readied the air compressor and brad nailer. I decide to use a 1" brad nail to attach the band. This size is adequate to hold the band in place, but its a small enough gauge that it wouldn't leave a large hold to be filled.
The actual assembly of the band was as simple as applying a nice bead of glue...
...and nailing the band to the shelf at regular points to give me a nice looking end result.
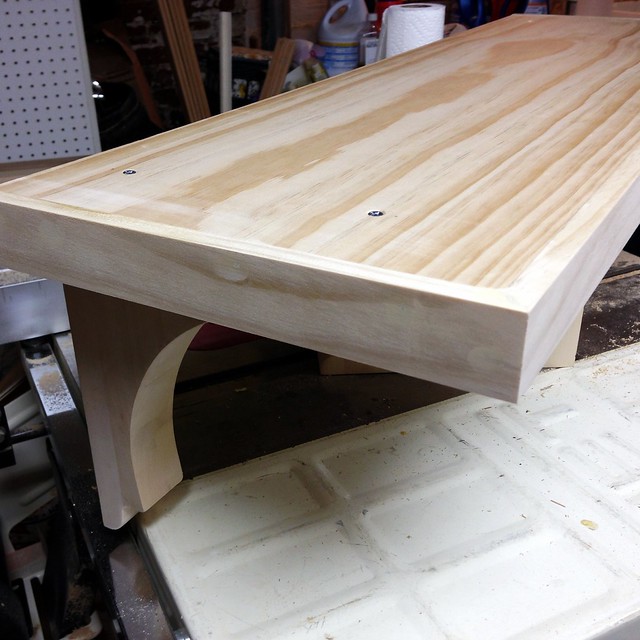
For good measure I placed a single nail from the side band into the front band at each miter, just to hold them together while the glue dried. As you can see, once it's flipped over the shelf looks more substantial and has a nice finish in the corners.
We decided the brackets should mount slightly inset to the sides of the shelves, rather than right at the edge. I determined the location of the brackets by setting them on the shelf, then marked a few positions to drill the pilot holes.
To attach the brackets and give ourselves the consistent 1-1/2" offset from the band, I used an excess piece of our butcher block as a spacer, which is exactly 1-1/2" thick, and clamped the bracket to the shelf.
I flipped the shelf and drilled pilot holes into the bracket, then using my countersink bit, I cut a small relief to ensure the screws would sit flush with or slightly below the surface of the shelf.
This will protect anything being placed on the shelf from snagging on the head of the screw once the shelf is in place.
If this were a more permanent solution I would have probably attached them with small wood dowels so there wouldn't be any visible screws, but I really am not worried about it on this project.
Once our shelves had actually become shelves, the final step was so fill any holes or imperfections with wood filler and give it a good sanding.
We still need to prime and paint the shelves before hanging them, and we still have a few options for hanging that I'll cover later (once we actually hang the shelves), but this should give you a good understanding of how our two upper shelves will look, and how easy it is to whip together some nice shelves without major effort.
The lower shelf will be a little different, and a little more complex. I'm working on it a bit more tonight and tomorrow, so I hope so share that with you a bit later this week, but we'll see. I'm on a bit of a euphoric high after the Nationals clinched the National League East last night, so I don't know how much I can focus on projects. I've been waiting for a baseball season like this for many years. (Yes, these were our seats for the game when the Nationals clinched the division last night. How awesome is that?)
What do you think? Are the shelves a good solution for our open area? Do you think the shelves we built are going to look good in the space and look substantial enough? Also, do you have any guesses as to what is going to make the lower shelf a little more unique versus the upper two? Give it a shot in the dark and take a guess.