In keeping with this week's theme of New Year Resolutions, I'm happy to report that we can call one of our goals officially done -- applying the coat of roof paint over the newly patched area. Last week we talked about the work we had done on the roof to stop a very pesky leak that has been coming and going for years. To do this we had to use a roofing cement that remains a bit elastic but requires a somewhat extensive cure time before covering with a final topcoat. In our case, the top coat of choice is a reflective aluminum based roofing paint.
Years ago when we first had our skylight replaced, Mike Simpson of Lyons Contracting helped me tremendously by pointing out the current shape of our roof and the fact it was in need of a coat of paint. Growing up with shingles on our roof, I was a total stranger to the maintenance items for a standing seam metal roof like we have.
Mike informed me that we have a great roof that was made with good materials, has no serious visible problems, and is perfect for a very low pitch (like our roof has), but that there are some minor maintenance items that need to be performed on a regular basis, including painting.
Since our roof is not visible from the street we didn't need to choose a color that matches the house. As a result Mike suggested we use this particular aluminum base roof paint. It does a great job of protecting the roof by creating a somewhat thick and textured surface over the metal roof. When applies properly, it keeps water off of the metal, prevents rust and corrosion, seals up all of the joints, and saves some money by reflecting the hot sun in the summer.
In our years in the house I've painted the entire roof a couple of times. It typically takes me one full day working alone and about eight gallons of paint to do it. It makes for a long day, but at about $180-$200 for paint and supplies, it sure beats the $1500-$2000 a roofing company will charge.
Although I've painted the roof in the last two years, I still had to paint the recent patch job. The patch we applied in November had fully cured and was ready for paint. I figured we wouldn't get a shot at painting until spring when temperatures got back up above 50 degrees, but we received a small window of opportunity over New Year's weekend, so I jumped on the project.
The paint we use can be found on Amazon and it is also carried by one of the Home Depots near us, though not all seem to carry it. It is in their roofing section and comes in five and one gallon containers. Though I prefer the five gallon for our big jobs, the one is all we would need for this small amount of painting.
I grabbed a gallon, got home, and headed up on the roof. I was dealing with a small window of time where the temp would be above 50 degrees for the initial dry time and there would be no rain for 24 hours, so I had every intention of making some quick work of the project. However, when I got up on the roof and looked at the patch that I needed to paint, this is what I saw...
Ugh! Those leaves were suck jerks! This is what I get for doing the project in the fall. The leaves had blown off the nearby tree and embedded themselves in the wet roofing tar, then dried like that. I ended up working for about 30 minutes to get all of the leaf debris out of the sticky mess. Such a pain.
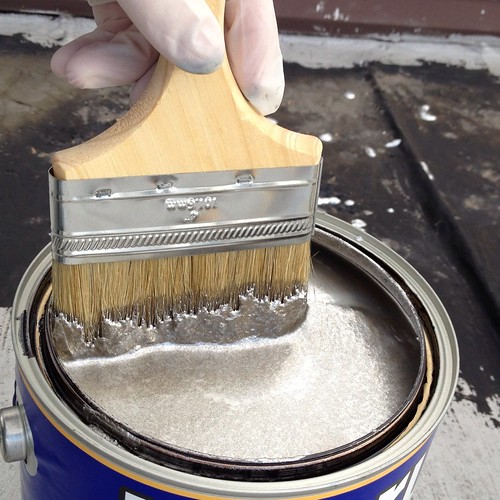
Once I finally had all of the leaves removed from their tar resting places I could finally turn to painting. I vigorously (and I mean like a crazy person vigorously) shook the can and popped it open. It sure looked like it was fully mixed, but this wasn't my first rodeo, so I knew better.
Using a mixing padel on the drill I plunged it down through the liquid in the first half of the can and found the thick portion of the product that had settled in the bottom of the can. It's kind of an oily sludge consistency so i had to work carefully to be sure I didnt slop it all over the place. Working the drill very carefully and slowly, I mixed the paint throughly until it was a consistent, thick, and shiny viscosity with a hint of a brown tint that I could effectively paint with.
Once mixed the next step is actually quite easy. Just apply liberally using a brush you are going to throw away when you are done. When I say liberally, I mean liberally. You really only need one coat, so no need to miss or have low coverage. Thick, full coverage is the name of the game. Notice that I'm wearing gloves? This paint is tough to get off and gets everywhere. If you get it on yourself or your clothes, you sort of look like the tin man.
After all was said and done, our new roof patch was cured and fully protected from the elements with a shiny coat of paint.
Since I had only used a portion of the paint around the skylight I went around the roof finding any spots that looked like they needed a little touch up or refresh of paint. Look at how clearly you can see the two year old paint versus the new paint. Looks like I'll need to paint the whole roof again the summer of 2013.
But until then, I'm hopeful the new patch and paint will keep the water away and out of our attic. Now I can mark this item off of our 2012 New Years Resolutions and move onto the next super exciting project. Hrm, so many to choose from, maybe I'll clean the basement that I was brutally and publicly shamed about yesterday.
Have you used a roof paint like this? Any experience with painting metal roofs? If so, how long do you typically go between coats? Let us know, we'd love to hear.