Before we get started on today's post, we just wanted to let you know that we announced the winner of our $100 Father's Day gift card to The Home Depot. Be sure to stop on over to see if you won.

Ok, back to today's post...

One of the features I always remember from homes of my childhood were the loud and obnoxious ventilation exhaust fans in bathrooms. My parents consistently scolded reminded me how important it was to turn them on each time I took a shower, and as a result I always hated them. (I know, it's an odd thing to obsess about as a youngster.)

Their audible whir would rattle along in an often failed attempt to remove the humidity from the bathroom in which it was installed. More typically sounding like a hamster wildly running on a wheel in need of grease, their integrated lights and yellowed plastic surrounds often looked to be the most out of place elements on any given bathroom ceiling. I always found the fans that doubled as heat lamps, very 70s chic, to be the most grotesquely charming. Are these relic fans functional? Debatable. Aesthetically pleasing? Heck no. Something that can be done better? Absolutely.


Photo Credit: Meador.org

Unless you're dealing with an exhaust fan in a powder room where you want to leverage its talents as a noise maker to mask unpleasant commode sounds, a vent fan should not be seen nor heard, but should do its job and then some.

When we decided to renovate our bathrooms we pledged to figure out a better way to manage steam/odor removal from the rooms. What we ended up with is a more than workable solution that has resulted in many a guest saying "Now, how do I turn the fan on? Oh, it is on? Wow, I don't hear it at all."

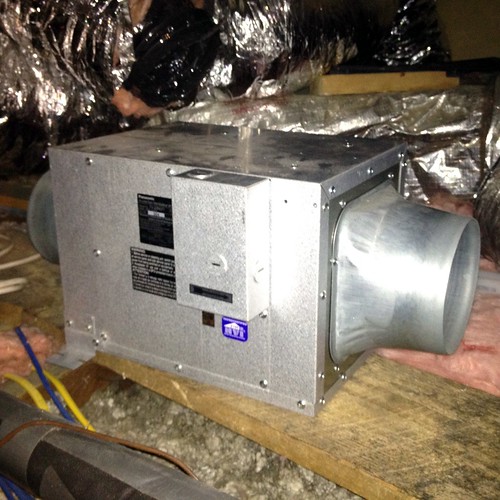
Using Panasonic's line of quiet inline duct fans, we were able to locate the fan unit in an out of the way attic location, with only a small vent intake on the ceiling. It's worked wonderfully, and it's mounted in a location where the minor hum can only be heard when standing still and silent in the hallway (below where it's mounted).

We like the end results of our guest bath fan so much that we're using the same brand and line for our master bathroom, though the challenges we're facing are slightly different.

First, the bathroom's space is far larger, so we need a vent fan that can remove significantly more air, or a higher CFM (cubic feet/minute). And second, the mounting locations available in the attic would place this fan directly above our master bedroom's bed. The last thing we want is for the hum of this larger (but apparently still very quiet) unit to transfer through the ceiling joists and into our bedroom.

I came up with a little system that should solve our problem. Once I had run all of the ductwork for this fan and secured it in the attic, I realized there was an alternate mounting method. Rather than affix it to something that would rest on the ceiling joists...


Continue Reading Full Post
Comments 14

Though most of the tools we've covered on Toolbox Tuesday have been geared around woodworking, painting, HVAC, or other items commonly associated with home improvement, today's tool has a far more technical lean to it.

Some time ago we filled you all in on our completely and totally overkill structured wiring projects. We also gave you a glimpse into our even more awesomely nerdy DIY Server Rack, which includes a 48 port patch panel for our home's network.

The thing with this project is that it isn't just about running wire and plugging in components. Running network cable, though relatively easy and completely DIYer capable, requires a certain amount of patience and a collection of job specific tools to do it right.

Remember my mantra, "One new tool for every project?" This mantra is never more true than when you run cat-6 in your home. Though many tools are critical in home network cabling, one tool stands out among the rest in helping me to quickly and easily identify if I've done the job correctly, or the potential issue if I've messed it up (hey, it happens).

The tool I'm referring to is the Test-Um LanRover Pro TP600 Network Tool and Tester. When running network wire you must be sure to make "home runs" (consistent runs of cable from the outlet to a common termination point). There's no splicing in the middle, like with phone or cable wire. In addition, you also need to make sure you aren't kinking or bending your cable too hard, or running it near a significant source of interference, like big fluorescent lights. Once all of your cable is run you end up with a single bundle of wire in the basement (or network closet location), lots of outlets all over the place in the house, and the hope that you've labeled everything accurately and have not damaged any cables, but how do you test this?


Continue Reading Full Post
Comments 0

Before we get into today's post, don't forget that we've got our Father's Day $100 Home Depot gift card giveaway going on. If you haven't already left a comment, be sure to head on other to that post and drop us a line. One lucky winner will receive a $100 gift card to help fund your latest DIY endeavor. You can't beat that!

We've been hard at work on a couple of projects around Old Town Home lately, some that we hope are interesting, and a few others that are...hopefully going to be more interesting once a little more is done. While we've been spending lots of time on various tasks that are not particularly sexy, like insulation and duct work, we've also been quite hard at work on a feature or two here on the blog. It's funny, work on the blog can be nearly the same level of efforts as home renovation, just less dirty. So why not share some of our progress on the blog with you. At least it's way more interesting than what else we've been doing lately...

Now that we've been up and running for over a year and we've amassed quite a few posts on various topics under our e-belts, we just feel like there needs to be a better way to organize some of our more relevant posts. Our old projects page was a complete mess, complete with a smattering of some projects here and there, more crucial projects omitted from the page, outdated material, and just an unpleasing layout.


Continue Reading Full Post
Comments 3

***This Reader Reward is no longer accepting entries – See the winner below.***

We're very happy to announce the winner of our Reader Reward for a $100 Father's Day gift card to The Home Depot. Congratulations to ashley, a reader from Cleveland, who'll be celebrating Father's Day with a trip to see the Indians play. I can't think of anything much better for Father's Day. We hope she'll stop back and share the useful project(s) this great Father's Day gift card assisted with!

Thanks to everyone for entering, and sharing all of your plans. We enjoyed reading what the weekend has in store.

It's reader reward time again! In honor of Father's Day we're giving one of our lucky readers a $100 gift card to The Home Depot. 

If you remember, we did a similar reader reward about a month ago for Mother's Day. We absolutely loved hearing all of your plans on how you planned to celebrate the day. Though Mother's Day is an extremely important event to celebrate, we obviously can't leave all of the DIY Dads out of the mix on their important day. So we want to hear about all of the cool and extremely manly events you have planned.

Are you taking in a baseball game? Maybe grilling out? Or perhaps you'll put on your tool belts and work on a few house projects? (I think that's how Lulu will be celebrating with me). 


Continue Reading Full Post
Comments 81

This week's Ask Old Town Home comes to us from Old Town resident, Kate. Kate recently moved into her 18th century home and has been having a small issue with her basement's stone foundation. Here's what Kate has to say:

We just moved into a home on Prince Street in December and one of the things that sold us on the home was the amazing stone dining room and kitchen in the basement. According to the man who renovated the house in 2004, the house was built onto the original retaining wall of the Potomac. While they look nice, the stone walls have some issues. My biggest complaint is that they shed a lot of dust. It drives my husband nuts that I have to spend a couple of hours each weekend vacuuming the walls! But we're told we can seal the walls and that we should have it done while we're on vacation with the pets since it is toxic. My husband is still on the fence about doing it. After last night's heavy downpour, we discovered another issue... the wall is "weeping" some water. It's not pouring in, but the stone is wet. What is weird is that it isn't pouring in from the top of the wall; rather it is coming from midway down the wall. We don't even know who to call about this, let alone what can be done about it. Any thoughts? Thanks!

Unfortunately, this isn't a particularly easy one to solve. No matter the "solution," there will always be some unexpected/unwanted side effects. With one exposed brick wall in our house, and a basement that has all brick walls and soft mortar, we feel your pain on both the sandy mess and the weeping walls. Hopefully, even if we don't have a magic solution for you, we at least have some information that can help.


Continue Reading Full Post
Comments 28
  • Search

  • Login
  • Follow
  • Advertising

If you're looking for information on advertising and sponsorships, head on over to our sponsorships page. You can purchase site sponsorships in a few easy clicks. 

Toolbox Tuesday
Open Housing
  • We're Featured!

Old Town Home has been featured in the following places and publications:

The Washington Post
 
Washingtonian Magazine
 
Domino
 
Old House Journal
 
 
Apartment Therapy House Tour
 
Washington Post Express Feature
 
Home & Garden Blogs
 
© 2026 OldTownHome.com. - Privacy Policy
Login Below
or
Sign in with Facebook
Connect

Unexpected Error

Your submission caused an unexpected error. You can try your request again, but if you continue to experience problems, please contact the administrator.

Working...

Working...