I don't think Week of Alex II could possibly be considered complete without the inclusion of a particularly manly/geeky how to post, don't you agree? Well, I've surely got one for you.
When we talk to friends and neighbors about our house, or even to people we've just met that are blog readers, one of the most frequent topics of conversation revolves around our whole house audio. Whether they're interested in having it in their home, or are just curious how it works, for many (myself included), the idea of room filling music at your fingertips anywhere in your house is an absolutely awesome concept. While there are many different options out there that involve the placement of speakers and other devices in obvious places within the room where you want music, most people are far more drawn to the idea of built in speakers and controls that blend and disappear in the room.
I'll tell you one thing for sure, it doesn't matter how much we like music, if the device that delivered the music looked like a giant piece of furniture, there's no way Wendy would go for it (but I might, just sayin'). As cool as it may look, our house isn't Mad Men.
I'd say the thing I hear most often during conversations is "I'd love integrated music, but I just don't know where to start when running wires or installing a speaker. Is it hard?"
My response to this question is typically, "Well, in general, it's not hard at all, but in your house, it could be."
The key here is the distinction between running wires and installing a speaker. Running wires can be very easy or very hard, depending on where you're running them. If you're doing it on the top floor and have access to the back of the ceiling via the attic and you have the necessary electrical in the attic, it can be very easy. If you're trying to run them in a ceiling that has no access from above and is fully insulated, possibly with spray foam, it can be ridiculously hard. Bottom line, it's a case by case basis and you often won't know your case until you start poking holes in the walls or ceiling.
All of this being the said, installing a speaker when the wires have been run to the necessary location, purely child's play. No, really, if you've already gotten your wires where they need to be, you've got yourself a DIY task anyone can handle.
Over the weekend I found myself jumping forward several steps (and maybe getting ahead of myself) so that I could feel like I was actually accomplishing something. I decided I wanted to patch a rather large hole I had created months ago with the intention of installing a speaker. The hole is just in front of our bathroom window and was once the location of an HVAC vent. We're moving the HVAC location and are placing a speaker in its place.
Since I was installing this in a plaster ceiling and in a place that already had a large hole, I had to be a little more destructive than you typically need to be. A speaker install needs a perfectly round hole and the wall material can't be much more than 3/4 inch thick to accommodate the mounting brackets. Because of these restrictions, the fact that old plaster and lath is nearly impossible to make a round hole in without the edges cracking and crumbling, and the tendency for plaster thickness to be variable (up to and over 1 inch), I had no option other than to make a larger hole that I could patch with drywall.
This speaker is getting installed in a location where I've had extensive access while installing all of the attic insulation, so I took advantage of this access by running the wires necessary for this speaker prior to completing the insulation.
It's also important to note that we're only going to have one speaker in this room. When you normally think of music you think of speakers, in the plural. In a bare minimum setup you tend to have two speakers, a right and a left. Since audio is recorded with multiple channels, some sounds come from the right, some from the left. This may be very obvious to most people, but if you've never heard of this or thought about it, just give U2's Achtung Baby - Zoo Station a listen, it's obvious in the intro. So the question is, how do we ensure we aren't missing out on music from only one speaker that has to do the double duty of left and right? Simple, dual voice coils.
I can hear the audiophiles reading this scoffing at the idea of a single speaker producing adequate sound. "BAH, you lose so much quality, need better range, need an enclosure, etc, etc, etc." Keep in mind, this is our bathroom, not our home theater, not a recording studio, not a professional sound booth. We just want music while we brush our teeth or sit in the bath. For this purpose, this single speaker will do beautifully.
The speaker we bought for this purpose is a Polk Audio 6" In-Ceiling/Wall dual voice coil speaker. I chose it because it is relatively small, it's range seems good, and it has dual voice coils. I also tend to like Polk speakers and have been using them as far back as the days I pimped my ride with two 12" subs in the trunk (yes, I was lame). But I digress. The point and purpose of a dual coil speaker is to accept connections from four speaker wires rather than just two. The speaker can then do double duty without issue, handling both channels and ensuring you don't miss out on any sound.
The speaker comes in a small box with a cutout template for the wall or ceiling opening. It also has a perforated grill cover (for when the project is completely finished), and a solid plastic cover to protect the speaker after you install it but before you're done with the work.
Using the piece of drywall I cut in my super duper magnetic drywall cutting post from yesterday, I began by cutting a nice and even hole for the speaker. While the speaker comes with the cutout template, I only use this to make a basic outline, measure the diameter, and establish a center point for the hole. Using my drywall hole cutter, I score the drywall on both sides using the established center point and outline, then cut out from the center of the drywall.
Once you cut from the center to the perimeter with the saw, if you've scored both sides the pieces will just fall out. If you've only scored one side, you will need to use your utility knife to cut away the back side once the pieces break away. What I'm left with is a perfectly round hole in just the right size that's ready to accept the speaker. If you're adding a speaking to existing drywall, it's even easier, since you don't need to worry about installing a patch. Just determine the center point of the speaker location and use your circle cutter to pop a hole in your ceiling it wall using the same technique.
Next, pull the speakers wires down from the ceiling. You need to prep the wires to get them ready for the speakers. Since these are in wall wires, they need to have their plastic jacket stripped away. Carefully cut back about four to six inches of jacket to expose the red and black wires inside.
Once you have your red and black wires, use your wire stripper to strip off about 3/4" of wire sheath. In our case, I'm using a 14 gauge stranded (and inexpensive) in-wall speaker wire.
If you look at the back of the speaker, you'll see four binding posts that will allow you to feed the wires through.
Each has a side (left or right) and color, it's in your best interest to make sure you keep them all straight as you secure the wires. The next several steps are very quick and easy. Just feed the wires into the posts to secure them in place...
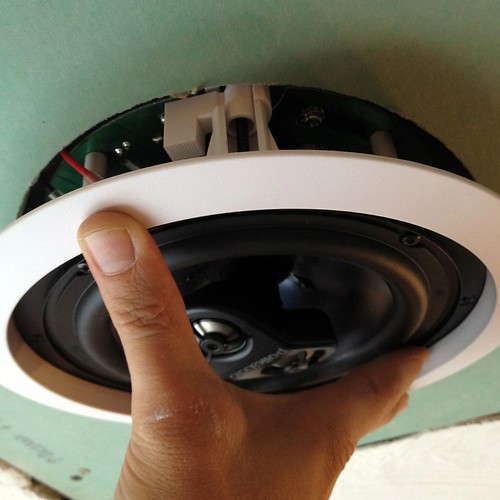
...and tuck the speaker into the opening.
As long as you make sure the wires are free from the clamps, securing the speaker in place is a simple task. Using the drill I simply tighten several screws around the perimeter of the speaker.
These screws flip the plastic clamps out and then draw them down on the rim of the drywall to secure the speaker in place. The main thing here is to not over tighten the screws, you just want to get them to the point where the speaker is secure. Here's a photo of the plastic clamp that flips out. This is why the wall material cant be too thick.
And there you have it, just a few simple steps to hook up and install a speaker in the ceiling. Obviously I'm not done and still need to fill in the seams of the patch and skim the whole thing, as well as paint and a million other steps between now and then, but for the example purpose of this post, we've installed the speaker and properly hooked it up. The best part, from this point forward, we'll have music in the room while working on our project. And as any good DIYer knows, music always helps a project wrap up just a little bit quicker.
One other note about the install. If you'll notice from the earlier photo of the hole, the insulation job I recently completed just above this speaker is very important. Speakers with open baskets need some sort of insulation behind them to ensure the sound is going in the direction you want it to go, towards the room. The insulation work I had already completed was perfect, and it will do its job to both keep the room warm or cool, and direct sound down toward the room's occupants.
So what do you think? Is this something you think you can handle and might be interested in? Do speakers in the ceiling and whole house audio components in your home sound appealing to you? Let me know.
Looking for information on how to go about wiring up your speakers? Check out what we've done for running the structured wiring in our old home.
Or if you want to see the system that runs this whole house audio, or the crazy server rack I built for the basement, you can check those out too.