Every Christmas season I look forward to the opportunity to decorate our modest home's exterior. While extravagant light displays and inflatables may be the decor of choice for many homes, I like to take a different direction that honors the age of our home as well as its Victorian simplicity.
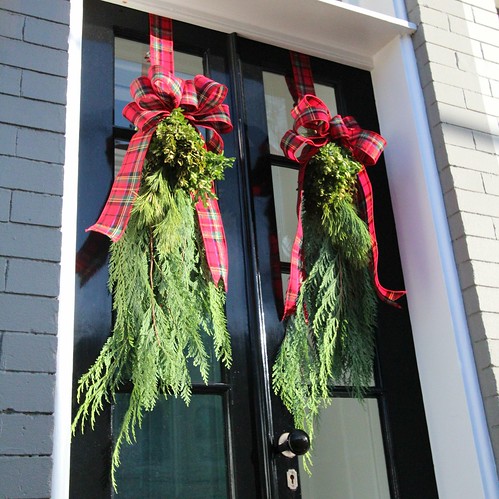
Last year when I set out to decorate, I used a theme featuring fresh greens and pop of bright green ribbon. I liked the fresh swag look so much -- and received so many compliments on them -- that I decided to make swags for the French doors again this year. However, I definitely didn't want to have the same look as last year, and inspired by the Scottish Walk Weekend in Alexandria and our participation in the Designer Tour of Homes, I opted to showcase tartan ribbon as the focal point of this year's fresh greens.
The scope of the work included making two swags, adding a wreath to each of the three windows, and sprucing up the two cast iron urns with natural elements that had a Christmas flair. I kicked off the project by informing Alex that I would be needing two "roughly twelve inch lengths of wood." Oh where in the world could he find wood? I just haven't a clue.
After a little grumbling about having "no wood to spare" and something about it being "set aside for safe keeping," he miraculously found two scrap pieces that somehow fit my needs. In addition to the wood pieces, I gathered the supplies I'd need and got to work. These supplies include floral wire, scissors, a hot glue gun, and festive satin ribbon.
I started the project by hot gluing and wrapping the two pieces of wood with a the red satin ribbon.
I first applied several dabs of glue down one side of the first wood piece, and quickly before the glue dried, wrapped the ribbon around the wood. Next, I completed this process for the second piece.
This pop of color gives the swags a good backing to sit against, but also protects the paint on the doors from getting scratched from swinging swags. It also disguises the simple wood support.
Once the sticks were wrapped, I gathered some of the greenery we had picked up when we purchased our tree. In addition to our two Christmas trees, I picked up some branches with long pine needles, a few bundles of western red cedar branches, and some boxwood sprigs at the Heather and Greens sale in Old Town. With all of my lovely greenery ready to go, I got to work laying out my vision.
Starting with the long cedar branches, I gathered several together with floral wire to form a bundle, and then secured them to the wood backing a with a second length of floral wire.
After twisting the floral wire, I could see the next benefit of wrapping the wood in ribbon. The ribbon actually allows the wire to sort of bite into it, keeping it all securely in place.
With the cedar branches in place, I grabbed the long white pine needles in a slightly smaller and shorter bundle and wire tied them together as a bunch, and next secured them to the wood.
Using a small bundle of boxwood braches, I topped off the swag's natural greenery, again with wire. Using several different types of greenery is very important as it offers visual interest through variations in texture and shape.
Finally, I topped the entire swag with a plaid bow, the perfect complement to our participation in the Scottish Christmas Walk Weekend.
The final step in the basic assembly was to trim back the tops of the greenery that were protruding from behind the bow.
The final step of the assembly was to hot glue a length of ribbon securely to the back of the swags. Taking this ribbon, I ran it up and over the French doors, affixing it to the back of each door by wiring it to a suction cup.
I also placed a suction up on the outside of the door to secure the bottom of the swag and prevent it from swinging or banging against the door.
All in all, I'm really happy with how the swags turned out. They add a nice pop of color and texture to the front of the house.
The scale this year is much larger than in previous years, and I think this really went a long way in making the decorations look great.
Here's a closer look.
Next I turned my attention to the windows. The fact that we have only three front windows makes it easy to make a decent statement without breaking the bank.
For a bit of a more modern twist, this year I opted to use square shaped boxwood wreaths. When I laid the wreaths out on the floor, Mel was an instant fan.
I opted to keep it simple, and the only thing I added was a tartan bow to the top of each wreath. Using the same ribbon as well as boxwood greenery ties the window decor back to the swags on the French doors.
We hung each wreath from the meeting rails of the sash using a little floral wire and a 3M command strip.
The final step in our exterior decorating effort was dressing up the two cast iron urns. Our existing sky pencils, though we loved them, have been in a bit of a death spiral over the last several months. We felt there was little we could do to save them, so we decided it was time to transplant them elsewhere and choose a new trees for the front. It all started with a trip to our local nursery where we saw many different options.
After much deliberation, we landed on two small spiral evergreens -- a bit of a twist on the traditional Christmas tree. To us, it seems like the perfect fit.
We expected to pull the old sky pencils with a simple tug, but man did they put up a fight! Their roots had grown down through the middle of the urns and they were nearly cemented into place. The right urn was so completely in place that we needed three people working at once to pull it out.
Once we removed the sky pencil we noticed a sweet potato growing in the soil. This is thanks to the sweet potato vine we had planted. We've heard that a sweet potato appears at the end, but we've never dug it up to verify this claim.
With the old trees out, we popped the new trees in and added a whole bunch of soil.
Once the trees were in place I started playing with clippings from our Christmas tree, white pine boughs, cedar branches, and several clusters of red berries. After a little back and forth, I think it ended up looking really great.
I was finally able to take a step back and look at our newly planted urns. How grand?
We were both a little sad to see the sky pencils go, but we'll try to give them a better home elsewhere. Plus, we're really happy with our new evergreen friends out front, and their width will still allow for room to plant colorful flowers in the Spring.
Lastly, we added two electric candles to each window, and voila, we're ready for the holidays. Here's a final look at the front of our home.
We set out to achieve a simple yet elegant look for our home this holiday season, and I think we achieved it. What are you doing to decorate your home, inside and out? Do you gravitate towards the more traditional, or are you going out on a limb with more unexpected choices?