One of the worst parts about our kitchen when we bought our house was how horribly dark it was. The dark wood cabinets and severe lack of lighting meant the whole area was like a cave. (And not in a cool man cave sort of way.) As soon as we bought the house one of our first tasks was to tackle an inexpensive kitchen makeover, using the little money and skills we had at the time. We started to fix part of the problem by painting the cabinets white and resurfacing the nasty green counter tops with a textured spray paint. But that only solved the first half of the problem. As soon as the sun went down, the room went right back to dark due to the fact that all light in the room came from a single overhead ceiling fan/light combo, and an ugly one at that.
In this photo, I think I'm laughing about how disgusting that fixture was.
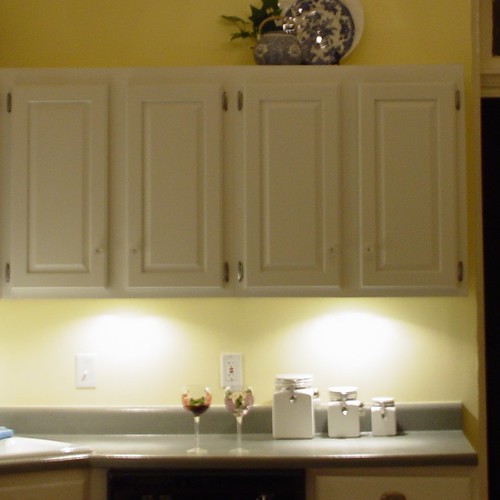
To solve this issue of a significant lack of light and to add some visual interest to the room, we wanted to install some under cabinet lights. Aside from providing the lighting we desperately needed in the room, it would also provide task lighting directly on the countertops, an imperative item when cooking.
Without much knowledge of how to attempt this, or even a real plan, we embarked on what was ultimately the first "electrical" project in our home, and boy are we glad we did.
We headed out to Home Depot and looked around the lighting aisle for something we could use as under cabinet lighting. We weren't sure of the style we wanted, or even what kind of lights to buy, but we happened upon a pack of Westek "Puck Lights" similar to the ones to the right.
This was well before the days of LED or even Xenon, so the decision on a halogen bulb was easy. The package we chose touted quick installation and surface mount application, so it seemed to be absolutely perfect for our needs. We bought a single five pack of lights for the five cabinet bottoms we needed and excitedly went to our house to work on the project.
When we got home and got to work on the install, we learned the package was right -- the installation was as easy as drilling holes for the wire, trimming the wire to the right lengths, snapping on the plug, screwing the light bases to the cabinet bottoms, and plugging them in. Following the instructions on the package made the entire process a snap.
The first step was to locate the lights where they would look best. We felt placement in the center of each cabinet box would work best to evenly spread the light and look the most aesthetically pleasing when they created the pools of light. We also placed one in the corner directly above the sink to light our dish washing area.
Each puck attached to the cabinets with a couple of screws. On a difficulty level, this was about as beginner as you can get. Great for our first little project.
After the puck was mounted, I drilled a few holes in the bottom of the cabinets to run the wire up and through the cabinet interiors. I wanted to do this rather than have the wires run under the cabinet. There's no wrong way, but we felt this just looked cleaner.
One thing that helped was that we were really lucky with the electrical. When we bought our house, there was an existing switch behind the sink that controlled an outlet in the center cabinet. We were able to run all of the wires to this outlet which allowed the switch to control the lights' function.
I also knew we would want other switches to control these lights, not just the one by the sink, so I replaced the original light switch on the wall near the entrance to the room with an X10 switch from Smarthome.com. This would allow for remote access to turn the light on and off without being directly wired to the switch in the cabinet. Pretty cool, right?


After our relatively simple install, we tacked the wires in the back of the cabinets with plastic wire staples to keep them out of the way of the items in the cabinets.
We then flipped the switch and were overjoyed to witness the warm halogen glow of under cabinet lights. It was such a treat to be in a kitchen that wasn't horrible dark and depressing.
As you can see in the photo, the counters hadn't been painted yet, but we could tell things were starting to look up. We knew that when we were done the hard work on our cabinets and counters would be complemented by our quick and easy, yet remarkably effective lighting solution.
After the counters were spray painted gray and the cabinets painted white, we had almost completely transformed our entire kitchen for only about $100, taking the once dark and depressing space from this:
...to this:
Have you done any quick and easy lighting updates to your kitchen? Did you see some serious bang for your buck? In our case this inexpensive solution has reinforced that we want under cabinet lighting on our "real" cabinets once we do our actual kitchen renovation in a few years. But in the meantime, this inexpensive kitchen makeover made working with what we had much more bearable.