Lest week we covered our kitchen renovation saga at length. It was a fun termite infested walk down memory lane that helped is remember the project that turn us from soft newbie homeowners to hardened DIYers who can take on anything. We may have accomplished our goals, but it also made us thankful that project is behind us. Today we're going to switch gears a little bit from massive kitchen reconstruction to using our kitchen for one of those things it is supposedly meant for...cooking.
In my quest to try new vegetables this winter, I've discovered a new found obsession with Brussels Sprouts as well as an abhorrence of roasted turnips. (Is it just me, or do the turnips taste like sweaty feet?) Today's culinary challenge will focus on the parsnip.
I recently had an amazing side dish at a restaurant that was a delicious concoction of diced roasted carrots and parsnips in a decadent creamy sauce. For my efforts here at home I want to level the playing field in my comparisons and are therefore am preparing all of the veggies in a similar fashion -- dressed in olive oil, salt and pepper, and roasted until tender. My feeling is that we'll get a true taste of the natural flavors of the vegetable, rather than it being a comparison of recipes.
After preheating my oven to 425 degrees, I cleaned and peeled my one pound bag of parsnips.
Oddly enough, a recipe I found online (which I used as a rough guide) indicated the parsnips should be peeled but the carrots should not. I have no idea why (anyone have any ideas on that?), but followed the instructions to clean my roughly half pound of carrots.
Next up, I cut the parsnips and carrots into approximately one inch pieces, cutting the larger sections of vegetables in half lengthwise.
After placing the cut vegetables on a baking sheet, I drizzled them with 1 1/2 tablespoons of olive oil.
 Continue Reading Full Post
Each year on the first Saturday in March, Old Town Alexandria kicks off the St. Patrick's Day festivities for the month with a parade. Old Town is a fitting location for such an event as you can find three Irish Pubs, a Dublin Chipper, and several other establishments that turn Irish for the month lining the one mile stretch of King Street.
In honor of today's parade, Wendy and I will be live tweeting with photos and our personal narrative of the event. So if you can't make it down to Old Town for the dog show, car show, and parade, we hope you'll follow along below (new posts should load automatically) or on our Twitter page.
So sit back and enjoy the show :-)
Bring On the Tweets:
 Continue Reading Full Post
As many of you may have seen this week, Old Town Home was nominated for Apartment Therapy's Homies Award as one of the best DIY blogs. We can't even tell you how flattered we are not only to be nominated, but to be inside the top ten of a category of 273 DIY blogs! Having only started Old Town Home last April, we're shocked and elated to be in the company of so many talented bloggers.
Only the top six contenders advance to the next round, and sadly we were just shy of this spot. Regardless, we wanted to thank everyone who voted from the bottom of our hearts. We appreciate you taking the time to vote, as well as being interested enough in our lives and projects to join us on our renovation journey, in good times and in bad.
We also want to to thank those people that leave such touching comments, both here at Old Town Home as well as on the Homies page, including one that read:
Awww. Thank you! Knowing that people enjoy reading our blog makes all of the hard work, long hours, and late nights worth it. Juggling the demands of our careers, renovation projects, life, and now the blog can be overwhelming at times. But feedback like this makes my heart smile and our motivation soar.
 Continue Reading Full Post
In our previous posts on our newlywed kitchen nightmare we've covered:
We had come so far from our original disaster to a nearly completed project, and the final significant step was to deal with the floor. We had to pull up a fair amount of the flooring along the wall in order to get down to the floor joists for the footers. However, roughly two thirds of the kitchen floor had original heart pine from when the addition was put on the house around 1890-1900. We weren't able to salvage any of the pine from the areas we had pulled up because it had already been cut, damaged, or replaced long before we moved in. But the original wood floor was beautiful and rich with a tight grain pattern. Unfortunately, one third had been damaged, cut, or poorly replaced at some point over the years. It was our job to repair this unsightly situation in as budget friendly of a way as possible. If you're not aware, heart pine is $$expensive$$, and we had close to $0.
Our first step was to pull up the damaged sections, patch in the sub floor where necessary, and find an adequate replacement flooring. We actually got really lucky when we found some wide tongue & groove beadboard at Lowes that was pretty much the perfect width to match our existing flooring. The back side of the beadboard was a simple flat stock material that was exactly what we needed.
We planned on using the yellow pine in the picture with an interesting stain treatment to simulate the look of the heart pine through the rest of the floor, but I was skeptical that we could properly match the color.
After laying the new floor in long lengths without cuts, like the rest of the original floor, we were feeling pretty good about our progress.
 Continue Reading Full Post
Termites, water damage, and structural damage, oh my! If you've been following along the last couple days, you know about the roller coaster of emotions we experienced at each critical moment of our kitchen disaster and rebuild. From feeling completely defeated, to feeling as if we could conquer the world, and right back to confused and bewildered, it seemed difficult to predict how we'd feel by the end of the day each morning we woke up. How would you feel if the main corner posts of your house had been so damaged by water and eaten away by termites that it looked like this?
It looks like a crumpled paper bag, not a solid 100 year old piece of 4x4 lumber.
We were able to stick with the project and as we ticked each major element off of our lengthy to do list, our confidence as DIYers grew. We had toiled away for a while on the demolition, electrical, and plumbing, and finally had the kitchen and sun porch in good enough shape that we could begin to enclose all of our work. We were finally moving into the phase where are kitchen would begin to transform from hellhole back to a usable part of our home. However, before we could even begin to think about our finished drywall, we needed to insulate.
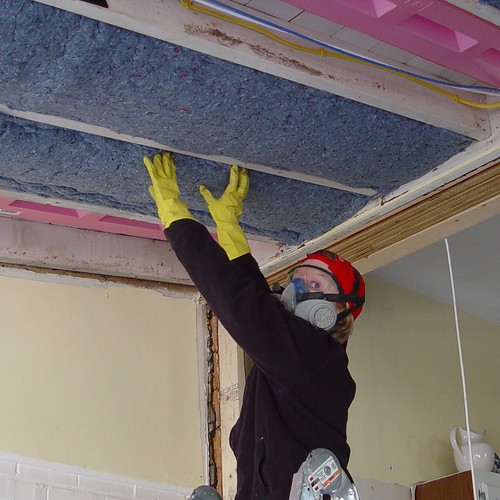
In previous posts we mentioned how cold air seemed to blow through the walls with little difficulty, and we were not exaggerating. If you stood within about four feet of the wall you could physically feel the temperature drop. Beyond the cold, the room was loud, any and all noise easily transferred into the room as if there were no walls at all. We were interested in both the thermal insulating factors of an insulation material as well as the possibility for sound attenuation. But back in those days, before the prevalence of itch free and eco friendly insulation solutions, we feared we were stuck with fiberglass.
Through some extensive research I was able to locate an online store that I could order packages of UltraTouch recycled denim insulation.
 Continue Reading Full Post