In our new section called "Ask Old Town Home" you have the opportunity to ask and have your questions answered to the best of our ability. Today's topic comes courtesy of Jen from Harrisonburg, Virginia. Jen asks:

My question is about how to get a smooth finish when painting wood furniture. I used the instructions from another blog perfectly and even used the exact paint that she raved about (Zinsser primer and Ben Moore Metal and Wood paint, low lustre in black). As suggested in the other blog, I used a foam roller to apply the paint which gave the paint an awful, rough texture on the wood. This was unexpected, and not what the blogger had promised. It almost felt like the roller was coming off in tiny pieces and adhering to the paint on the dresser! After the first coat dried, I ended up sanding most of the roughness off and re-applying another coat with a paintbrush which left bristle marks. The end result LOOKS great, but when I run my hands across the top I'm not happy with the texture. Do you have any tips that could make my life easier when I tackle my next furniture-painting project this summer? I love the look of painted furniture, but I'm afraid to get the same result again! Thanks.

Thanks, Jen. This is a great question, and one that we have a lot more first hand experience with now then we did at this time last year. Our information largely comes courtesy of our recent experience painting our salvaged front door and French doors last summer. We wanted as smooth and as high gloss of a finish as we could accomplish on our own, so I ended up doing a lot of research on the best possible methods and paints to achieve this look. This information can be generically applied to painting furniture or just about any wood surface. Here's what we learned:


Continue Reading Full Post
Comments 14

Despite having self proclaimed "black thumbs," I have to say we're elated at the growth of our potted herb garden. In just the few short weeks since we completed our planting, our wide variety of herbs have really grown by leaps and bounds. One might say our herbs are ginormous. (Yes, that's a technical term.)

Here's what they looked like last month after planting them....

...and here's a shot of them today. 

Wowza! Planted in these decorative ceramic pots in our small urban backyard are the following:

  • Two basil plants (my personal favorite)
  • Sage
  • Dill
  • Oregano
  • Cilantro
  • Parsley
  • Rosemary
  • Chives
  • Mint

Although we're relishing in our success up to this point, I must admit that we're not completely sure how we'll use our newfound supply of fresh herbs, especially given that they all will be used in vegetarian dishes. (Alex is a vegetarian, so we only prepare/eat vegetarian dishes at home.) In particular, the sage and oregano present the biggest challenge for us, but we're off to a good start. 

I recently made a delicious quinoa salad, recipe below, complemented by an ample supply of fresh chives and basil. If you're looking for a healthy and easy recipe to use some of the fresh herbs you may be growing in your garden this year, I promise you this one's a winner.


Continue Reading Full Post
Comments 14

How many injuries does it take to plant a small area in your backyard? If you live here at Old Town Home, the answer is three. Yeah, seriously. Three. If you thought we were kidding when we say we're not talented when it comes to gardening, we may have you convinced otherwise by the time you finish reading this post. 

In the back corner of our yard, behind the big old tree, sits a small raised bed. Here's a look at it just two weeks after we bought our house. 

This area, set off by an old, cracked raised brick border, is a veritable wasteland. I mean that literally as that's where Lulu goes to do her business. In addition to "watering" the area with dog urine, the area sees little sun and the soil is infiltrated with a tangle of tree roots, poor soil, and aggressive ivy, making it nearly impossible to sustain plant life. Icky? You bet.

Over the years we've planted and replanted the area, spending hundreds of dollars and countless hours in vain. Here's how lovely it's looked in the past...promptly before it all withered and died.

Though we've tried and failed in the past, we're still willing to give it another try...as long as it didn't cost us a lot of money. This time around we spent less than $20 dollars for two bags of mulch and one bag of miracle grow soil. Thanks to my parents who have a surplus of growth from their yard, the plants were largely free! In town for a recent visit, they brought us a hosta, lily of the valley, ferns, and a few lilies. Rounding it out with some ajuga we purchased for the front bed but opted not to use, we were good to go.


Continue Reading Full Post
Comments 11

Last weekend Wendy and I stumbled on a real treat. While walking with Lulu on Saturday morning, hitting up our usual stops (the pier and farmer's market), we saw a sign stuck into the ground on a corner.

Could it be? Yes! An estate sale! I'm sure you can probably guess (or have previously read) about how we feel about estate sales, and this one was a little better than most others. This estate sale was being held in a house on the corner of Prince and Pitt streets and is a home that Wendy and I have both admired from the outside for many, many years.

The home was built around 1820, and though the front of the house is somewhat grand and impressive, the real allure for us is the view from the sidewalk next to the home.

The second and third floor windows that look east toward the Potomac are the perfect combination of impressive, unique, and charming. We've long imagined what a view over Old Town from these windows might look like, and lucky for us, we were finally getting the chance to see it.


Continue Reading Full Post
Comments 24

We've been doing quite a bit of HVAC work of late as we get ready for the heat of summer and the various items necessary for the master bathroom renovation. From demolition of horrendously installed duct work, to custom fabrication of vent boots, even the most minor work that needs to be performed on ducts requires the right tools.

Over the years I've gotten more and more comfortable with the work we've been doing in our home's ducts. But my comfort with the work we've done has been due in no small part to the correct selection of my set of snips that I purchased years ago. 

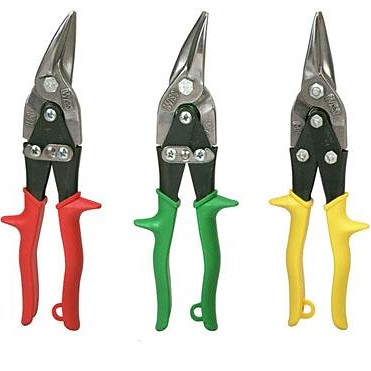
When we were just starting to work on HVAC I knew I'd need a pair of straight cutting metal snips, so I headed out and picked up a pair of compound action snips with an ergonomic handle. There are many different kids out there, from the snips that look like simple oversized scissors, to ones that are actually pneumatic, but a basic middle of the road compound cutting tool should do just fine for most purposes.

The compound movement of these snips allow them to cut up to 18 gauge metal with relative ease. You don't have to exert a tremendous amount of force to get through the material, and it tends to make a nice clean line. This isn't to say you won't get a good forearm workout if you're cutting a lot of metal during a project.

These straight cutting snips are what I tend to use in probably 75% of situations where I need to cut metal for duct work. They have a small set of blades, allow you to begin cutting from a point, and they make a nice and straight line without damaging either side of the cut. Some snips will leave one side crisp while bending and folding the other side out of the way. 

I used these straight cutting snips to make the small cuts in the corners of the duct boot last week. They did just what I needed and left me with a good edge to work with. 

As useful as the straight cut snips are, there are often times where you need to make a curved cut. While the straight snips will work on a soft curve to a certain extent, if the bend of the curve gets at all tight you'll end up wrestling more with the snips and the metal than you will end up making progress. That's when the second set of snips comes into play. 


Continue Reading Full Post
Comments 1
  • Search

  • Login
  • Follow
  • Advertising

If you're looking for information on advertising and sponsorships, head on over to our sponsorships page. You can purchase site sponsorships in a few easy clicks. 

Toolbox Tuesday
Open Housing
  • We're Featured!

Old Town Home has been featured in the following places and publications:

The Washington Post
 
Washingtonian Magazine
 
Domino
 
Old House Journal
 
 
Apartment Therapy House Tour
 
Washington Post Express Feature
 
Home & Garden Blogs
 
© 2026 OldTownHome.com. - Privacy Policy
Login Below
or
Sign in with Facebook
Connect

Unexpected Error

Your submission caused an unexpected error. You can try your request again, but if you continue to experience problems, please contact the administrator.

Working...

Working...