A while back we shared a little project we had done back in 2003 that allowed us to turn an absolutely disgusting eBay find (and the dirtiest and grossest thing we've ever received in the mail)...

...Into a great looking storage solution for our kitchen.

Our "white hutch," as we've come to know it in our household, has been a veritable Swiss Army Knife of kitchen furniture. From wine glass storage behind the upper glass doors to miscellaneous cookbooks/recipes/food scale/juicer/whatever else we could fit in there storage in the bottom cabinet, it was about as full as we could make it. Over the years we've asked a lot of out trusty white hutch, and It was clear that this hardworking piece had seen better days. 

The paint was chipped, scuffed, and dirty, the doors were not closing properly, some of the hardware was starting to pull loose, and Alex had gotten overzealous with his application of caulk that was now cracking and looking tired. I'm not being critical of Alex's caulk skills here, just ask him and he'll gladly admit that he was "just learning" in these early days. 

In addition, the bead board in the back of the cabinet still retained the red accent color, selected to complement our old floral window treatments in the kitchen and sun porch. Today, the red bead board backing just wasn't going to work with our new "London Fog" gray (or should I say "gray") color.

Since our big epiphany over the weekend which includes moving this lovingly restored kitchen furniture to our sun porch, it was high time we give it a little facelift to allow it to blend with our decor. To tackle this side project, I got to work taping off the back of the cabinet. 


Continue Reading Full Post
Comments 11

Furious, frustrated, fuming...confused! Yep, that about sums up how I'm feeling at the ineptitude of "professionals" after seeing something that I discovered last week while painting our bay window. You know what the strangest thing is? It's not even on our house.

Last week, while up on our lower back copper roof, I was talking to my neighbor about some painting she recently had done (by a good contractor that I had a chance to chat with). During the conversation with my neighbor she said, "Should I be concerned about the nails coming up through the roof?" Puzzled, I asked her which nails she was worried about, and she mentioned that she had seen some coming up while looking our from her back bedroom window.

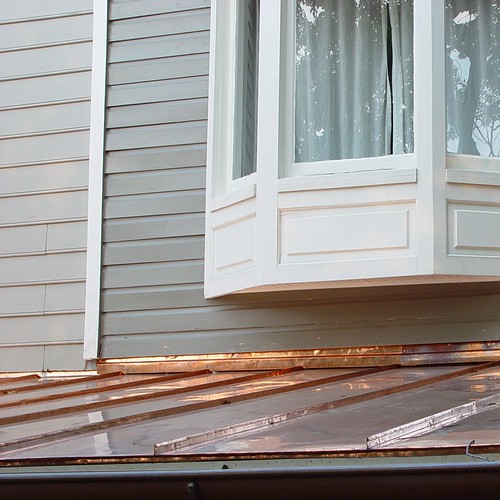
Both our upper and lower roofs are one large shared area, so I walked over to her roof to see what she was talking about, and I was simply blown away by what I saw.

It's a little difficult to discern from the photo, but yes, your eyes do not deceive you. What you're looking at are sheet metal screws put right through the copper standing seam roof material and screwed right into the wood sheathing beneath. I was FLOORED!

After stammering for a second or two, I got my words together and let her know that someone, likely through a complex combination of stupidity, ignorance, and sheer laziness, has more or less sabotaged her (which is actually "our") roof.

I quickly worked through what had likely happened and came up with a logical (well, logically stupid) and probably correct reasoning for the recent appearance of these screws.


Continue Reading Full Post
Comments 35

Never in a million years did I think that my clearance rug purchase from Home Goods would snowball into a kitchen "renovation." But given that we're the proud new owners of IKEA cabinets and brand spankin' new butcher block counter tops, I'd say that we're well on our way to a substantial renovation. But let me start at the beginning.

For those of you following along these last few months, you might remember that one of our new year's resolutions was to redecorate our sun porch to remove the tired floral window treatments, and to better incorporate the wine fridge into the furniture layout. Here's what we were starting with back in January.

The first step I took to accomplishing this was to purchase inexpensive bamboo blinds from Home Dept as well as a new wool rug from Home Goods. The only problem? I felt like I had taken our room from bad to worse.

My disgust with the changes left me in a state of complete design paralysis for several months, after which time I finally came to terms with the fact that in order for the new purchases to work, we'd have to repaint both the kitchen and sun porch since they're largely one big open space. After careful deliberation reckless abandon and lack of test swatches, I landed on Benjamin Moore's London Fog. Although the color wasn't exactly what I thought it would be from looking at the paint chip, overall the new color is a big improvement and we're well on our way to a better, more cohesive space.


Continue Reading Full Post
Comments 25

It's official. Our kitchen and sun porch have been lovingly slathered in two coats of Benjamin Moore's London Fog. This labor intensive process stretched from 7:30am Sunday morning until Thursday evening, largely due to the cracks and crevices presented by the brick walls in the sun porch. 

In honor of the new color, here's a little background music for you while reading this post, courtesy of my high-school-into-adulthood favorite band, +Live+, and lead singer crush, Ed Kowalczyk, as they perform "The Beauty of Gray." 

Over the last several days, we've transformed the space from a sunny yellow color to a more subdued shade that better complements the new Home Goods rug and Home Depot bamboo blinds. Here's a look at the before, featuring Benjamin Moore's Traditional Yellow.

And here we are under the London Fog.

Obviously we have a long way to go in terms of whipping the sun porch into shape, but the fresh coat of paint is a step in the right directly. On the long wall, we have plans to build a wine bar/storage unit, although Mel may not love being dethroned from the top of the wine fridge. 


Continue Reading Full Post
Comments 17

When we moved into our house, our gutter situation was far less than desirable. The white aluminum gutter that adorned the back wall of our home may have been just 10 feet wide, but its modern shape looked out of place on the rear of our little historic home. The situation was further conplicated by the fact the gutter emptied into some PVC elbows, and ultimately a 3" PVC pipe, rather than a normal downspout.

This insufficient setup often resulted in severe clogs due to ice and debris. The clogs then led to gutter overflow issues, ice damning, and ultimately, the massive termite damage we uncovered in the back kitchen wall that led to near disaster.

I mean, we had to have known there were issues when the previous owner pointed out that he placed a plastic rubbermaid container with a 10lb weight in it to catch overflowing water from the downspout. He was apparently "sick of how the water sounded when it kept hitting the window." Hrm, not sure why he didn't unclog the gutter an install some screen, but hey, if he'd been more proactive we couldn't have afforded the house.


Continue Reading Full Post
Comments 3
  • Search

  • Login
  • Follow
  • Advertising

If you're looking for information on advertising and sponsorships, head on over to our sponsorships page. You can purchase site sponsorships in a few easy clicks. 

Toolbox Tuesday
Open Housing
  • We're Featured!

Old Town Home has been featured in the following places and publications:

The Washington Post
 
Washingtonian Magazine
 
Domino
 
Old House Journal
 
 
Apartment Therapy House Tour
 
Washington Post Express Feature
 
Home & Garden Blogs
 
© 2026 OldTownHome.com. - Privacy Policy
Login Below
or
Sign in with Facebook
Connect

Unexpected Error

Your submission caused an unexpected error. You can try your request again, but if you continue to experience problems, please contact the administrator.

Working...

Working...