We left off with our nostalgic tour of the master bedroom "before" with a goal, a direction, and a sliver of progress. During our prep for the project we acquired the closet doors we had search for endlessly over the course of four years, and we had purchased a great looking antique rug off of eBay. We were headlong on our way to a huge project but we didn't really realize it. Why? Because our antique rug was distracting us due to it's extensive FILTH!!!
I'm not sure if any of you have ever purchased a large rug from eBay, but they sometimes seem to arrive as if someone had stored it in a sand or dirt pit. I'm talking stored in a barn and dirt falling out of them and getting left on the floor dirty. Of the eight rugs we've purchased from eBay that are layed throughout the house, an unbelievable amount of dirt has come along with the rug for at least three of them. Usually we can clean the rug well enough with shampooing and vacuuming, but for our master bedroom behemoth that wasn't going to cut it.
We ended up enlisting the help of Hadeed's, a local carpet cleaning service. They took the 100+ pound rug away and did an offsite clean before returning it in pristine condition. Money well spent. We also got such a great deal on the rug (about $400 including shipping), we felt an extra $140 was well worth it to know that we were walking on a clean rug in our bare feet.
While our rug was out getting cleaned, we kicked off our end of the major project. Our plan was simple but lengthy.
Simple, right? Well...easier said than done.
 Continue Reading Full Post
Thursday, November 8, 2012
One of the themes of our kitchen renovation has been that "we're thrilled" with the results. I can't stress just how genuine this feeling is. We're not "thrilled" like the guests on an HGTV reality show where they just redid a room by putting live moss all over the walls, or like the homeowners are when the guest designers just spray painted a family heirloom. Oh no, we're actually thrilled with what our kitchen now looks like given what it started as (remember, green laminate counters, bad appliances, etc.), and where it is now.
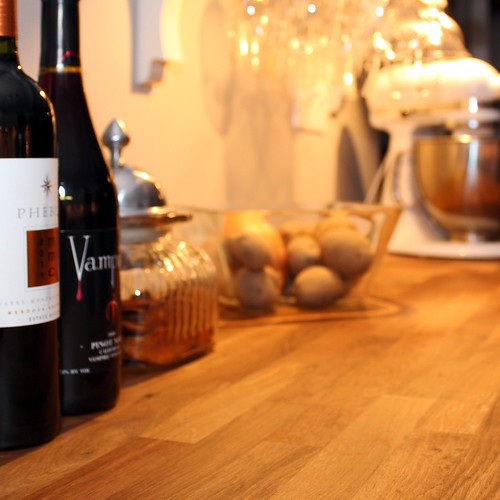
All of that "thrilled" being said, that doesn't mean we don't have opinions on the various aspects of materials, appliances, and finishes we chose. Today I want to take a few minutes to give everyone my opinions on our butcher block counter tops from IKEA, just in case someone is considering using this for their own purposes.
Warning: I'm going to be brutally honest here. It doesn't mean we don't like the product, because we do like it, but I did notice a few items I wish I had known going into the project.
We began considering the use of IKEA counter tops after seeing it in quite a few blogger projects around the Internet, and after a few commenters here and on our various other social media profiles suggested (ahem, insisted) we give it a look. When we began researching, we were lured into the behemoth of Scandinavian delight by the excellent prices being offered on the website.
 Continue Reading Full Post
Wednesday, November 7, 2012
As the winter closes in and our windows and doors begin letting in the dreaded drafts of cold air, many of us are looking for ways to make things a little more weather tight. From storm windows to weather stripping, there are hundreds of little tips and tricks to get the most out of your home's energy efficiency, but what happens when the typical approach isn't sufficient?
Local Old Town resident and fellow old house owner Kate asks:
Our front door has a pretty big gap where it meets the threshold. Short of using a draft dodger, what can we do to help make it a tad bit more energy efficient (keeping in mind we are not the handiest of folks). The problem is that the door is not squared in the corners, and we're not sure the door sweeps you find at the hardware store will provide enough clearance. Any ideas, short of replacing the door (which would not be the best plan according to the BAR - Board of Architectural Review)? Thanks!
This question deals with a topic that affects many home owners, regardless of the home's age. Settling, adjustments, or original install can all leave gaps at the bottom of the front door that are hard to solve without throwing something in front of the door. Sure, there are the obvious answers to the problem, like a wiener dog door stop.
If you don't like wiener dogs, there are always many other options that you may be a fan of, like this snake/dragon...
 Continue Reading Full Post
Tuesday, November 6, 2012
In yesterday's post about our efficient use of our extra daylight savings "fall back" hour, you got a little glimpse into our master bedroom closets. While we were writing that update, it occurred to us that we've never actually shown much of our bedroom other than a random before and after. Given that we actually moved out of our bedroom for a year during its overhaul, I think it's high time we fill you all in on the nitty gritty details of how our bedroom went from bland and dank...
...to a sanctuary for zzzz's.
Over the next few weeks we'll give you a rundown of the various ups and downs of the project.
The whole project actually started long before we kicked off any real renovation. The "demolition" (as we'll gently call it) actually began on the first day we were in the house in 2003. Our first task in the house was the removal of shoe molding throughout the whole house in anticipation of the pros coming into refinish the floors in the house prior to our moving in.
 Continue Reading Full Post