What better day than April Fools to post a long overdue update on our basement progress?
Yes folks, this blog post isn't a joke, so don't worry, you're not going to be had in the last line or two. However, this post is a bit out of character, as it largely involves how closely we worked with a great contractor to accomplish what we wanted to accomplish.
If you'll recall, back in November we told y'all about working on a major basement overhaul in our Old Town row house. It was about the time of our last blog post that we somehow reverted to the ways of our 20 year old selves and went full bore on renovation work.
Here's the #1 April Fool
I'm talking 8 hour day job work, 8 hour house work, a break or two to eat, some long days, late nights, raw hands, and lots of sore muscles. And though we hired out a good amount of the work we were doing, that certainly didn't stop us from participating as much as if we were doing it all ourselves.
The goal of our basement work is to turn the space into a wood shop. Everyone on HGTV talks about a basement "man cave," but I'm sorry, that's just too cliché. In our house we're far more interested in a unisex and utilitarian space that will work as a separate shop and laundry. Let's collectively get over the idea of "man cave" and instead go for "gender neutral room where necessary, productive, and cool shit happens." Deal?
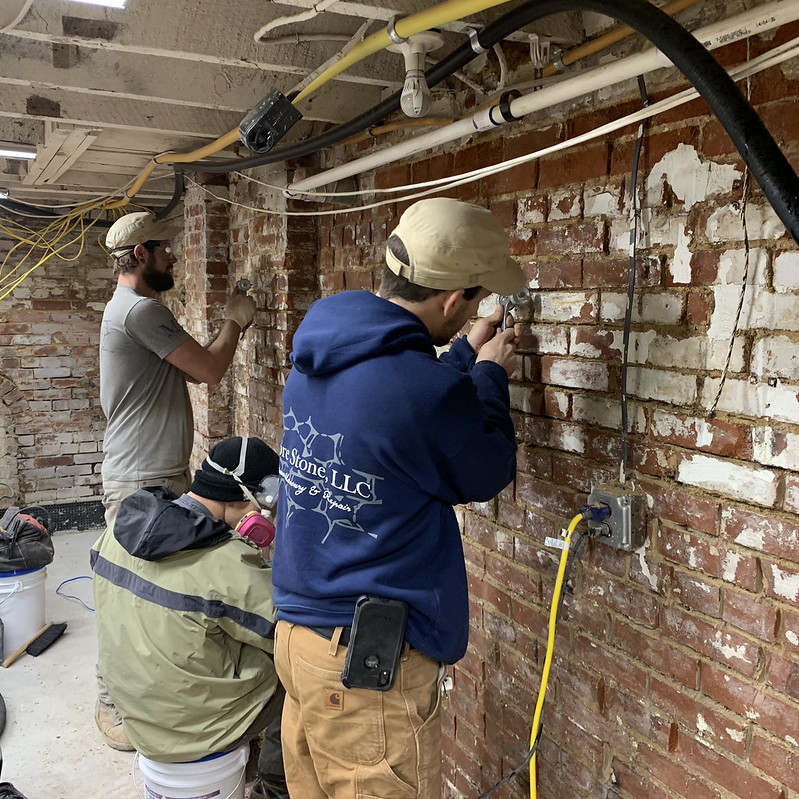
For our project and working with our mason, Sean Moore of Moore Stone LLC, we had to devise a plan of attack. Our basement walls had been covered in thick and failing waterproofing paint. We wanted to remove the paint and have Sean and his guys repoint everything. This meant we had a good amount to get done before Sean and his guys could start work. Naturally, we went ahead and set a start date as encouragement to get everything done.
Since we bought our home in 2003 until now, that old waterproofing paint had gone from bad to worse. But I'll tell you one thing, removing waterproof paint is not an easy task. While removing the paint, we noticed it had adhered with an especially strong bond to any of the cement mortar that had been used, so we also wanted to undo some of the cement mortar repointing that had been done years ago before it began destroying the brick.
If you're a fellow old house enthusiast, a casual reader of old home magazines, or even a viewer of historic home renovation shows, you know that using the right mortar is about the most important thing you can do when it comes to caring for historic masonry. This is due to the fact that historic bricks are inherently soft, and the mortar that cushions the bricks from one another needs to be softer than the brick, lest you end up forcing the microscopic natural movement of the brick to cause deterioration.
We talked about proper mortar selection as far back as 2013 when we were trying our hands at repointing some of our brick ourselves. The idea is simple, user proper historic mortar and DON'T use any Portland Cement when it comes to mortar with old bricks. There are several options on the market, but all involve using a lime based mortar rather than cement mortar. Since cement mortars cure harder than the brick itself, and the brick moves naturally during the normal freeze/thaw and expansion/contraction cycles of the seasons, cement mortar can cause soft bricks to be destroyed from within...and there's no coming back from that.
When working with old masonry, Sean typically works with type S lime mortar in a color that will look good with the brick. However, in working with us we'd hoped to use one of the specific mix of colors that you can get from DeGruchy's LimeWorks.us. We got ourselves a sample pack of their Ecologic mortar colors and chose one that we felt looked best.
The standard colors are fine, but too consistent for our taste. Old mortar was mixed with sand that had plenty of natural color variations from stones and other elements. LimeWorks has a few options that mimic with look by mixing a few colors and then adding in flecks of coloring. The final color we ended up choosing was their 90%/10% mix of DGM 050/SGM 250 with XF slag flecks (3rd from the bottom I believe).
Okay, I'm getting too far away from what we were accomplishing, back on track.
Quite a bit of the paint came off relatively easily wherever the wall is below grade and on an exterior wall. This is proof that the brick absorbs and releases moisture and moves enough to fracture the paint's bond. But the area where the brick had been repointed with cement mortar, and it wasn't exposed to mortar (party wall with our neighbor), that damn paint was like a friggen rock! I started by trying every different type of paint stripper. Peel Away, SmartStrip, Soy, Caustic, steam, heat, Infrared (Speed Heater), nothing worked!
The strippers just make a mess at best, and I swear the heat and steam are just absorbed by the brick, making it so the paint never heats to the point it needs to release or soften.
Eventually I just ended up using a good old hammer and 5-in-1 tool as a chisel along with the pull scrapers.
Then I added a tool that worked really well to my arsenal. At the advice of several people on Instagram, including the guy who invented the tool itself, I picked up a Porter Cable Restorer. It's basically a handheld drum sander with different attachments and dust collection.
Once I got the paint removal started, I grabbed this sander with the paint removal wheels to grind down/burn off any remaining paint. It worked really well, and is a tool I'm very glad to own now. They're also coming out with a Craftsman version of the tool with a new styling and more powerful motor, so be sure to keep your eyes open for it if you think it might work well for you.
As projects in our house tend to go, paint removal was slower than I expected. Our buckets of dry mortar arrived and Sean and his two other guys were slated to begin. I told them I wasn't as far along as I'd hoped, and if they didn't mind my working in their space while they worked, I was just going to keep moving along.
The next several days I worked on one side of the basement on paint and cement mortar removal, while they worked on the other walls on the repointing process.
On my side of the equation I was using a Dewalt Rotary Hammer like a surgeon to carefully chisel away the solidly adhered cement mortar, which was fracturing the paint in large swaths. It was the best tool for the job by far, and beat the pants off of a brick hammer and pointing chisel. But it was loud and grueling work. I would cut a channel with the grinder and then chisel out the cement mortar with the hammer.
On the other side the guys were using various scraping tools as well as an angle grinder to cut away the old soft lime mortar. They were experts with the tool and there's little if any evidence of an errant grinder wheel hitting one of the bricks. Meanwhile, I kept working on my paint horror.
While I had repointed previously using a pointing trowel, it's slow work. The masons preferred to use a mortar bag to squeeze the mortar into the joint, and then strike the joint using a tool to give it the classic look of a concave joint.
During the work, I introduced Sean's guys to an angle grinder repointer's dust shroud for the DeWalt angle grinders that facilitates dust collection and prevents the level of dust that's usually associated with messy repointing work. This is the shroud in action, where you'd normally see a spray is dust!
The shroud, coupled with a dust extractor vacuum, cuts down on a good 70%-90% of dust you'd normally see. I also figured out that the shroud, through not really meant to fit the smaller grinders, fits nicely if you remove one of the set screws on the grinder's locking collar.
Sean and his guys worked fast, and then caught up to me pretty quickly. the last day we were all working on the final wall at the same time. They were above me raking out the joints, raining a shower of lime mortar down on my head and hair while I was trying to remove the last of the paint I'd be able to get off. I'd long since given up on perfection and decided to embrace the remaining white paint as a level of character that will tell the story of our house for many years to come.
I can't tell you how much I appreciated their willingness to let me be in their way and work with me on this project. They said they didn't mind, and even picked up a few ideas for tools they wanted to add to their approach to repointing, so that was cool as well.
Most people want to hire someone because they want to have the job done for them. For me, I want to do the job myself, but it's all about time. When I hire someone I want to be involved in the process to learn and experience. I know a lot of contractors don't like this and feel like they are being watched or slowed down. I also know that we sometimes pay a premium or "involved homeowner tax" for being involved, but I personally get so much more out of the process by being involved that it's well worth it to me. We'll eventually repoint something else in the future, and there's a good chance I'll use what I learned by working alongside Sean's guys, and I appreciate that.
After the repointing was done I had to keep the mortar wet, especially on the party wall, to ensure it didn't suck all of the moisture out of the mortar and cure too quickly. To keep water on the mortar I used a garden sprayer and walked the basement walls every hour spraying them all down. I did this as I could over the next two days and watched as the mortar slowly took on the light gray color we were expecting.
The end result of our effort to remove the old paint and cement mortar, and Sean's team to repoint everything, is pretty spectacular. It may still be a basement, but I'd say it's a basement with some walls that have rather breathtaking character.
We no longer have mortar crumbling and falling on the floor. Paint is no longer crumbling into our belongings. I look around this basement now and I see a space that will be an amazing space where we will create a lot of very cool things!
Now we just need to take care of everything else that's needed before we can call this project done. What's that you say? Oh, how about...move plumbing, install boiler, radiant heat, insulate, move stuff five thousand times, laundry room, storage, work benches, tool storage, more work benches, omg we have so much to do! More in our next blog post...that will be in fewer than four months. :-)
We've been keeping people updated on a lot of our progress real time over on Instagram, so if you're on Instagram and don't follow us, be sure to add us to see all we're working on. We've also been adding a lot of tips and tricks via Instagram Stories.
Also, this is not a paid advertisement or partnership or any sort. If you're in the DC area and are looking for a good mason, give Sean Moore at Moore Stone LLC a call. We can definitely recommend them.
And here are some links to the tools that we mentioned in this post that really helped the whole process.