Our first window restoration is entering the home stretch!
In our last few posts about this project we covered old putty removal in a DIY steam box, paint stripping, repairing the broken sections, and applying Blopentine (Boiled Linseed Oil + Tupentine) to the stripped antique window sash to rehydrate and protect the sash. We also detailed how we used a bath of water and linseed oil soap to protect raw cast iron hardware. That linseed oil is a little bit of liquid magic y'all!
The next steps in our restoration of the 130+ year old original window sash for our home are critical. With everything repaired and stabilized, beyond putting glass back in, from here on out the whole process is all about steps to turn these sash into a window, and to keep water and weather from infiltrating the window and the house.
Allowing plenty of time for the blopentine to dry and fully cure, I applied a coat of oil based primer over the entire sash. I like to start priming at this stage of the game, before placing the glass, for several reasons. First of all, it’s far easier to prime without concern of getting it on the glass. Second, I worry that the sash wood will suck the moisture/oil out of the glazing putty before it skins and cures, causing it to wrinkle and crack. Ultimately, priming it first gives another protective barrier that will let the putty set up as it should. Third, it allows us to ensure paint covers the sections of the sash that will ultimately be covered by other things, like weather stripping and sash lifts.
The oil based primer we use is from Sherwin Williams. It’s a traditional stinky slow drying oil primer, and it might not be the best for us. But I’m going to justify things by saying I’m saving the environment by restoring the windows and riding my bike to work every day. That works, right?
After applying a coat of primer over the entire sash and allowing it to cure, it was time to weather strip.
One thing to note in the photo below is that I primed the sides of the sash. There's a debate as to whether this is preferred or not. Old windows are supposed to "breathe," and some pros prefer to leave the protected sides exposed to the air. Other pros I've talked with say to prime the sides but leave them unpainted to allow for smoother operation. I may leave the sides exposed on future windows, but this one is primed.
While most of the weather stripping for old windows goes in the jamb, there’s one piece, well, make that two pieces of weather stripping that gets applied directly to the sash’s meeting rails. Looking back at the sash before stripping you can see one half of the original interlocking zinc weather stripping still in place.
This meeting rail interlocking two piece weather stripping is meant to keep air infiltration from sneaking between the upper and lower sash when the window is closed. However, this old weather stripping was so caked with paint, beat up, and damaged that it was more a barrier to good window operation than it was to promoting a weather seal. I carefully removed it and all of its nails from the sash.
I can tell you first hand that a failed meeting rail weather stripping not only allows hot or cold right through the separation in the sash, but when the wind really gets going outside you'll even get a good high pitched whistle going. Needless to say, we're really looking forward to weather stripping that will truly work.
I ordered several lengths of the M4B and Hemmed Hook Meeting Rail Bronze two part weather stripping from Killian Hardware. Well packaged, it arrived bubbled wrapped and bundled in a rigid cardboard tube to be sure it wasn’t damaged in shipping. Not by coincidence, it’s the same bronze material as the spring bronze we already installed in the jambs.
Luckily, this product is nearly the exact same dimensions as the original weather stripping, so all I had to do was to cut it to length and nail it in place.
Before I got into placing the weatherstripping I went ahead and pre-painted the parts of the sash that the bronze will cover. This way we get good protection behind the bronze, and we don't have to deal with trying to paint around it later. We used our normal custom trim color on the upper sash piece since it will face into the house, and our new exterior trim color, Sherwin William Pure White, on the lower sash.
Next up I cut the metal using a simple pair of straight tin snips, being careful to cut without bending or pinching the metal to deform it.
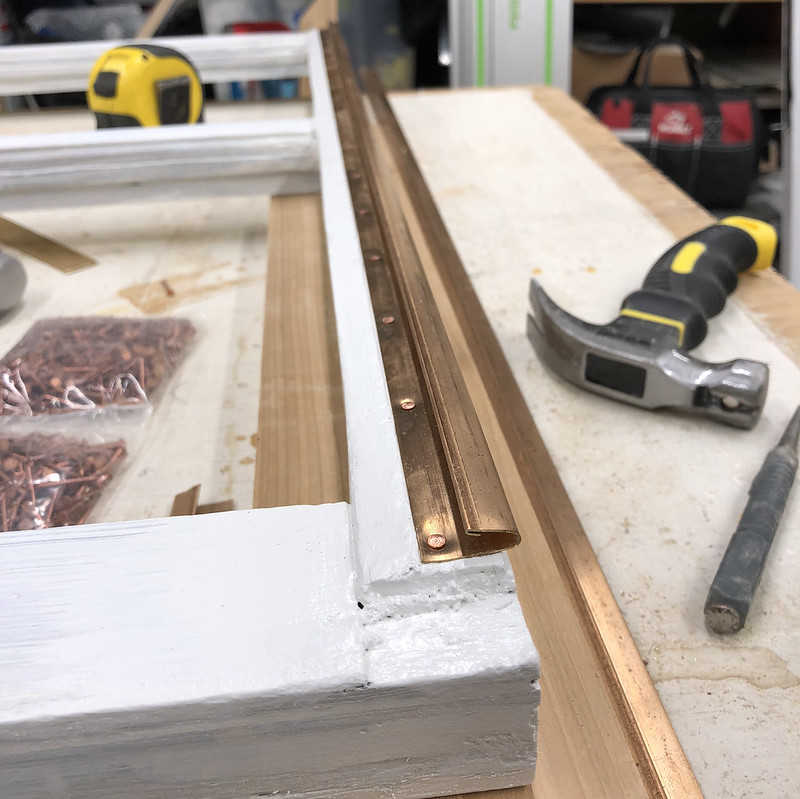
Once cut to length it was just a matter of nailing it in place. I decided to place nails every 2”, which is a little closer than what was there before, but works a little better for the window width and consistency. You can see the old nail locations for reference below.
I marked the weather stripping at 2" intervals using a pencil, dimpled each mark using a nail and one swift hammer strike, then pre drilled holes to facilitate a much easier process for placing the small 1" copper nails.
When the holes are drilled they do tend to push through to the back of the bronze leaving some high spots. To prevent these high spots from interfering in the application, I just flip it over and tap the crown out with a small hammer.
Just like applying the weather stripping in the jamb, it's best to work from one end of the piece to the other to ensure there are no ridges, kinks, or bends. I like to start the nails over the whole sash before coming back through and setting them all flush once I'm sure everything looks good. A tiny hammer and nail set help ensure you don't do any damage to the bronze while nailing.
Apply the weather stripping before placing the glass is a little bit of peace of mind for the paranoid. There's a lot of rattling when nailing these tiny nails in place, and I wouldn't want something to slip or flex enough to break the old glass, regardless of how unlikely it may be.
With the weather stripping in place the sash are ready to truly turn into windows again with the placement of glass. In our case we have some original and need some replacement. Next time I'll fill you all in on the tedious, sometimes frustrating, but often fulfilling process of sourcing wavy glass, cutting wavy glass, and glazing old window sash. When you have the right tools, materials, and a little experience, applying glazing putty can be an almost therapeutic process.
What do you think so far? We may be taking far longer than originally planned, but the window is really starting to take shape. I've banked a ton of tips and tricks for the next window and expect it to not only go much faster, but to also turn out way better. I guess this is why we're starting with one of our second floor windows.