It's been a long time coming, but a major sub-project in the never ending project that is our Master Bathroom is essentially complete!
Yes, it's true, and I can hardly believe we're reporting this major milestone to you! Our master bathroom in our Old Town row house has been an ongoing project since...well, the early days of our blog. And if you're counting, our blog just turned six years old a few weeks ago!! In Internet years, that's like 82 I think.
We may not have had any hoopla surrounding our blogging birthday, but there's really no better way to celebrate than with a completed project!
Since there's a pretty good chance you don't have any clue what I'm talking about when it comes to our cabinet project, let me quickly refresh your memory.
It all started with a drawing on a happy hour napkin that outlined Wendy's vision for our bathroom vanity wall. We completed the vanity several years back by converting an antique buffet into a marble topped double sink, but the two cabinets that were planned to flank the vanity were both just figments of our imagination.
After we finished up the first steps on the napkin vision, following a very very VERY lengthy process of more steps than I care to mention to get to the point where our bathroom had things like walls, a floor, flushing toilet, and other things you commonly associated with a modern bathroom, we had ourselves a very lonely looking vanity.
In anticipation of the cabinets project we picked up a cart full of pine lumber and supplies from Lowe's and figured we'd have it all finished up in a few weeks...womp womp.
The build started with gusto as we built the cabinet bottoms, but quickly crawled to a near halt as other projects took precedence. The problem we faced was the classic DIY conundrum. The bathroom was functional but cosmetically not complete, but the cosmetics could wait.
After a lengthy hiatus we picked the work back up and began construction of the upper sections of the cabinets.
This even included custom cabinet crown to mimic our bathroom's crown.
Even after getting this second wind, there they sat. Nearly complete but still far to go. These cabinets needed lower "doors" to front the pull out laundry baskets, and a whole lot of paint before they could be called done.
Well, our third wind blew into town and today I'm here to report that Phase One of "Make Matching Cabinets From this Napkin Sketch and Wood" has crossed the finish line. And even better, we love the results!
When it came to painting we first had to prep with a lot of sanding. I felt like I sanded everything smooth for days. After sanding everything to 180 grit we painted the uppers and lowers of the cabinets with one coat primer and two coats of paint.
To apply the paint we decided to go the brush painted route rather than spraying. We did this for a few reasons, but primarily because we want these cabinets to look like they've possibly always been a part of the house. Though spraying is fast and looks great, the smooth and brush mark free finish just looks a little too new for the look we're going for. I even built the uppers in a way that's typical for older furniture, using multiple pieces of wood for the backing rather than large sheets of plywood. If all turns out as we hope, this will look like furniture that's been moved from room to room until finally ending up in our bathroom.
While we were trying to make the exterior of the cabinets look polished with clean lines and no joints, but still handmade, we made the interior of the upper cabinets a little rougher. This is typical of older antiques where boards not typically visible on the backing aren't quite even or have small gaps. So we used this approach rather than plywood, which also allowed us to work around the wainscoting and rail moulding of the room in a more effective manner. This way, if someone in the future doesn't want these cabinets in the room, taking them out won't leave a large gap in the room's moulding.
Finally, after painting and reassembly in place, the two components of the build were screwed together, the lower and upper cabinets were secured to the wall to prevent the possibility of tipping.
We could practically see the finish line! At this point all that was left was to finish the lower laundry pull out drawers. This included adding a bunch of venting holes, sealing the interior of the wood boxes, and building the cabinet "doors" that will face these drawers.
The venting holes were the first step. I ended up using a 1" hole cutting saw drill bit and measured out consistent spacing on all four drawers. Ten holes on the back and five on each side. So 20 holes in each drawer and 80 holes total. It's our hope that these holes will allow the dirty clothes in these boxes to breathe and avoid getting stinky. We know we won't be throwing wet clothes or towels in there but the holes are another precaution.
With the holes all finished we sanded the boxes completely, inside and out, up to 180 grit paper. Then we used the same floor finishing sealer and finish we used on our floors in our Foursquare, Pal X325 and Pal X95. This floor finish is the final line of protection against clothing stink issue. It's washable and seals the wood, making it less likely to absorb the smells or water if anything wet sneaks in.
In the process of working on these cabinets, especially because it was taking so very long, we got the drawers painted and even started loading some stuff into the upper shelves. I know we'll eventually place more practical items on these shelves, like extra hand towels nicely folded, but for now a few sentimental items work nicely.
The final step of the project was to build and apply the drawer fronts that look like doors. To build this out I used a router bit set I had for rail and stile doors that matched very closely to the profile the antique buffet vanity has on its doors.
I had to modify the finished boards just a little by taking a small edge detail off with the table saw, which made the assembly a little more difficult. That's what those little shim pieces are in the photo. Those pieces fill in the gap left by cutting off the little bit of extra wood left by the router. Then I used MDF panels in the doors to protect against expansion or contraction of the panel since MDF is so stable.
We finished the door fronts, test fit them in the opening, and there the cabinets sat again..for several more months. Ugh, we were so close!!
Not only did we have other projects to handle, like the living room project at our foursquare, I had hit a mental block. Our other projects were keeping us busy and I wasn't sure how I wanted to attach the door fronts to the large drawers, so I became paralyzed by the decision. This happens to me so often on projects. I typically need a little inspiration from Wendy to jump start the work again, and in this case she was effective in her strategy. She asked for these cabinets to be complete as her birthday gift.
When I finally came around to the decision of how to attach them, it was like a weight had been lifted from my shoulders. I was going to screw from the inside of the drawers into the back of the doors. But that had its own difficulties. It took a ton of measurements and patience because I couldn't mount them with the drawers closed.
After about an hour of work on each drawer, I finally had everything attached and ready to be sanded and painted.
Sanding was straight forward, but was critical to smooth the irregularities left between the joints.
Again, sanded down to 180 grit and we had ourselves some drawers ready for a coat of primer and two coats of paint.
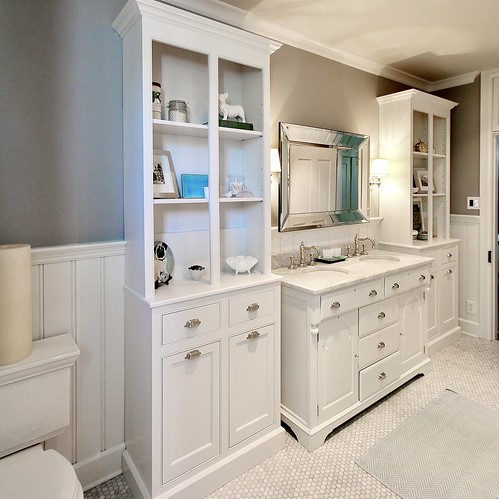
Finally, after nearly two years of on and off effort, we could look at the two large cabinets flanking our vanity and say "they're done!" Well, almost.
Eventually I want to build three pane glass doors for the uppers, but for now my attention needs to turn to more important projects.
We really tried to plan for everything with these cabinets, including making sure the drawers would nearly perfectly accommodate extra rolls of TP, hidden away but easily within reach.
The finished product, inspired by a restaurant napkin sketch many years before, looks just as we always wanted. It feels balanced and offers great extra storage in the bathroom. And best of all, we no longer have a laundry basket sitting behind the door of our bedroom.
As far as the bathroom goes, we have a few very minor moulding details to finish up then we'll call this bathroom project complete for the time being. Of course, we still have other items we'll need to tackle in this room, and most projects are never truly complete, but for us, this long lasting project has almost everything in the "done" box checked.
Interested in how we got to where we are? Check out some of our other posts about the cabinet build.