A few weeks ago I built a thing...and Wendy sort of hates it.
You see, when it comes to aesthetics, Wendy has an innate ability to determine what is appealing, and it's an ability that greatly exceeds my own in the same arena. I like a nicely finished project and will go to great lengths to ensure I’m doing the absolute best job I can. But at times I tend to focus more on function over form, sometimes leaving something to be desired when viewing the finished product. Some would call me practical, but Wendy begs to differ. After all, there’s often a better way that’s also pleasing to the eye.
Need an example? Just look back on the weather station debacle where I mounted it initially in an “unapproved” location. It had to be remedied lest we risk the wrath of the weather station police.
Well, we recently had a somewhat similar situation, but I think the outcome of this form over function aesthetic debate might just end up swinging my way.
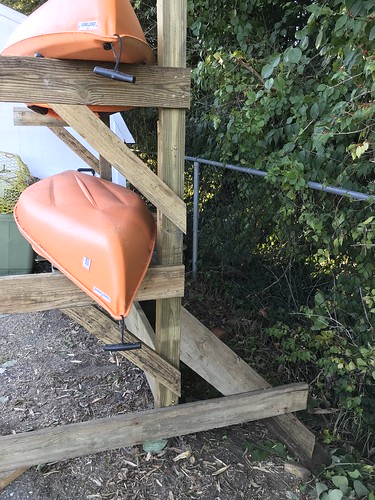
We have two plastic kayaks (yes, the same ones used to change the weather station to a more acceptable location) at our Foursquare house. We can launch them right into the water next to our dock, they’re a ton of fun for us, visitors, and Lulu, and we very well may be adding to them by getting a tandem kayak next year.
The problem with these kayaks is that they don’t have a home. When they aren’t in use (which is most of the time) they sit in the way. They sat on our porch all last year.
Once we painted our porch they sat in our yard most of this year.
And in the winter last year we left one on the porch and put the other in a room inside, which is weird and cumbersome to deal with. Unfortunately, they are just too big for our shed.
So...what to do?
Well, over the last few years I’ve been collecting wood that has washed up in our yard during high tide periods. I always had this grand hoarder-esque thought process of “I should probably keep all of this because I’m totally going to use it one day.” While this was my justification, the voice in my head worried I was just being delusional and had taken the first steps on the very slippery path of filling our house with garbage bags full of Beanie Babies, mountains of Restoration Hardware catalogs, and limited edition Happy Meal toys.
I wanted to resist the urge to devolve into a reality TV “most disgusting” clips show where you'd find me debating some host about whether they could throw out an 8" length of grey 2x4, and instead use some leftover wood I had and the driftwood I'd collected to build us something useful. Like a shining beacon of trash, the opportunity had presented itself. Yep, you guessed it, a kayak holder, or a yak rack.
This project was meant to be a quick and dirty, very simple, rustic, and quick build. Did I mention it needed to be quick? I had an afternoon to put it together, and I really wanted to get the kayaks off the ground before all of the leaves began to fall.
My approach to the project was very improvised. I had two 8’ 4x4 pressure treated posts, a spare length of pressure treated 2x12 leftover from rebuilding some porch steps, and a hodge-podge of hoarder driftwood. I also had a bevy if Pinterest images swimming in my head that articulated the basic needs of a yak rack. Essentially that you needed arms to sit the kayaks on, and you have to make sure it won’t tip over.
When it came to tools for the build I wanted to keep it simple. A circular saw, rafter square, drill, nail puller (to remove nails in the old wood so they didn’t destroy my saw blade), level, pencil, and tape measure.
After measuring out the width the posts would need to sit apart from each other at about 7', I tied them together with the 2x12 and several 8” exterior lag screws. This gave me a substantial base that would support the whole thing. I also left the length of the 4x4 posts at 8’, which is what would later drive Wendy to label this a “monstrosity skyscraper that is now the only thing I can see.”
Once I had the basic structure of the frame in place, I turned my attention to the driftwood for the remainder of the build.
I used one of the ragged lengths of 2x6 to attach the two posts at the top of the rack, making a large rectangle that I could stand up on my own to attach the lower support. The key here was my ability to stand this up on my own, without calling Wendy for help. It was an unintentional avoidance of what would have been an imminent veto of the project, but I figured I was being a good spouse by not bothering my lovely wife with trivial details.

I left the top right "rustic," but that detail was removed due to request.
After cutting a few more lengths of 2x6 driftwood for the leg supports, I stood the large rectangle up and secured the supports with about 3' extending in front of the rack, and 2' extending behind. Since the kayaks will front load the rack we don't need quite as much support toward the rear of the stand.
Next I had to begin assembling the arms where the kayaks will ultimately rest. Using more 2x6 driftwood (I'm pretty sure we get a lot of 2x6 because it's material used for dock decking) I began cutting arms that would extend forward from the posts by about 24".
In each case I made sure the arms were square to the posts by using my cheapo plastic rafter square. I really need to get myself one of the much nicer metal and laser etched Empire rafter squares.
While these arms and the four screws I used to secure each one would have likely been sufficient to support the kayaks, I didn't want a situation where they began to sag over time. To brace these arms I used some 2x4 driftwood cut at a 45 degree angle at the top and bottom and screwed them to the arms and the posts.
Finally, to ensure the now very top heavy kayak rack wouldn't decide to tip forward, I cut two more 2x6 driftwood pieces and attached them at 45 degree angles to the posts toward the rear legs. I ended up attaching them only on the back and not on the front to allow for future expansion by way of an additional kayak placement near the bottom of the rack.
Weird camera angle, it's not propped up off the ground in the back.
I finished up the project, proudly marched inside and exclaimed to Wendy, "Come look! I finished up what I've been working on all afternoon!"
Wendy wasn't sure what I had been doing and walked over to the window. I proudly presented my finished rack, and my lovely wife simply said, "It's just so...tall?" I took that as a stamp of approval for a job well done.
The one thing that Wendy did ask was that I remove the jagged rustic detail I had originally left on the top right driftwood support. She felt it made it look too "janky." I felt it gave the whole thing a little character. I conceded and took my circular saw to the ruggedness and squared it off. Wendy was right.
Ultimately Wendy does appreciate that the kayaks are no longer on the ground, but she wishes I'd maybe made the whole rack a little shorter. I wanted to leave room for a possible 4th kayak, or maybe a small shed roof. The jury is out on whether I'll be cutting this down a foot or two to shrink it a bit, or if I'll make some other modifications. But I know one thing for sure, that giant rack is a damn thing of beauty (and honestly, it's not that big).
In the end we have exactly what I set out to build, a kayak rack to store our two kayaks off the ground. Bonus points for having a little room for expansion. Should I be ashamed of my form over function aesthetic that resulted in building an unapproved structure in the sightline of my loving spouse? Should I shy away from my tendency to collect driftwood for future projects for fear of being labelled a hoarder by friends and family? Or should I throw caution to the wind, keep doing what I'm doing, and building the things that my soul wants to build (including giant and debatably ugly but adequately functional assemblies)?
