Sometimes all you need is a little progress to get reenergized and very excited for what's to come!
We're not new to this DIY game and understand the amount of time it can sometimes take to feel like you're actually getting somewhere on a project, but at times it can be hard to remember just how it feels to transform a space when the transformation takes a long time to come to fruition.
Several weeks ago I shared with you my tendency to "convince" us to jump from project to project when my impatience (and feeling we're lacking progress) begins to mount. Though we have several ongoing and long term projects we're working on, I really felt like I needed a quick win to jump start my energy on our renovation. The inspiration to make this switch in priority came thanks to an offering of help from my parents, who offered to do some painting and help us move forward.
With the promise of help we whipped into high gear on prepping our new home's office for painting, and acquired all of the necessary supplies in anticipation of my parents' arrival. When the day came we all piled in our cars and headed to the house with thoughts of paint brushes dancing in our heads. While Alex finished up sanding and doing a final coat on all of the drywall patches, my parents and I began the time consuming task of priming everything in the room.
Personally, when I think of painting I often think of the quick and usually low cost but major impact of change a new wall color can bring to a room. Unfortunately, it's way too easy to forget the amount of time and effort this often takes. Between sanding and patching holes, getting the walls prepped for paint, priming, carefully cutting in around all of the trim, giving yourself adequate dry time, and making sure your brush marks all go with the grain of the wood and do not leave drips, before you know it you've invested many hours with your fingers crossed that you'll like the color when it's done.
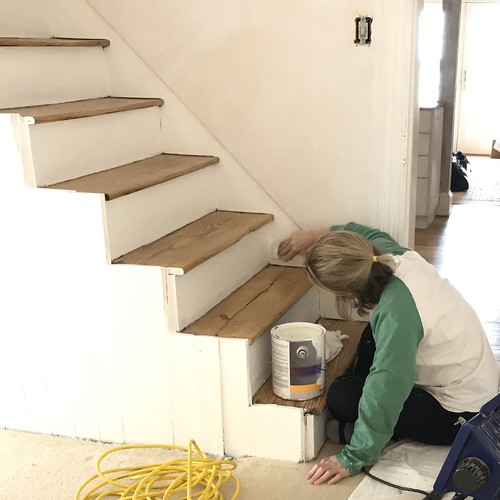
In the case of our office room, we had quite a lot to paint. There was the beadboard wainscoting, the walls, the door casings, the four doors (including nine window panes in two of the doors), the stair risers, and the large built-in cabinet at the end of the room.
But let me tell you about something magical that happened as we started to paint. All of the work ahead of us started to simply melt away as we began to cover that old golden yellow wall paint and stadium mustard brown trim color. It sure didn't hurt that we had my parents in to move it forward more rapidly.
As the primer went on I immediately began to feel a tremendous sense of excitement for what this could become, and this was only primer.
At this point I started to realize just how bad this room has been making me feel. This is the first room we walk into when we arrive at the house, and the last room we leave. And the truth is, I've always really hated how it looked. Stained carpet, dated wall colors, holes in the walls, little natural light, and a weird smell every time we entered the house. It's simply not a welcoming space.
As we continued our efforts to prime and paint, all of those less than desirable traits in the room slowly gave way and the room began transitioning into what may become my favorite room in the house (at least for the time being).
We painted with my parents well into the night, covering every surface in the room in a coat of high hide primer, and even started on the first coat of trim paint on the casings, doors, and wainscoting.
My dad was set up in the room upstairs to work on all of the built in's shelves, doors, and any other removable pieces that needed to be covered.
I continued working with my mom in the room to cover the beadboard, walls, stairs, doors, and built ins.
Alex kept working to get everything sanded and patched just before my mom and I would swing through with paint. During the process Alex took a look at the handrail installed on the back stair. In his words, "it was janky." To be honest, I had been focused on the room as a whole and didn't even notice just how bad the handrail was. Once the white primer started going on I saw that the handrail would detract from the whole room.
The whole thing was supported by a 2x4 screwed into the upper stair opening trim and lower panels on the side of the stairs. It was very crooked and swayed when pushed. As a result, it had to go. Removal was a snap and Alex began hatching plans to build a newel post and handrail later.
By the time Alex and I left at 1:00am to head back to Alexandria, we could see it coming together, in spite of the very dim light.
Alex needed to be in the office the next day, but my parents were staying for the week to do a mix of relaxing and painting everything except the wall colors. While we went back to Alexandria to work, we periodically received updates on their progress. Every photo we received made me even more excited to return.
After my parents packed up and headed home, Alex and I headed back to the house to finish up the painting. I have to admit, I was positively giddy with excitement to get back and finish up the painting. Not only was the wonderful surprise of a nearly finished painting project waiting for us, but we were going to get to apply the wall color!
What wall color would we choose? How about Sherwin Williams' "Agreeable Gray"?
It's my hope that this whole house will be calming, welcoming, relaxing, and an embodiment of a waterfront cottage. Therefore we are planning to go with subtle grays through most of the rooms, with color and texture added through furniture and accessories.
Our painting process has changed little through the years. After priming we prefer to paint the trim with two coats first, then we move onto two coats of the wall color, starting with cutting in around the edges, then rolling the field. It's a tried and true process to complete it in an efficient manner and end up with a good looking paint job.
I also mentioned that we're using the White Dove trim paint from Benjamin Moore's Advance line. This is a waterborne alkyd paint and goes on with an extremely high gloss. As soon as we arrived we could see just how wonderfully glossy this trim paint actually is (in spite of the dim light outside).
I had to get a little creative when cutting in at the highest point of the two story stairwell wall since our ladder wasn't high enough to reach.
A little painters tape and a ceiling rolling extension gave me just the reach I needed to get to area where the wall meets the ceiling upstairs.
In addition to painting the room we also started stripping the cast iron strap hinges that go on the small closet door under the stairs. The raw iron against the white time paint should look pretty amazing.
After several more hours of painting the whole room was really coming together.
It was tough to see the color while it was dark outside and the room was primarily lit by the work lights, so we went to bed wondering just how it would look when we woke up the next morning. Much to my delight, it looked amazing in the daylight.
We still had a fair amount left to paint (like a second trim coat on the stair risers, utility room door, and window panes, but the vast majority is complete and I simply love it!
With most of the paint on the walls and trim we started to notice a lot of little gaps and cracks around the room that would need to be patched, like the gap at the back of the built-ins. We solved this little issue with a bit of scrap pine we had on hand.
We also had to carry some of the painting up the stairs since so much of the wall is completely visible. Unfortunately, we needed to create a somewhat arbitrary line where the new paint ended.
After all was said and done we're nearing the end of this little update project, but we still have some pretty major steps left. Specifically, we are getting new carpet installed in the room, Alex still needs to build the newel post and handrail, we still need to finish stripping the hardware and reinstall the closet door, and I need to figure out decor for the room. But these final steps are the part of the process I love the most, and I can't wait to dive in! Oh, and the ceiling fan. Something needs to be done about that ceiling fan.