A back staircase is the stuff of dreams for old house nerds like us, but our back staircase left us feeling a little flat.
As we've been working on our quick office makeover, one of our major areas of excitement had to do with the minor overhaul of the room's back staircase.
More specifically, it had to do with removing that previous handrail, which was equal parts unsightly and unsafe.
We believe this back staircase was once fully enclosed by the tongue and groove vertical 3" strips of wood that now only exist from the stair treads down to the ground. It appears someone at some point opted to cut these off at each tread in order to open the staircase to the room.
Some day we hope to close the staircase back in, and maybe even put a door to the upstairs a few steps up, but that's a bigger project for a later time. In our post on restoring the cast iron closet door hardware, we talked about the challenge of deciding where to stop when doing a "quick makeover" and this element was no exception to this challenge. In fact, Wendy and I passionately disagreed on tackling this element now as part of the "quick makeover" phase. I wanted to hold off until we enclose the staircase and Wendy felt we needed to work on it now to not only improve the look but more importantly to improve the safety of its design. I guess you'll soon be able to tell who won this debate.
The vertical 2x4 at the base of the stairs where the old handrail was mounted was apparently added without much consideration for aesthetics. It was crooked, secured with only one screw at the top and bottom, and the screw at the bottom was too short and pulling the piece of wood it was mounted to off of the stairs.
To make matters worse, the large gap below the too small handrail (which was mounted sideways, by the way), was the thing of parents' nightmares when they imagined their children bouncing below on the way down the stairs and sliding right out of the side of the staircase.
The good news is, due to the shoddy install, it was excessively easy to remove. And once that handrail and 2x4 were gone, the room immediately looked a hundred times better. It's one of those things where it looked awful, but seeing it all the time caused us to learn to ignore it and lose perspective.
After we painted everything we turned our attention to the old handrail replacement. We'd need to build some sort of a handrail suitable for the location, and would need to mount it to a newel post.
Newel posts are crazy things. If you've ever see an old house newel post, look down at the base and realize that it actually extends well below the floor and is secured to the floor joists. This is what lets a newel post at the very bottom of the stairs maintain its stability while people pull and lean on the handrail. And if you're ever looking for a salvaged newel post for a project of your own, make sure you buy one that was removed with this tail piece and not just cut off flush with the floor.
For our newel post, in order to make sure we have enough stability, we needed to secure it up at the 2nd step. This was so we'd be able to screw it into the stair stringer with enough support, and we wouldn't need to cut a hole in the floor to drop it down and attach to a joist. I was worried it would be odd having the newel post start at the 2nd step, but once we held a few pieces up to mock up the look, we felt like it was right where it should be. Much further forward and it would interfere with the flow of traffic from the kitchen into this room.
My plan was simple. I ripped a fir 2x4 down to 1.5x2.5 to act as the core of the newel post. I then mounted this core piece to the stair stringer with several 4" screws to ensure a good hold.
After the core was in place we went with the wiggle test (you know, where you just have to wiggle it, just a little bit) and it felt nice and sturdy.
My plan for our newel post was to create a solid and nice looking but very simple 4"x4" post. Our main staircase newel post is much more ornate...
...but our back staircase is simple and utilitarian. It's a holdover from a time when the back section of the home was the owner's portion to the rest of the hotel. And while we may not be restoring the enclosed staircase at this time, it should still reflect the original intention of its role in the house. So I mocked up a rough view of the newel post for Wendy so she could get an idea of what we were trying to accomplish.
Based on this crude mockup, I received the all clear to proceed with the work.
While the look of the newel post was settled, the handrail is another story. I really struggled with how we should set up the handrail to be both safe and aesthetically pleasing. But in the end we decided to take a cue from the house, which gave us a jumping off point.
The photo above is of the room upstairs from the office at the top of the back staircase. The original railing, in place to keep people from plummeting into the back stairwell, was all we really needed when it came to how we should build the handrail.
I'm not sure how easy it is to tell from the photos, but the corner posts and top rail are made from 2x4's that appear to be original to the house (about 1-7/8” x 3-3/4” to be exact). The top rail is rounded over at the top to make the hand hold more comfortable. And the two lower rails are then just 1" smaller stock by about 2” tall. Ultimately it's a perfectly simple example we can base our design on.
With our plan in hand I was able to use a fir 2x6 ripped to 3.75" for the top handrail. I then passed this through the router to create the round over look we need on the top of the handrail. It's slightly thinner than the original handrail, but should mimic the original look well enough.
For the lower small rail I ripped a piece of 5/4 stock pine down to about 2", which is the measurement for the original lower rails upstairs.
Once I had everything cut to size I was able to mock up the whole thing with a whole lot of clamps and wood not really cut to length. This allowed us to get a feel for the planned staircase handrail and decide exact height and placement.
We had a good 15-20 minute discussion about the ideal height of each element of the stair. We wanted to make sure the handrail felt comfortable and offered safety for people walking up and down the stairs. We also wanted to make sure the lower rail would look correct while offering protection to those shorter people walking up and down the stairs. What we ended up with was an upper rail that was right about 36” off of the stair tread, along with the middle rail just above the half way point. We opted to install one lower rail instead of two under the handrail (unlike the inspiration has) because we felt it would look a little too busy for the space. We also decided on white paint instead of a really dark stain in order to better fit into the room's light aesthetic.
After we settled on everything I used a pencil to mark the exact angle and location where I’d need to cut the handrail. Rather than fooling with a protractor or trying to determine exact angles, the newel post and wall where the handrail was terminating acted as the guide for the correct angle. Then I just had to set the angle on the miter saw so that the laser line matched my pencil line perfectly. This ended up at about 44.5 degrees on one side and 45.25 on the other side. Gotta love old house angles.
I cut the lower angle first, then made small cuts on the upper angle until I had it pretty much perfect. Each time I made a cut I’d check the rail by sliding it into place. All I really needed was a clamp on the newel post to rest the handrail against, then gravity did the rest of the job.
After everything was cut and dry fit the whole thing needed to be sanded. I used the random orbit sander with 80 then 120 grit paper to take out all of the saw blade marks and anything left by the router. Then I went over all of the corners or “sharp” areas with sandpaper to ease all of the edges. This will make the whole thing look like it belongs, like it’s been there for decades, and is well worn from many years of use.
Before installing anything Wendy primed all of the handrail pieces to make the painting process a little easier. While she was priming I was assembling two of the pieces of the newel post with a little glue and a few nails.
For the newel post I had rabbeted two pieces of wood cut to 4” wide, leaving just ¼” on the rabbet. Then I used 1x4 stock pine to make the 4” post.
Once I had the two sides of the newel post assembled I screwed another 1” thick piece of wood to the core newel post piece, then installed the newel post around the core.
The first piece was the side that faces the stairs and handrail. This way I could get it in place and install the handrail with screws from the interior of the newel post, limiting the number of screws I’d have to later wood fill on the outside.
This means that the handrail is far more secure, but it also means that there’s no easy uninstall in the future. If we want to take this handrail out, we’ll need to essentially take apart the whole thing. Good motivation for a future project I guess.
The lower rail was a little easier to deal with. Since the lower rail's primary purpose is safety and won't be tugged on consistency for stability as people go up and down the staircase, we went ahead and nailed it into place in several locations rather than screwing it in.
We were both getting pretty excited as it was all coming together. We felt like it was looking great, it fit really well with the house, and best of all, we were knocking it out in a very short amount of time. And while the first two aspects of this were satisfying, the speed at which we were completing this project seemed to be so foreign that we almost didn’t know what to do with ourselves. Were we really going to complete a woodworking project from built to install in a weekend?
The final step to the build was to determine how we wanted the top of the post to look. I’d planned for and expected a simple flat top that we’d be able to pop into place.
But when we started talking we began discussing a ball, a smaller square top on top of the planned top, or maybe one of the pair of fighting cocks we won at a charity auction. (Long story, but it involved a lot of wine at our table and our insistence of honoring the home's history which strangely enough, includes cock fights on the property.)
I imagine you’ll be disappointed to know that we ended up going with the simple flat top. I know, boring, and way less cool than a fighting cock. Right?
After install all we had left was a bit more wood filler and sanding to make everything smooth…
When I was sanding everything I really made sure to gently round over the corners of everything to really make this feel like an older piece of the house.
Finally, a coat of primer, and two coats of our trim paint, Benjamin Moore White Dove.
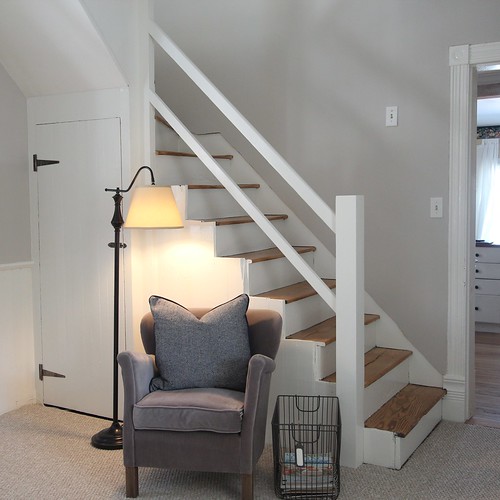
When everything was said and done this newel post and handrail looked exactly as we’d hoped.
It’s solid, sturdy, functional, and gives the room the feel we want it to have. The handrail, newel post, and lower rail are not too busy or ornate and work in this room with so many other wood details without competing with everything.
The handrail and lower guard rail both look like they belong with the upstairs railing and seem nicely integrated into the newel post and the wall where they are affixed.
Mounting it a step up from the stair definitely makes it feel like it isn’t interrupting the flow of the room, but it’s close enough to the lower stair to allow people to easily grab it before beginning to ascend the staircase.
While this may not be the end all, be all for what this room’s staircase will ultimately look like, it is a pretty great looking temporary solution until we get to that point many years down the road. Wendy is thrilled with the handrail and I love that I was able to built it for her.
The fact that it mimics the upstairs railing really makes me wish we were working on that upper room sooner than later. But we have to have priorities, order, patience, etc. So until that day when we can transform the room above the office into something much cooler, this will do quite nicely as a preview of things to come. At the very least, it's a pretty significant change from the before...
...to the after!
We can’t wait to get all of the furniture loaded into this room and everything set up the way it will look for good (or until Wendy starts to move things around). And we also can’t wait to share the full room afters with you once we are happy with how everything looks. But in the mean time, do you think we did the house justice in mimicking the architectural hints given by the upstairs handrail? This back staircase can now officially be considered the back staircase of our old house dreams.