Slow and steady progress across multiple major projects feels quite nice!
But before we get to our "tortoise and hare" style of renovating, we have a few fun things to update you on this week, including a live TV morning show debut!
First off, last Friday was National Dog Day, or #NationalDogDay if you were paying attention to the Internets. It's a day when you're supposed to celebrate your four legged canine's contribution to your life a little more than on other days. But in Old Town Alexandria pretty much every day is National Dog Day.
Our city is so incredibly dog friendly that many stores place water bowls and dog treat trays on the sidewalk near their door, shops advertise their dog friendly stance with "Pet Friendly" signs placed in their window, some restaurants have a "dog menu" for when you're sitting outside eating and your pup is under the table, there are several dog (and cat) specialty stores, there's a local weekly "Yappy Hour" in the courtyard of the Hotel Monaco, and we even have multiple parades where the highlights are either the dog show just before or the packs of dogs with their owners marching during the parade.
If you're a dog lover, you really can't beat Old Town Alexandria, and that was the focus of a live "Great Day Washington" segment for which Lulu was invited to be a model.
Overall we think Lulu is a natural. Perhaps a bit neurotic and at times a diva, but it's the eccentricities that make the best celebs, right?
Beyond Lulu's live television appearance Wendy and I were interviewed for a piece on CBSNews.com that focused on the pros and cons of purchasing old homes. The article was published earlier this week and includes perspectives on the topic from five other sets of old home owners, including us.
You can check out the full "Buying a historic home? 6 owners share the pros and cons" article. We love contributing on pieces like this one as it's one of our goals in life to recruit many more crazies to this wonderful hobby of old home renovation/restoration.
The article covers some valuable insight and information for those considering the purchase of an old homes, and especially those considering the purchase as their first home. And if you currently or have ever owned an old home, it's also a good read to nod along to as you read the likely similar experiences you had along the way.
Okay, that's enough of the other stuff, time to get into a little under stairs storage bench progress.
As of the last post on this subject, we left off with the beadboard largely installed and we showed vaguely how the secret panel would work. However, I didn't do a great job showing exactly what I meant with photos, so I can rectify that today while covering what we've accomplished.
Since the panelling we're using is salvaged from a large pile of wood that's been in the attic for who knows how long, the paint on it is flaking, dirty, and generally gross. Though the final coats of paint are still some ways off, we wanted to get a coat of primer on the whole thing since it's right in the middle of the living space.
This would also give us a pretty solid indication of how it will look when fully painted and no longer a mix of natural wood, dirty antique white, and faded green. I have to say, even with a coat of primer alone it's truly night and day difference.
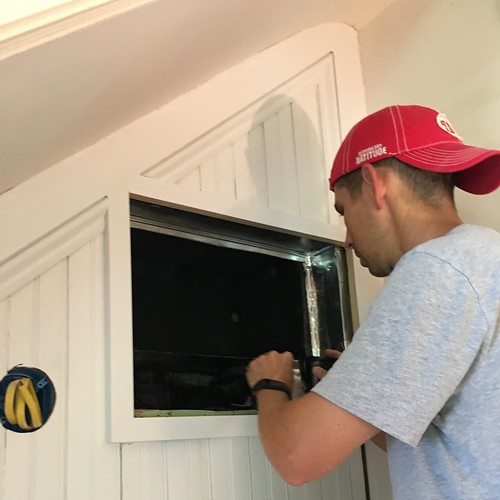
With everything in place it looks like a single cohesive bench and wall. The air intake is fully integrated and the panel is hidden in a way that looks natural. We'll still need to build the flip up bench top so the lower section can be storage, but let's take a second to go over how the panel removal will work. Starting in the above photo we'll be able to remove a piece of the right trim as well as the bench top by pulling it forward slightly and lifting it out. Once it's out we'll remove the interior back of the storage panel.
Then we'll slip our fingers below the removable panel on the back section of the wall.
The final piece to remove is the 2x4 support pieces behind the panels. This is tight in place but can slide out to open the entire area.
All told it's a pretty decent setup that will allow occasional access to the crawlspace when needed, but will look like a normal bench storage area otherwise.
The next bit of work we did on this project was to finish the interior of the storage. While the outside will be painted white, we went a slightly more simple route for the interior. We decided to use the same Pallmann X-325 sealer and X-96 finish that was used on the floor.
Finally, while it's somewhat tough to see in the photos above, the wall and ceiling around this storage bench is in pretty tough shape (as is the rest of the room, but that's a different project down the road). Plaster on the underside of stairs often take a beating because of the vibration of people using the stairs on a daily basis. In our case the plaster near the bottom was almost completely detached and fully separating from the lath. Plaster Buttons to the rescue!
After applying a massive number of buttons to the small space, the plaster was once again secure and solid. No more sag or bounciness to worry about. Now all we had to do was re-plaster the two walls and slanted ceiling of the small space.
I decided to use the same three coat plaster approach we used in the restoration of our living room. It really worked great in there, so why not continue the tradition? We had just enough leftover Master of Plaster base and finish coat to make this a pretty easy task to accomplish, but we'll certainly need to buy more when it comes to doing the rest of the room.
We started by using the first coat of Structo-Lite with embedded fiberglass screen.
But as I was plastering and Wendy was holding the thermostat out of my way she commented on how the wall seemed "bouncy". While I had secured the underside of the stairs with the plaster buttons, but seemed some of the wall had also broken free but I didn't notice. At this point the problem was still very fixable, so I applied a few buttons right into the plaster.
I think it's hysterical when I put buttons in over a coat of plaster because it reminds me so much of the Play-Doh Fun Factory I had as a kid. The plaster oozes through the holes and looks like fake spaghetti.
Once the wall was back in good shape I moved onto the screen application. Now that we've done this a fair amount it's a very straight forward and simple process.
After allowing adequate cure time we moved onto the Master of Plaster base coat application.
I still can't get enough of working with this plaster. It goes on so nice and smooth compared to what I've done with joint compound. But I have to say, that curved section at the top of this photo was difficult regardless of the material we were using. I think about 50% of my entire time plastering was spent making that little curve look nice and smooth. Here's an in progress shot of that curve.
After the finish coat was applied we are left with a wonderfully smooth, crack free, and completely repaired wall and ceiling section.
And if you notice in the photo above, we also painted the interior of the air intake with a flat black paint so you won't be able to see the shiny silver through the antique cast iron grate we're going to mount in the opening.
So that's where we are today on the storage bench. It's really start to take shape and look good. We'll need to caulk around the whole thing once the plaster has cured, build and paint the flip-up bench top, install and hok up the light, and finish work on the cast iron grate. But it is really coming together and starting to look how we imagined it when we starting talking about it months ago.
We can't wait to share more as our work progresses. The more we look at this hallway space the more excited we become. Wendy can't wait to paint and decorate the space and I can't wait until all of the walls and moldings look as good as or better than the day the house was built! Despite a really rocky first year of owning this home, I think the more time we spend improving this house the more we're going to fall in love with it. I mean, what's not to love?
What do you think so far? Is it coming together nicely?