Antique heart pine is amazingly resilient, but restoring it has long been intimidating to me.
Over the last several months we got to see our house's heart pine floors go through a true transformation when they were refinished, but they were largely in good shape already.
But today I want to share a little about the process of uncovering and restoring the heart pine hidden beneath layers of scratched and cracked tiles, old tar paper residue, and plywood on the floor of our first floor bathroom.
The downstairs bathroom at our house has seen a slow transformation since we moved in. The floral wallpaper, wobbly toilet, wonky pedestal sink, and damaged floor have seen better days.
After removing the room's wallpaper, repairing the walls, replacing the light fixtures, exposing "shiplap," removing the baseboard heaters, and building a custom sink top from butcher block...
...we, or more specifically, Wendy, had one additional major thing to tackle on this project, the floor.
She (and I) absolutely hated the floor and it needed to go. It doesn't look terrible in photos, but the 1-1/2" tile covering the floors was badly damaged with major scratches throughout, cracked and loose grout, cracked tiles, and a general dinginess that made it feel like we simply couldn't get it clean. Worst of all, the tile was installed over an insufficient plywood backer, no isolation membrane, no cement backer board, and using glue rather than thinset. It was unfortunately doomed from day one, and there was nothing we could do to repair without completely ripping it out.
We started by removing the old tile and subfloor beneath the sink. We figured this would let us know where we stood and if we could actually attempt to restore this floor.
After a good scraping and sanding we could see the floor looked to be in good enough shape (in this small section) to attempt the restoration through the whole small room.
So we launched ourselves into the demo that consisted primarily of using a pry bar to get under a large row of tile (one or two tiles at a time)...
...and then using the circular saw to cut a channel most of the way but not all of the way through the plywood that would allow us to fracture and pull up the plywood in large sections.
I want to point out here that the installer didn't use thinset or glue between the plywood and original floor, or thinset between the plywood and tile. Both not the best way to go about installing ceramic tile and also fortunate for us. Instead we found a layer of deteriorated tar/felt paper below the plywood, which had ground itself into the wood so significantly it was almost one.
The biggest problem we found when we pulled up the ply was a secondary plywood patch in a rectangular shape beneath the toilet. This explained by the toilet area dipped down, why the toilet rocked, and why it seemed a little softer than the rest of the room. This was also very bad news for our "let's just pull it all up and hope for the best" approach to the project.
Unfortunately, the patch under the toilet wasn't the only problem. Several boards in front of the toilet were badly damaged where it looks like water had snuck in and rusted out old cut nails. Other sections seemed to have been chewed up a bit. Ultimately, at this point we knew we'd need to do a fair amount of repair during this restoration project. It's a little bit of bad luck, but not at all unexpected given that the floor has been used in a bathroom for many years and water has snuck under for quite some time.
So we got to work carefully pulling up the boards that needed to go and coming up with a plan and estimate as to how much replacement flooring we'd need.
I got in touch with Roland from Royal Oaks Flooring, who had acquired some good looking replacement heart pine to patch damaged sections in a few rooms of our house. He pointed me to a wholesaler in the Chantilly, VA area where he gets his heart pine.
This is the sort of place is truly a no frills "pros only" supply house. The have a front desk and a warehouse, and that's about it. While they have signs that say "Trade Only," they were willing to work with me because I knew exactly what I wanted and I had been given their info by a longtime contractor client of theirs. if you find a good supply house for anything, there's a good chance they'd be willing to work with you even if they are trade only, but you need to give them a call to see if they have issues with a non-pro buying something.
From my trip I was able to score a bundle of about 25 square feet of great looking heart pine, most of which were a full 10 feet long. This runs about $6 per square foot and each board is a consistent width at about 3". While the pieces we're replacing are different widths, this would still work for us.
Since the dimensions are different between the old and new we pretty much had to replace full lengths (about 77" each) so each board would be either all old or all new. We also had to do a little shimming below the boards where they met with the old wood since the old boards are about 1/8th of an inch thicker than the new.
So the first step was figuring out just how I was going to lay this new floor to make it look natural against the old. This specifically meant figuring out the widths we'd need and how many of each piece.
Once we had everything laid out I figured we'd need a few pieces a little bit skinnier than the rest. Since all of the new flooring came in the same standard width, I had to rip a few pieces to about 2" wide and then cut a new groove in the board.
I started laying the floor in place, weaving new with old, and face nailing on floor joists as I went. It was less than ideal given the tight spaces, but once we fill the holes it should more or less disappear.
While laying the new wood I had to drop the height of the toilet flange by about 1" since the height of the finished floor was going down by that amount. This was a pretty easy plumbing change and just required we cut out the old below the floor and then splice in a new stub. We'll be able to put the new flange in once the floor is all set and finished.
I also went ahead and added some additional framing reinforcements directly below the toilet and around the waste line. That way the floor is fully supported below the toilet and is fully supporting the toilet. We won't have any more toilet wobble and sag like before.
As I was placing the new boards I made sure to force some gaps between the boards with a pry bar while nailing.
The old boards all have moderate to significant gaps between them, and if we were to butt everything together you'd be able to easily see the different between old and new. Instead, we kept a few gaps between the boards to help them look a little more true to the period of the house.
Once I got everything in place with the new floor, we were faced with some pretty bad damage right in the middle of one of the boards. Worse yet, it was pretty much a focal point on the floor and there's no way we could really disguise it.
Rather than trying to creatively use wood filler or splice in a bad patch of some sort, we decided to cut the damaged piece of wood back by about one inch. You can see where we planned to cut it back to from the pencil line on the photo above. I just used a board to set the cut line I planned to follow.
This required a bit of patience to get it just right, but once the width was trimmed and the new piece was in place, we were very happy we took the time to correct it now with this approach.
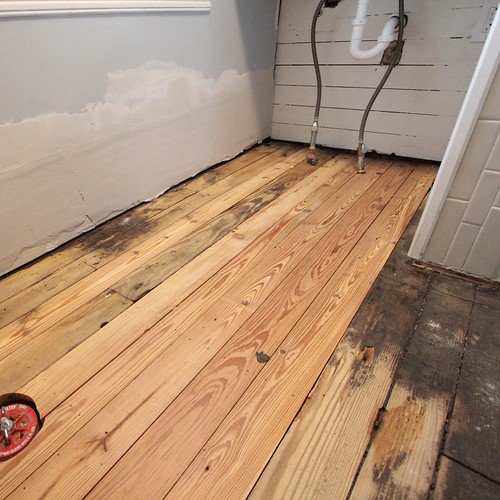
Once all of the new wood was nailed in place it was time to scrape, scrape, sand, and sand.
The dark colored old wood is where the felt/tar paper had more or less become a part of the wood. I could have started sanding but that tar residue would gunk up the sanding belts so quickly I'd have gone through more than a dozen without making a dent. Instead, I started scraping.
Scraping a floor like this is absolutely a full body workout. Before I knew it I was sweating and grunting along and accumulating quite a heap of black dirt. The thing is, this dirt is "valuable." Black gold, as it were. The old floor has great dark dirt between the boards, but the new floor is nice and clean. This black dirt works quite well when forced between the new boards.
Once packed I used a small nail to really force the dirt in place to darken between the boards.
After the floor had been thoroughly scraped I was ready to begin sanding. Looking good, no?
Since this is such a small space we figured we could probably sand the whole thing with a belt sander and random orbit sander. If it were a larger room I surely would have rented some pro equipment. I started sanding with 40 grit paper going with the grain on the old floor and diagonal across the new floor and transitions between old and new.
The diagonal passes really help flatten out all of the new floor and any bumps that pop up, but it certainly leaves a significant number of marks in the wood. So I followed it up with final passes with the grain.
I felt like we sanded forever. Sanding this floor took several hours of effort, all because the stubborn black had seeped so deeply into the grain. Also, the new wood really has a ton of resin that quickly gunks up the paper.
To keep things running smoothly I used sandpaper belt cleaner. This waxy stick can be rubbed on the belt paper and will knock off the resin buildup, saving the paper.
Sanding turned out to be another full body workout. My shoulders, back, and abs were sore as could be for days afterwards.
But after hours and hours of sanding, the room was looking really good. There were a few areas where the wood had deteriorated, specifically along the cut nail line where the rusted nails had also eaten away some of the wood. These areas need to be repaired in some way without cutting out and replacing the boards.
In order to fix this and all of the nail holes in the new boards, we opted for a pretty old fashioned technique. We needed wood filler, but not any old wood filler would do. In order to patch us these sections of floor we needed wood filler made of antique heart pine flooring. While this may seem like a tall task to find this product, the good news is that it's easy to make on our own. We just needed to mix some fine sawdust from sanding with some standard wood glue.
When Roland refinished our floors last year he left a large container of residue sawdust from sanding. I gathered up a little of the dust and began mixing the two parts.
I stupidly ran out of glue for the first batch, so my homemade wood glue was a little too dry. We went ahead and applied it in the various gaps and damaged areas we wanted to fill. I made the cardinal sin when mixing it up, I started with the ingredient I had too much of rather than too little of.
The consistency of the homemade wood filler was weird, to say the least. It was a mix between tunafish, peanut butter, and looked a lot like some of Mel's cat vomit. Who's getting hungry reading this?
We slowly worked our way around the various gaps and holes, packing the custom wood filler in as best as we could. We'll need to get more glue and mix up more sawdust in the next few days, but we're certainly getting close to being able to check this little project off of our list.
We'll need to sand all of this smooth, then fill any gaps with a wetter mix of wood filler. Then we'll need to sand a few more times with finer grit paper before finishing the floors. After that we'll need to add some baseboards, put on some more paint, and build a front for the "cabinet" below the sink. Even with several significant steps left, we're stating to see a light at the end of this little tunnel. But boy does this floor look good compared to what it looked like when we started.