Who doesn't love a project that's quick to complete and offers major impact?
With our new house we've been spending the last year on what seem like massive, slow moving projects. Besides refinishing the wood floors and sprucing up the shed, nothing else in the house really felt like we were actually finishing anything. Completed projects being few and far between made us feel like we wanted a quick and easy win this winter that wouldn't break the bank.
When it comes to quick, easy, and generally inexpensive, there are few more impactful projects than low voltage outdoor landscape lighting. Everything you need is easily purchased, straight forward to install, and you don't need to worry about electrocuting yourself since all of the wiring is low voltage. All you need is a vision, a plan, and a handful of hours.
If you're not familiar with our new house, it's a white clapboard house that's about 108 years old. Its style is a mishmash of four square and late Victorian farm house with a giant wraparound porch. But most notably, its "front" is situated to the back to give it a great view of the water...
...while its "back" is actually the front and faces the road. This means that the road facing side of the house is full of interesting angles and details that surround a nice sized brick patio where we plan to spend many nights around the fire pit.
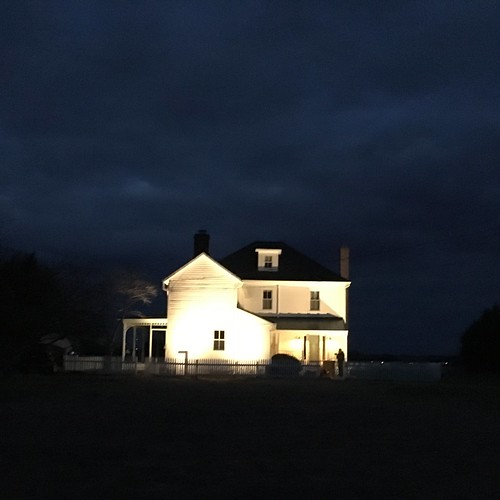
But the thing that's so strange about our house and where's it's located is that at night there's pretty much no light. Once the sun sets it's essentially dark to the road, save for the two farmhouse porch lights we installed last year.
That is until I was working late outside one day back in September. I was putting in a new fence post when it started getting dark. In order to work into the evening I dragged out one of my work lights, then I had a thought, "What would some nice lighting on the house look like?"
I snapped the above photo and sent it to Wendy looking for her thoughts. Turns out, she loved the look! Which ultimately green lit the project and we went into planning mode.
The last time we installed outdoor lighting was in the back yard of our house in Old Town in about 2003. We wanted to put some lighting in at the base of our tress and a few path lights, but this was before LED lighting and energy efficiency, so it's truly a different world now.
That's a spry five year old Mel in this photo from 2006.
Back then our options for lighting required a larger transformer or fewer lights due to the total wattage of lights the transformer needed to drive. Two 50 watt halogen spotlights, plus three 5 watt path lights meant we needed a minimum 150 Watt Transformer for our tiny project. But now that low wattage LED bulbs are available, we could get ten 50 watt equivalent spotlights that each run 7 watts, and still use less wattage than our whole back yard from back in 2003. But the big question has always been, is the higher efficiency worth the cost, and is it really more reliable? More on all of that later. Let's get on with the plan.
In any low voltage outdoor lighting project there are three major components you'll need to purchase, and two major elements you'll need to plan.
To plan:
- What kind and how many lights do you want?
- Where will those lights be placed?
To purchase:
- The Low Voltage Transformer
- The Lights
- The Wire
That's it, it's that simple, just three sets of items to buy and a little work. Alright, let's go over each item and how we chose the ones we purchased.
The Plan
When we were figuring out the type of lights we want and how we wanted to position and lay them out, we decided to look at this as a two phase project. Phase one, to be installed immediately, will include uplighting on the street side of the house. And phase two, to be installed at a later and yet to be determined time, will include small path lighting at various places around our garden walkway.
The reason why this phased approach is important is because it will impact how we run the wiring. If we plan things out correctly we will be able to run all of the wire now while hooking up the lights for phase one, then we'll just need to attach the lights for phase two, no need to run additional wire.
The Purchase
1. The Low Voltage Transformer
The transformer is the power plant that drives your lights and is the most important thing to size properly. In order to size the transformer wattage properly you just need to add up the total wattage of the lights you're planning to use, and then size up the capacity by about 15%. So if your total wattage adds up to 85 watts, a 100 watt transformer will do the trick. In our case we planned on using seven spotlights and as many as 10 path lights. We didn't have a specific wattage number for the lights, but expected it to come in around 70 watts for phase one, 80 watts for phase two, and possibly another 60 watts for future expansion, so 210 watts total. Adding 15% brings that total to about 250 watts. Given that wattage and what is available, we decided on a multi tap 300 watt transformer (with 150 watts per "tap").
Beyond wattage of the transformer, there are a few other features to consider. We purchase a transformer with a light sensor and built in timer that will allow our lights to turn on when the sun sets, and then turn off a specific number of hours later.
2. The Lights
Choosing the lights is probably the most difficult part of the whole process. In our case, we're focusing only on the phase one lights. We simply want seven spotlights to provide up-lighting on the house and illuminate the street side. But this is where it gets tricky. On one hand we could purchase lights that are LED spotlights. However, these lights are a bit more expensive that halogen spotlights, don't allow you to control the light color temperature, and don't allow you to specify the spotlight angle. Rather than buying LED spotlights, we decided to buy traditional 50 watt halogen spotlights, and then picked up 7 watt LED bulbs that are 50 watt equivalent, 2700K color temp, and a 40 degree angle. This would allow us to simply swap out the 50 watt halogens for the 7 watt LED bulb while both giving the control over the details and costing less than the native LED spotlights.
3. The Wire
A lot of people don't really think about the wire and simply get a roll of the 16 gauge wire that is the cheapest in the lighting aisle. However, it's important to realize why you might not just want the 16 gauge wire. If you have an extremely long run of wire and you use a small gauge wire, you might get a voltage drop near the end of the run, which can cause lights towards the end of the wire to appear dim, flicker, or simply not work. In our case I knew the runs would be long at roughly 125' on each of the transformer taps, so I picked up a 250' spool of 12 gauge wire. This will be more than enough to ensure proper voltage can make it all of the way to the end of the wire run.
The Install
When it comes to DIY projects, especially those that involve lighting, the install of low voltage garden or accent lighting couldn't be easier. It simply comes down to running the wire, clipping on lights, and hooking the wire up to the transformer.
For our project Wendy's dad, Mike, was helping me out for the day, which made the whole thing go extremely fast. We kicked off the effort by laying all of the wire out roughly where it would go around the yard. This allowed us to figure out just where we install all of the lights, and allowed us to determine how to make the best use of the wire.
Once the wire was laid out, Wendy's dad started using the spade to push back the dirt from the wood garden border where we could lay the wire.
Since this is low voltage, we don't need to completely bury the wire, but we do want to make sure it's not in a place where it can be damaged. Laying it between the garden border and the dirt is a perfect place, as it won't get hit with a shovel while we're planting, but it's completely hidden and out of sight. There were a few places where we needed to remove a few bricks in order to run the wire from bed to bed, but this was extremely easy as well.
Before I started installing the lights I decided to hook the wire to the taps of the transformer. This was as simple as stripping the wires and putting them under the screw terminals of the transformer. Really, you can't get any easier. Later I mounted the transformer on the wall with the supplied screws.
Once all of the wire was in place and hooked up to the transformer I started placing the lights. Let me tell you one thing for sure, they've made install of the lights about as each as they can be. Each light has a tail of wire that runs to a screw type connection.
You simply place the supply wire in the plastic bracket and then script the contact spikes down onto the wire.
Each light took only about 5 minutes to go from box to fully installed, and it was perfect timing too as the sun was setting and darkness was setting in. This allowed us to position our lights as we installed them.
Light positioning is the most important aspect of the project, having people give their opinion of position while you position the lights.
One thing to note about the LED bulbs, polarity matters. When I first installed the LED bulbs they didn't light up. I thought the MR16 bulbs were either bad or incompatible. It wasn't until a little while later I ended up switching around the bulb just by flipping which pin was plugged into the holder. At that point the bulb started working. Keep that in mind if you are doing retrofit LED bulbs and they don't turn on right away.
As we installed the observers shouted things like "a little to the left," "a little to the right," "now remove that branch that's in front of the light," and other useful info.
If you notice in the above photo, the light on the very left is a little "cooler" (bluer) than the other lights on the house. That spotlight is the native LED spotlight. I decided to buy one to try it out just to see the difference. We'll replace that with the spotlight and replacement bulbs we used elsewhere, but the experiment reinforced exactly why I wanted to use the replacement bulb approach.
The whole project really came together very quickly and truly made a massive impact on our home's curb appeal. The total cost for our project was about $380 all together, which while not insignificant, seems pretty reasonable for the major change it makes to the house. It also felt great that we were able to check an actual project off of our list. The house looks great with all of the light and it feel like it makes our very pretty home really stand out even at night.