Over many years of DIY, we've learned that sometimes even the smallest details that can go unnoticed make a huge difference to an overall result.
Years ago, back when we were renovating our upstairs hallway, we replaced the shiny gold polished brass light fixture that once adorned the ceiling with something a little better suited for our style and decor. We don't have any great photos of that original light, so this is the best we can dig up.
We bought the new fixture from Restoration Hardware and loved that it mimicked the shape of our hanging bell lantern in the first floor hallway while retaining as much hallway headroom as a flush mount fixture. It was the perfect solution for our difficult lighting decision.
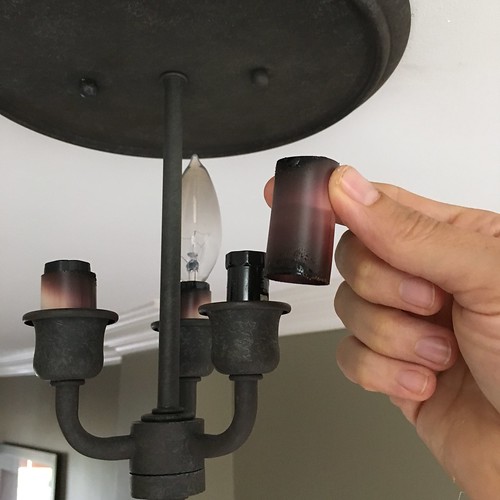
As the years have passed we noticed that our use of traditional incandescent 40 watt candelabra style bulbs (the wattage suggested by the manufacturer) seemed to be burning the white plastic sleeves of the fixture. At first it was a little off-white, then brown, and then recently they turned very black.
From this little bit of evidence, it was obvious that the bulbs we were using were getting extremely hot and burning the chandelier sleeves.
Upset the sleeves were looking so very bad, and worried that allowing this to continue could cause damage to the fixture (or worse), we decided it was time to do something about this pesky eyesore.
The first step in the process was to determine a way we could reduce the heat made by these bulbs without reducing the amount of light the three lights put off. Until we could effectively limit the heat in the fixture, we'd end up in this same spot again, looking at blackened sleeves in no time.
To accomplish our goals I moved to using three LED candelabra bulbs with the vintage "filament style" design. In this case I used Kodak brand bulbs in a 2700k color temp. I like the design of these bulbs since they look very similar to traditional bulbs, minimizing the size of the base where the LED electronics are housed. (Some LED bulbs have a much larger plastic base.)
Commenter, Kelly, asked a good question about whether or not you can use LED bulbs in enclosed fixtures. Since this is an enclosed fixture we need to use LED bulbs that are rated for use in enclosed fixtures. I ordered two types of bulbs, one type is a Thinklux brand that's rated for enclosed fixtures, and the other is Kodak, which is not rated for enclosed fixtures. After I installed them and wrote the blog post, I realized I'd swapped them after reading Kelly's comment. So now I've installed the Thinklux upstairs in the enclosed fixture and the Kodak downstairs in the open hanging fixture. If you have any questions about LED bulbs rated for fully enclosed fixtures, check out EarthLED.com's complete list. This is where we order almost all of our LED bulbs.
And if you're curious, the main problem with using LED bulbs not rated for enclosed fixtures is the heat that the bulb can generate and how that heat may damage the circuitry of the bulb, shortening the bulb's overall life.
These bulbs put off just as much light as their incandescent equivalent but run at a fraction of the temperature. In my experience the LED bulbs remain cool to the touch for as long as they've been in use, whereas the incandescent bulbs are too hot to touch within a minute of being turned on.
Once the bulbs were replaced we could get started on the next step of this quick fix. Since candle sleeves just slide over top of the candelabra bases, replacing them is extremely easy. With the new bulbs in place, I measured the distance from the bottom of the light base to the lower section of the LED bulbs.
Since most LED bulbs have a plastic or metal collar at the bottom of the bulb that can vary in size (the bulbs we chose have a metal base of about 1/4 inch), I wanted to be sure we could cover this with the candle sleeve.
I determined we'd need a 2" candle sleeve to cover everything that needed to be covered. Again, this 2" size is possible only because we're using lower operating temperature bulbs, otherwise it would burn the sleeves even quicker if they were up closer to the glass of the bulb.
Rather than simply replacing the sleeves with another set of white plastic sleeves, I wanted to take a bit more authentic route. And by authentic, I mean wax.
I've used these beeswax style candelabra sleeves for projects in the past, so I know they are good quality and look great. With my size in hand I ordered six beeswax candle drip sleeves in white (three for upstairs and three for the downstairs light).
These sleeves give the light fixture a slightly more natural look as if it were a dripping candle. But most importantly, it does it without any need to really modify the fixture. You just slide the old sleeve off of the fixture, and the new sleeve on.
The sleeves are a bit fragile since they are wax covered plastic sleeves, so they arrived well packaged and individually wrapped, ready for install.
Installation is as simple as it gets. I had already removed the old burned sleeve, so now I just had to take off the bulb, slide on the wax sleeve...
...and screw the bulb back into place.
As far as DIY goes...this isn't even worth mentioning on the difficulty scale.
Not more than five minutes after opening the package they arrived in we had ourselves a light fixture that was free from charred plastic sleeves.
After reinstalling the glass bell on the light and turning the bulbs on, we couldn't be more pleased with how great it looks with the new sleeves installed.
This is certainly a case where we don't expect anyone to ever stop and say, "Hey, it looks like your light fixture lights are real wax." But at the same thing we feel the wax sleeves add to the overall look in a way that looks more the way it should. We really like how the wax sleeves look and feel they subtly add to the overall aesthetic of what we're trying to do with our house. But most importantly, we also hope we'll never have a situation where someone at our home will stop and say, "Do you know that your light fixture's candle sleeves look they they've been burned? Is everything okay?"
Have you ever used the wax candle sleeves in one of your lighting projects? Does this seem like something you'd do on one of your projects or do you prefer the more traditional plastic sleeves?