Though progress has been slow, we've got ourselves the makings of a pre-sorted hidden laundry hamper.
Until now, we've kept all of our to be washed laundry in a large metal and fabric hamper that we bought back in 2000 shortly after we moved to DC. Since then we've thrown all of our dirty clothes into it in a heap. And since we renovated our bedroom and started our bathroom project, that hamper has been tucked behind the bedroom door, almost as if it was trying to hide away because it knows its days are numbered.
That old hamper has served us well, but we've wanted a better solution for quite some time. For our new hamper, our hopes are clear.
- We want our hamper solution to offer an integrated approach to our life, where the hamper essentially hides in plain sight.
- We also want to stop wasting time each week by sorting our laundry and piling it it the middle of the bedroom on the floor, instead having reserved areas for each type of laundry load so we can pre-sort our loads and just grab and go.
- And finally, we want the hamper to tell us when we need to do a load of laundry by holding only enough clothing for a single load in our small washing machine.
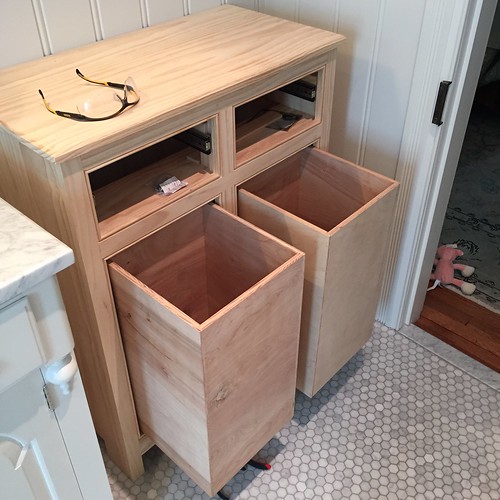
As you may remember, we've been building two custom cabinets on either side of our master bathroom vanity. While these will look like somewhat traditional tall cabinets that offer a bunch of extra storage, our plan from the beginning was to use the lower cabinet area to serve as our laundry hampers.
I'm responsible for the laundry in our home, and I have four different types of loads when I do laundry. Whites, warm colors, cold colors, and delicate colds that hang dry. If you'll notice, the two cabinets we're building have four large lower cabinet openings that just happen to be the perfect number for our load types.
We've debated how we want to handle this for some time, and for a while we thought we'd build the hamper containers as tilt out doors. But the more we thought about it, the more we felt we could do something that might work a little better.
I picked up four sets of fully concealed undermount KV 12" drawer slides and started building our custom hamper drawers. I had to build up the mounting locations of the slides a little bit but I could see it coming together.
The most important part of this whole endeavor is the measuring and planning of the drawer/box size. The drawer slides come with detailed instructions that feel a little like trying to decipher a treasure map. There are measurements and tables all over the place, and if you study it long enough it will tell you the exact dimensions of the drawers you'll need based on the opening, and exactly how to trim and cut everything to make it function properly.
I decided to build the drawers out of simple 1/2" birch plywood. While the cabinets are all pine, the fully concealed hampers don't need anything more than simple. Once I had all of my measurements figured out based on the test mounted drawer slides, I decided to cut all of the pieces for the hampers at once to reduce the need to change saw blades several times.
It was a pretty straight forward process. First I set the saw and cut each of the pieces of 1/2" plywood to size. I stacked each of the 4 side pieces for each hamper together and kept them organized by unit.
Next I cut the pieces of 1/4" plywood that will make up the bottoms of the hamper.
I had to cut the relief for the drawer bottoms since the 1/4" plywood was smaller than my dado blade can cut.
After all of the pieces were cut to the correct dimensions, I switched over to my dado blade to cut rabbets on the edge of each piece to form the boxes.
Cutting all of the wood for the four hamper drawers probably only took about an hour total, which was way easier than cutting and building each drawer one at a time. I also decided to go ahead and sand all of the pieces with 120 and 180 grit paper to knock off any fuzz. We're not sure how we'll finish the interior or exterior, but whatever we do we'll need to sand, and it's much easier to sand before assembly.
Assembly was also a snap. I used glues on the joints and the brad nailer with 1-1/4" brads to assemble three sides and bottom, then finished off the last piece with the same brads.
Before I knew it I had four matching boxes waiting for the undermount hardware. The rabbets on the edges made the assembly a snap and each box was nice and sturdy.
The most critical aspect of the undermount slide mounting involved cutting notches where the drawer slides extend beyond the back of the hamper boxes. This careful measurement is outlined in the slide's instructions and must be made exactly as outlined.
I really should have cut these notches before assembly, but I didn't think about it. Instead I ended up setting the dado blade to the right height and just ran the whole box upright over the blade to make the cuts. It wasn't ideal, but it worked out pretty well given that I did it all out of order.
If you notice the little pencil mark above the notches, that's another important piece of the slide mount. The slides have a little hook that goes into this hole to hold the whole assembly in place. The hole needs to be in a specific place to make the slides mount properly. To make the whole I used the drill bit they specified and marked the max depth with a piece of painters tape. This ensures the hole is deep enough based on the instructions, but doesn't go through the back of the hamper drawer.
The interesting thing about undermount slides is the fact that very little hardware actually gets mounted to the drawer itself. The slides are all attached to the cabinet and the only thing that's mounted to the drawer are the clips at the front of each drawer that hold the whole thing in place.
The clips mount with just two screws in each clip into the front of the drawers. Gravity does most of the rest of the work once the drawers are in place.
Before mounting the slides in the cabinet, I placed one where it will sit on the bottom of the drawer to get an idea of how the slide really works. It's cool to me that the hardware is so complex and significant, but it's designed in a way that you really don't see it once it's installed. In this photo, the bottom is the front of the drawer, and the top is the back.
I built the hamper drawers with the idea that I'll attach finished drawer fronts to them later. So I had to account for this while mounting the slides. I mounted the slides about 3/4" back from the front location so I can attach the drawer front and have everything match up nice and evenly when I build the fronts.
As you can see above, I left the back of the cabinets open as there are outlets in the wall that I want to maintain access to. If we want to do some integrated LED lights in the upper cabinets, I'll be able to plug them in behind the lower drawers since there's a decent gap behind them.
After mounting the clips to the drawer, and screwing the slides to the interior of the cabinets, all that was left was to place the hamper drawers on the slides to test it out. But I ran into a problem. I followed the instructions exactly, but the drawers wouldn't quite clip in. In order to make it work I had to use a needly nose plier to make a slight adjustment to the drawer slides. I bent the hook on the back upright just a tiny bit to give me an extra 1/8" of play, which let me clip the drawers right into place. Sometimes you just need to get a little creative.
Once in place we were able to test out the drawer's action. It was smooth, crisp, and the soft close feature of the slides works perfectly. The full extension also means that the drawers will be more accessible and easier to pull the laundry from the bottom.
I even tested out capacity of one of the hamper drawers. As it turns out, each hamper drawer will fit almost exactly one full load of laundry for our compact washer. This is perfect. It means that when a drawer is full it's time to do a load. And now that it will be pre-sorted, I can easily pull the load I want to do without the need to pick through everything. I was a little worried the drawers would be too small, but they turned out to be the exact right size.
In the above photo I actually had the slides mounted too far back by one set of screw holes. After I took that photo I moved everything forward by one spot and it's all right where it needs to be.
We still need to build the drawer fronts, as well as the smaller upper drawers and fronts, but we're well on our way to the dream of pre-sorting laundry. We'll probably put little labels on the interior of the drawer to remind us which drawer is which, but once we use it for a few weeks I'm pretty sure it will be an automatic when it comes time to put our clothes in the hidden hamper. It makes us giant nerds, but we really can't wait for that day.