When you think of a house on the water, what are some iconic furniture elements that immediately jump to mind?
If you're like us, you can't think of a water house without mentally adding a few Adirondack chairs to the porch, pier, or around a crackling fire pit. And when we bought our new house last October, one of the first accessories we wanted to pick up was a great set of adirondack chairs to fulfill our stereotyped ideology of what our house may eventually become.
Yes, we enjoy putting the cart before the horse, but you likely already know that about us.
While I wanted to hand fabricate all of our chairs, custom building them from lumber and plans, possibly after I felled my own tree and rough sawed it with a giant two man crosscut saw...by myself, Wendy convinced me this was a ridiculous idea given all of our other projects. For some reason she wanted chairs sometime before 2035. Ridiculous. Instead, after extensive research into the various options, Wendy found what seemed to be a good set of self assembled folding Adirondack chairs that didn't break the bank and had the look we wanted.
The chairs in question are the Merry Garden folding Adirondack chairs. They are unfinished and each is made up of about 30 individual pieces of fir. The main thing that was particularly appealing about these chairs is the fact that they arrive unfinished, which means the world is our oyster when it comes to their color and look. And their price is very reasonable, especially given their complexity, weight, and style. I think the only real reason they aren't three times the cost is due to the fir used to make the chair, rather than a more expensive cedar, cypress, or ash.
The reviews on Amazon are mixed with some negative comments about the overall durability of the chairs, which does give us a bit of apprehension. But we had a good feeling about them, so we decided to pull the trigger.
Back in November we bought several of these chairs as my birthday present, and they've been patiently waiting for finishing and assembly in a dark corner of our basement. Now that summer and porch settin' days are upon us, we've been putting some time into getting these bad boys ready.
The whole process started several weeks ago when I gave every piece a quick once over with sandpaper to smooth some of the big fuzz or splinters. There were a handful of Bondo'd areas where large knots have been filled, and those also needed a little bit more sanding, but there weren't too many we had to deal with.
Once sanding was complete, Wendy painstakingly painted each piece with a oil based primer. It was a torturous endeavor that made her hate the essence of life, but the idea of using oil based here is simple. Painting each piece individually before assembly ensures full coverage. And using an oil based primer will go a long way to keeping the weather (primarily water) from getting into the unprotected parts of the chairs and warping, weakening, or damaging them.
The oil primer takes a little while to dry, but it's well worth the added time in the amount of protection it offers and how much smoother it can be applied.
To apply the primer Wendy used a smooth foam roller to get good coverage while not leaving any significant brush marks in the finish.
After the primer was all done Wendy set up a spray area in the yard to apply the finish color that Wendy had spent the previous four months obsessing over. Then, without warning, it started raining and Wendy was left running everything back into the house. And this began our difficulties with this project.
First things first, we wanted a perfectly smooth and glossy finish with whatever color we chose, so we decided to use our Graco airless sprayer along with a small tip (313) to give us that beautifully smooth finish.
The color we opted for is the same as the new front door color, Wythe Blue from Benjamin Moore. We also decided to use their relatively new "Advance" line of paint, which gives a very high gloss look that resembles an alkyd paint, but in a water based formula. In the little experience we've had with this paint, I'm a pretty huge fan. I think I want to use it on the house's interior trim as well.
Now, this is where the story starts to get a little interesting. On the day we chose to paint the pieces outside the weather couldn't have been better. No wind, nice sun, a constant 67 degrees. You simply can't ask for better painting weather.
I got everything set up by laying some plastic in our too tall grass, then laying a couple of 2x4s to act as support rails for the pieces.
At this point I started to screw around with the paint sprayer. I don't know if you've ever worked with a sprayer, but it takes some effort, to say the least. The whole process to get painting is like 16 steps and I'm always paranoid I'm making mistakes or screwing things up, so I read the instructions repeatedly. After all was said and done we were ready to go and feeling good.
I started spraying everything and it was going well, but it was using up a ton of paint. The small 313 tip was really not small enough and I probably should have been using a 211 tip instead. We put the first coat of paint on one side of two of the chairs and then decided we should set the pieces for the other three chairs up and paint them all at once.
A little while later we had all 150 pieces of five chairs all over the place in neat little rows and I was steadily painting while Wendy was holding the hose and making sure I didn't drag it through any of the freshly painted pieces. It was all going so well until Wendy said, "Oh man, we're really going through the paint."
She was 100% right. The 313 tip was giving a lot of overspray on the plastic which was just wasteful. We had already gone through half of the gallon and we'd only finished one coat on one side of the pieces. I had wanted to do three coats on all sides. To add insult to injury, it was 5:15 on a Sunday, and the nearest Benjamin Moore store closed at 5:30...and it is 23 minutes away...Womp Womp!
We decided to just power through and get as much on as we could. Rather than try to flip the boards, we decided to go for two good coats over one side of all of the pieces. Then we could carry the pieces in on their wood supports and allow them to fully cure.
We wrapped up the paint sprayer, called it a night, and headed back to Old Town. A little defeated, but we had a plan of attack.
The next day I was working from home and I started my day bright and early so I could knock off early afternoon. At lunch I picked up another gallon of paint and headed back out to the house to finish off this project fraught with adversity.
When I got there the weather was far from ideal. Windy, cooler, and a bit overcast. I finished my day working and by the time I was ready to start getting set up to paint, the sun was starting to break through.
I wrestled with the plastic and made what seemed like a million trips to and from the house to get everything laid out. This was not an easy one person job, but the first coat had gone on so very nicely that I was excited for the end result.
I had everything in place and started spraying the second side of the pieces. Each coat took about 5-10 minutes and then I'd retreat inside to work on whatever else I could find while that coat dried. I was spraying even and thin coats, so the cure time was probably only about 30 minutes.
After applying three solid coats to the second side and allowing a cure of about an hour and a half, I decided to assembly the first back and seat. I excitedly put it together and then looked at my handy work, only to see another issue presenting itself.
I'm not sure if you can see from the photo, but there were distinct lines in the paint from the 2x4 supports. I had apparently sprayed the top sides of the chairs first and then sprayed the back sides second, which allows some element of particulate overspray to get all over the underside. This then changed the sheen and texture of the paint, and it made me crazy.
I called Wendy, talked over the options, and then made a reactionary decision. I'd need to flip the pieces that might have these lines on the top sides and repaint a final and third coat on the whole top.
I'd also already assembled the first chair back and bottom, so I cut lots of little pieces of tape to apply over the screw tops so I could just spray the assembled pieces. I thought I was saving time, but in retrospect, I'm really not sure.
As I ran around like a crazed maniac applying another coat of paint and trying to shuttle pieces that were already in good shape into the house, I was racing the sun. Sunset was only about 40 minutes off and I had to apply another coat, let it dry, get it inside, shut down the sprayer, then get all of our materials inside. I really wished Wendy had been able to make the trip with me, but since she was working I was a one man show on this one.
Little did I know we were fast approaching a moment where I had a nearly complete meltdown. I sprayed all of the pieces, applied a coat to the assembled bottom and back, and then began taking more of the pieces inside as the newly painted pieces dried.
Then it happened. I walked inside, was probably in there for no more than 30 seconds, then walked back out to the yard. When I approached the chair pieces I noticed something tragic. A small rain cloud had somehow passed just over our house and it apparently drizzled for about 10 seconds. Not even long enough for me to notice, but enough to rain all over the wet paint on the painted chairs. It wasn't on the radar, didn't give any warning, hell, I hadn't even seen it, but it was there.
I couldn't believe. I lost it. I called Wendy, she answered, and all I said was, "It just rained." I don't think I said much more, other than, "I've got to go." There were little white spots all over the new paint and I melted down. I was essentially out of the new gallon of paint, so there was no applying another coat. I was stuck. No photos were snapped of the issue on account of my losing all composure in the situation.
After my meltdown, I calmed myself, transferred everything back into the house, and then closed up for the night to let it all dry.
Two weeks later we went back to the house and checked in on the chair parts. The painting gods had my back and somehow the vast majority of the pieces had no issues. There are a few dimples on the assembled back and a few of the other pieces, but they're really not bad at all.
With the drama behind us I proceeded on assembling the chairs. Wendy and I created a bit of an assembly line to put all of the major pieces together to help the whole thing proceed at least somewhat quickly. I'd say each chair took about 45 minutes to assemble once I had everything figured out.
It seemed that assembling the backs, bottoms, and arms first, followed by attaching all of the bolt on pieces, was the fastest way to finished chairs.
The main thing I ended up doing that saved me a bunch of headaches later was to re-drill a few of the pilot holes in pieces where I couldn't see clear holes already drilled. The majority already had holes, but there were a few that, had I just put the screw in, would have surely cracked some of the chair pieces.
Also, while the company supplies a rudimentary wrench for assembly, using our drill as a screw driver and a socket wrench set made much easier assembly of the bolts and nuts.
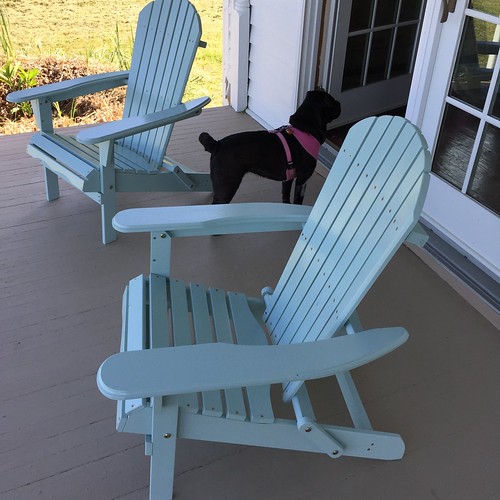
When all was said and done, we had our Adirondack chairs placed wonderfully on the porch. We have eventual plans to use them in the front garden around the fire pit, but since we're light on furniture at the moment, we plan to move them around to wherever we'll enjoy them most.
Wendy and I immediately enjoyed a few cold drinks while also enjoying our beautiful view. And we also really enjoyed the scale and look of the finished chairs.
If I were doing them all over again I think I might choose to roll them rather than spraying them, but that's only because of the giant pain I had with running out of paint and then the rain.
But from sitting in the chairs, moving them around, and collapsing them into their folded position, they seem sturdy and sufficient. I know there are concerns on Amazon regarding their strength, but it seems a non-issue for the chairs that we received. Granted, we've not had any substantial use thus far, but so far so good.
Our preliminary thoughts are very positive. And though they were a bit hard to paint, that was our own fault, and they weren't hard to assemble or enjoy. All in all, we didn't save much money buying the unfinished chairs when you factor in time and supplies, but they're the exact color we wanted (and now match the front door of the house too).
At the very least Lulu absolutely loves them, and I think we're going to have a whole lot of nice evenings enjoying these chairs in our house.
Do you have any Adirondack chairs that you really like? We'd love to hear your experiences.