The last several months have been nothing short of a massive effort to get our house back in shape.
The whole house freeze last February forced us to put ongoing projects on hold and focus on hiring people to do the HVAC install and replace all of the plumbing in the house. Once we had both of those items nearly wrapped up we turned our focus to refinishing the floors, I don't know, because we can't help but blow up any project to make it even larger and more overwhelming!? But with the floor completely finished, and only in need of final inspections on the HVAC and plumbing, we're nearing the finish line on these major undertakings.
However, before we can get the final inspection on the plumbing we needed to wrap up a couple of loose ends on the project. While we hired a plumber to replace all of the lines in the house, it's our responsibility to hook up or replace many of the various fixtures. Specifically, we had to install toilets, replace a few badly leaking faucets, put a new filler on the clawfoot tub, install a new water heater and overflow lines, and to build a new sink top in our first floor bathroom.
Do you remember our first floor bathroom? You know, the one that looked like this when we bought the house?
Then looked like this when we did a quick refresh.
Then looked like this after we had to destroy the joint due to the plumbing work.
Well, we decided that since things always seem to get worse before they get better, why not make it way, way, way worse?
We decided the pedestal sink had to go. The sink was installed off center, the tile behind it was very oddly installed, and we had to tear out all of the tile on the back of the shower wall in order to replace the plumbing and shower control valve. So we figured, hey, why not build ourselves a new sink that fits very nicely back in this nook?
Then we realized there were horizontal boards were hiding behind the drywall, sort in a shiplap look (though they're actually tongue and groove boards). With a little help from our friend, Sarah, she and Wendy took out their aggressions on the old drywall and exposed a paint and adhesive covered wood clad wall one afternoon.
Okay, now that we'd reached the extent of our disaster on the walls of the bathroom, it was about time for us to start putting things back together. I started by cleaning up that wood on the walls by getting rid of the adhesive ridges and any flaking paint. My goal wasn't to strip everything, it was just to make the surface suitable for a few coats of paint.
While I was at it on the walls, I also gave the floor a little sanding to see how it would clean up. Our plan is to pull all of the tile up in that room after our exploratory surgery on the floor showed us there's antique pine under the cracked tile and plywood. Here's the before:
And just look at how amazingly the floors sanded out in the after. There's a lot of patina and areas with minor damage, but it will definitely look great when we do the whole room and finish it like the rest of the house.
At this point I began focusing on the sink. Over a year ago some of our friends gave us a 11" wide and 6' long length of extra butcher block from Lumber Liquidators they'd used on their kitchen renovation. Wendy and I wanted to use this length of butcher block to build ourselves a bathroom vanity.
After measuring the opening I cut two lengths of the butcher block and biscuit joined them together to make a large solid piece of counter for the sink.
We chose a small size inexpensive drop in sink that seemed like it would fit in the space nicely. It was about $40 and is only 18" front to back. Using the included template I cut the hole necessary for the sink.
The thing that's really nice about a drop in sink is the fact you don't need to worry too much about getting the hole perfect. If it were an undermount sink I would have taken a lot more time to make a template, rough cut, use a router, and then sand the edges to get it all looking smooth. But with a drop in, you just rough up and place.
I cut the sink top a little large to give a little room for error. This was immediately apparent when I attempted to slide the sink top into place.
So I had to make final cuts with the circular saw once I had final measurements. I tilted the blade ever so slightly to make the bottom of the sink top narrower than the top. This would allow it to tilt into the opening while maintaining a good tight fit.
We'll ultimately make a door front to create a vanity "look" below the sink, but there's no need to build a full cabinet box. Instead I just placed support pieces on the wall and back that the sink top will sit on. I'll be able to just secure it with a few screws and gravity can do the rest of the work.
Once we were happy with the fit of the sink top, I prepared the sink top for finishing. The first step was to sand everything with 80 then 120 and finally 150 grit sandpaper. I also used the sander to round over the edge to give it that typical butcher block looks.
Next up Wendy started the finishing process. We decided to use the same finish that we chose for our floors, Pallmann's Pall-X 325 sealer and Pall-X 96 water based finish.
The sealer really brings out the great color in the wood...
...and four coats of the water based finish in matte will work to protect the wood.
While allowing a sufficient dry time on the topcoat, we turned our attention to painting the wood and new drywall. First we primed.
But the stuff on the wood kept bleeding through. Wendy went ahead and painted to see how it looked, but it was coming right through the top coat.
We weren't sure how we'd effectively block the color from bleeding through, so we started looking through our paint cans. That's when I came across our can of Kilz Max.
Funny story here. This isn't a full can of paint, it's a can with a tiny sample can of paint inside of it. Kilz sent us this free sample to test out along with some marketing materials a few months ago. We didn't have an occasion to use it immediately, but our issue at hand seemed like a good time to give it a try. So I ended up applying it to the wall and hoped for good results.
Low and behold, it seemed that the majority of the bleeding color was staying behind the primer. The lower section could have probably used another coat of primer, but since it will be below the sink and behind a door, I didn't bother taking the time.
After the primer dried we put on two coats of white trim paint, White Dove from Benjamin Moore, and were thrilled that the stains stayed hidden behind the stain blocking primer.
After the paint dried, and we applied the Wales Gray on the walls and turned our attention to the sink. The first step was to install the faucet and drain on the sink before mounting it. This allows you to make sure everything is secure and correct without having to crawl around on the floor.
I first worked to reinstall the light fixture we bought and installed last year before ripping the bathroom apart for a second time. I figured I'd be more likely to jostle the sink if I tried that second, so the light came first.
Mounting the sink was about as straight forward as it could be. I just ran a bead of 100% silicone caulk around the sink edge and then dropped it into the hole I'd cut earlier.
I allowed the caulk to cure for several hours before hooking up the water supply lines.
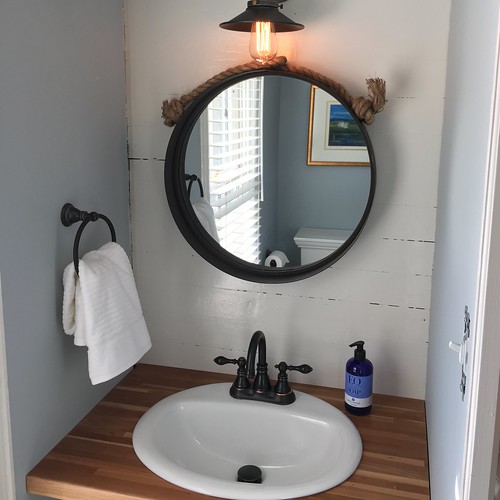
Finally, we rehung the mirror that kicked off this whole bathroom refresh oh so long ago.
We still need to put up two pieces of trim on the back sides of the vanity, build the vanity doors, and pull up and refinish the floor in there, but it is all really coming along. The best part, the whole vanity will only end up costing about $90 between the sink, faucet (part of a full bathroom package from Overstock, including a TP holder, towel bar, and towel ring for only about $70), and a little wood and supplies.
We can't wait to get this whole bathroom done and get onto the next step of taking up the tile. It may not be the end all be all of this bathroom renovation, but it sure will make a huge improvement until we eventually get around to doing the bathroom...for real.