We've reached a critical juncture in our vanity transformation project, and I'm super excited about it.
Though we've been discussing our adventures in tiling, the delivery of our marble a few weeks back put us in a great position for moving our vanity project along.
As we've grown weary of our tiling efforts, the unfinished vanity, sitting just a few feet away, began calling to our DIY ADD, "take a break for just a minute and pay some attention to me. I just want to be functional. Is that so wrong?"
No, vanity, it's not wrong at all.
As we've discussed before, we've had our bathroom hardware since purchasing it during the Restoration Hardware bath event in the spring...of 2009. It's been patiently tucked away in the basement, just waiting for the day it would be called upon to perform its duty.
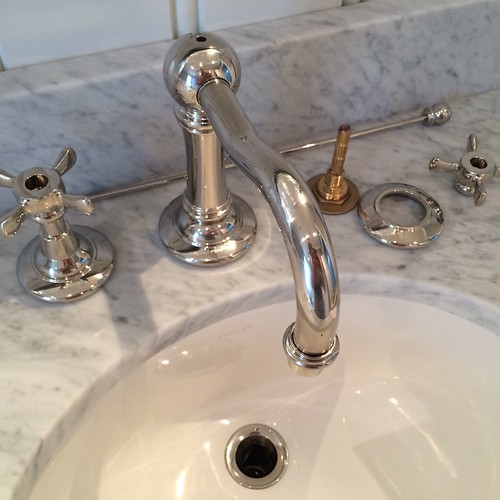
Well, this past weekend that day finally came. We broke out the glorious polished nickel 8" wide spread "Vintage" style faucets we'd purchased long ago and got to the install.
We'd chosen the Vintage style due to their classic looking cross handles, porcelain buttons, and raised neck. While it's not our absolute preferred look, and we both like the lower profile faucet necks, this is an instance where form over function simply doesn't make sense. We will use these faucets daily, and it's much better (in our opinion) to have more room below the faucet to fill glasses, wash hands, brush teeth, or whatever else that's necessary.
The marble guys had placed the 8" on center holes in the marble using a standard 1 1/4" hole saw, but the rest was on us.
Here's our faucet when we did a quick test fit after the marble was placed.
Given the instructions that accompany the faucets we purchased, one would assume this install is pretty much a "no brainer." However, the faucet instructions do little to illustrate just how one might fit their hands in a tiny little space to tighten the various connections, or how to properly orient the crosses of the control handles to ensure perfect symmetry from side to side. Let's just say there's no Ikea style cartoons showing me just how I should be attaching everything.
As a result, I feel this warrants a little "this is how we did it" example of getting from here to there. My hope is that it will save someone their knuckles or sanity in the future.
When installing a faucet like the one we're using, you have three primary pieces.
- Faucet neck
- Hot Supply Valve
- Cold Supply Valve
Anything else in the box is either functional or decorative and related to these three items (unless it also contains a sink drain assembly, in which case that's rather self explanatory).
It's best to start with the faucet neck install as that will set the basis for the rest of the project. The threaded pipe that drops through the vanity top is thinner than the typical vanity hole, so this allows you a little play to make sure you have the faucet centered and where in needs to be in relation to the sink drain.
I like to use a small level from the center of the faucet mouth to ensure a plumb line from the center of the opening to the center of the drain. Once it's set, I apply the locking ring to secure the faucet neck.
Since we're using marble rather than a mount to a porcelain sink top, I don't need to worry much about over tightening the brass locking washer. As a result I use a large adjustable wrench to really crank down the connection to ensure no movement.
The faucet we're using has a rubber ring around the base, so I didn't use any plumbers putty to keep water out. But if it didn't have that ring, I surely would have used some.
The next step is my most significant deviation from the installation instructions. The instructions tell me to apply the faucet TEE to the bottom of the faucet assembly right away, followed by install of the valves, and then the supply lines. But that will make the supply connections nearly impossible in the confined space between the sink and the back of the vanity.
Instead, I begin making up my connections before installing the TEE. This allows me to tighten all of the connections between the supply lines and the TEE without needing to lay on my back and work my handheld wrench into the tight spot beneath the vanity top.
After the TEE connections have been made, I then make the connections to the faucet valves, again all before install beneath the sink. If you've ever been stuck on your back hanging out of a vanity or sink cabinet, holding your head at a weird angle and straining your neck to get an adequate vantage point to see what you're doing just enough, lucky if you can get a 1/8 turn on your wrench to tighten your compression fitting...you know what I'm talking about.
At this point it's much easier to wrangle the whole assembly into place, first sliding the faucet valves into their holes and holding them with a loosely applied washer...
...then moving the TEE into position and applying the necessary plastic and rubber washers, and finally the nut that holds the whole thing together. Because I assembled everything above the sink, I only had to wrestle with this final nut, rather than the whole mess of supply connections.
One other tip with this piece. After trying to get a good angle with the wrench, I switched over to my 1/2" ratchet and was able to make short work of the tightening.
Beyond making the connections from the supply line to the base of the faucet valves, the final critical install element involved ensuring the faucet handles were set at the correct and equal height of 2-3/4" The easiest way to do this is to apply the washer on the top of the valve to get the height right.
Once the top washer is set to the right spot for the desired height, I tightened the lower washer by hand to secure the valve loosely in position.
At this point I needed to double check the measurements to ensure the positioning was exactly the same on both sides, and that it was in the correct position in a single line with the faucet neck.
Once I was totally happy with the position of the valves, I grabbed my wrench and adjustable wrench and tightened the washer to completely secure the valve in place.
And finally, before the valve was completely and absolutely tightened, I tested the orientation of the valve stem by fitting the handle to ensure it could sit perfectly symmetrical with the other handle. At this point, you can still easily make minor adjustments with the wrench.
It's details like this that take a lot of time to make sure are absolutely right, but absolutely pay off in the way the finished product looks.
Applying the faucet handles and valve stem covers are as straight forward as you can get. Just pop on the base, screw on the middle, then push on the handle and tighten a securing screw.
Finally, after all is said and done, there's one final major decision that has to be made.
French or English (Francais ou Anglais)
While installing the faucets I asked the question to Facebook, Instagram, and Twitter along with the following photo.
We had an overwhelming (but very mixed) response with lots of good suggestions, opinions, and feelings on the subject. Well, we ended up selecting English as our choice for a couple reasons, many of which were echoed from the social media contrbutions.
- We like the way the font for the English buttons look. Serif tends to look a but more classic and less modern, and that's the look we want.
- We don't really have any French lean or story in our house. Besides the fact that part of both of our families are from Alsace Lorain, and I can speak in horrible broken French that sounds like a two year old who's trying to learn basic speech, there's no reason to go French. I mean, Alexandria is Scottish, so unless we're doing Scottish Gaelic and the buttons say "Teth" and "Fuar", there's no reason to use another language.
So with that, we popped the English buttons onto their handles and tested out the new faucets with real and actual running water.
It was an occasion, I assure you.
This was a major step in the right direction to a functional bathroom, but it took so much longer than I originally anticipated just to install the faucets. However, taking my time I was able to ensure good connections and a planned install, saving my hands from excessive struggle and the connections from possible leaks. We're not going to allow ourselves to use the sinks until we finish the whole thing, and we still have drawers and doors to alter a paint before we're done, but these are good steps.