One of my absolute favorite aspects of our old home (and many old homes in general) is our house's period and restored architectural hardware.
Since moving into our home we've gone to great lengths to discover and restore period vintage hardware for our home. Whether that means scouring eBay or digging through the extras pile at a salvage yard, we've attempted to leave no knob unturned in our search.
Over the years on the blog we've covered our rim locks at length, including their restoration.
We've mentioned our sash lifts, stripping their paint, and how we've been tirelessly searching for just a few more matching lifts to complete the set.
We've detailed the various hinges we're using on our salvaged and original doors, and the differences between the first floor and second floor hinges (decorative downstairs, simple up).
And we've even showed off the cast iron slide bolt we installed on our vestibule doors and how it just happened to be very similar (in shape and size) to the one likely originally in this same place a century ago.
But of all of the items we've discussed, and of all of the effort we've put into restoration of these antique architectural elements, my favorite, by far, is the work we've done to make our transom windows functional.
When we moved into our home we had four fixed/painted shut transom windows.
- The exterior fixed front transom window above our entry door.
- The interior fixed transom window above the front vestibule door (just two feet from the first).
- The interior fixed transom at the door from our kitchen into the family room, which was once the rear of our house until the kitchen addition was added in about 1900.
- The interior master bedroom transom, painted shut, with hinges sloppily and incorrectly added to the side of the window.
Today we have six transom windows throughout the house. Yes, we've added two. At present, five are restored, four are functional, three have operational salvaged transom lifts, two of those lifts match exactly, and one was completely fabricated in our basement wood shop using salvaged glass. Tooting my own horn here, you'd be hard pressed to pick it out the new one among the others. :toot-toot:
The two we've added are:
- The decorative leaded transom above our stair doorway from our entry hall. Added to fill the large open space, and based on some evidence a transom once existed there. (Yes, it's mounted incorrectly with face mounted hinges on the side because I didn't understand our bedroom transom was not mounted correctly at the time. I'll be fixing that at some point.)
- The transom window (and whole jamb assembly) above our master bathroom door at left. That's the completely new one.
Transom windows, the small hinged window detail that sits above both interior and exterior doors in many old homes, are a great Victorian era utilitarian design element that end up adding a tremendous amount of character to a home. Though they've been around long before Queen Victoria, they gained popularity during the architectural phase that credits her name.
Originally implemented to allow additional light into the usually dark rooms, even when doors were shut, the windows that are functional (which allows them to open and close on hinges) were created to allow heated or cool air to flow between rooms more readily.
Since their inception they've even become part of everyday sayings. Have you ever heard someone say "I'm going to send it over the transom and see what happens," when talking about an idea? This expression has roots in the writers realm, where a writer would throw a manuscript, article, or other work over the publisher's closed door and through the sometimes open transom window, in hopes the publisher would pick it up, read it, and be struck by the work's brilliance. In a way, a blog is actually one giant experiment in "over the transom" writing.
It's been used in many ways over the years, such as in this political cartoon depicting bribery in a 1900 newspaper.
But enough with the history lesson, let's talk about why we're discussing transoms today.
After many years dreaming about this day (no, really, I've had dreams about it), the transom window above our master bathroom door is fully built, installed, painted, and 100% operational. And though I've talked about it once before, I want to cover just how one might go about installing a transom window lift in a bit more detail, as there seems to be a shocking lack of this type of information on the Internets.
Installing a transom lift is not incredibly difficult, but it's a bit tedious. The main things you need to know before putting this piece of salvaged goodness into place are the basic measurements for what you're trying to achieve.
In our case, our ceilings are 9' tall, door is about 7' tall, the transom is about 2' tall, and the lift is about 4' long.
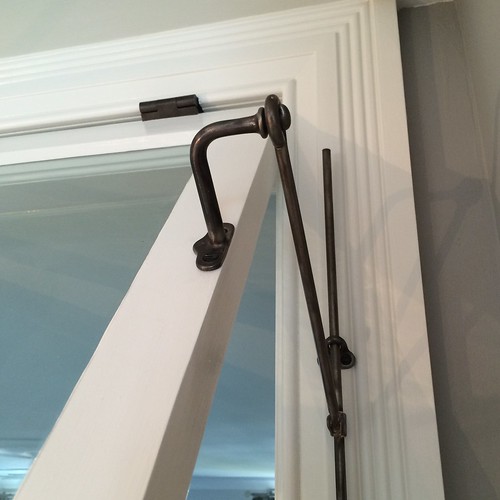
A transom lift consists of several key elements.
1. The spring pinch clasp that sits near the bottom of the lift and allows the operator to set the open/closed position of the lift. This piece mounts to the wall and provides the lower support.
2. The long rod that drives the whole thing extends from below the clasp to near the top of the transom. This rod is supported at several places, but is ultimately free moving.
3. Several supports that mount to the wall at the transom's midpoint and top connection and allow the rod to move up and down. These are often the pieces missing when buying salvaged transoms, so make sure all parts are there.
4. The hinge assembly and lift mount bracket that attaches directly to the transom sash and is hinged against the transom rod. This hinge and the rod's upward motion is what actually opens the transom.
In making our transom window operational, we want to achieve an install where we can open the window to about a 30 degree angle. This doesn't sound like much, but it's plenty to allow airflow without ending up with a weird hatch looking window, or one that's hard to get open or closed due to the weight of the window and its function.
I also consider the height of the window lift's operator (Wendy or me), and what a comfortable mounting height is to allow a person of average height to easily slide the window open.
All told, we chose a mount the clasp of our transom at a height of 50" above the floor. This is roughly the same height as a light switch, so it tends to work well.
If you're trying to mount a lift and need to pick a mounting height that works for your room that doesn't match our room's measurements, pinch the clasp and move the rod completely into the "up" position. This will make sure it's fully extended and you can determine where the upper extent of the rod reaches when in this position. This is important to ensure the rod won't run into the ceiling when fully up.
Once you know where the clasp will go on your moulding, hold the whole assembly in place and mark your screw locations. While continuing to hold it all in place, climb onto a stool or ladder and place the upper support bracket about 1" above the lift's hinge. Then mark those screw locations. Remove and drill your pilot holes based on the marks.
This upper support is one of the rod's guides and needs to be high enough not to interfere with the lifting of the transom rod, but low enough to keep the rod in place when it's totally lowered.
We're using a combination of #4 (for the supports), #6 (for the clasp), and #8 (for the bracket) screws, so pilot hole sizes vary. We pre-antiqued our screws gun blue, making them appear aged and black to fit better with the hardware. You can ready more about that process on our how to antique screws post. I know, gripping stuff.
Placing everything is pretty simple. Just secure the clasp and supports in your pilot holes and you're ready to move on. The middle support piece is still not attached at this point.
Next, pinch the clasp and lower the rod so that the hinge assembly, when collapsed against the wall, puts the top of the mount bracket near the upper support piece, and the upper section of the rod is still within that same support. This gives you the position of the rod when the transom is fully closed.
Climb back up onto the stool/ladder and position the lift mounting bracket against the sash to determine and mark the screw hole locations for the mounting bracket.
When it comes time to drill the screw holes for the mounting bracket, it's best to put a little bit of tape on your drill bit to mark the depth you want to drill based on your screw length. I like to do this whenever I'm drilling a pilot hole on something that I could accidentally punch through the other side on, ruining my day and possibly my life.
Once your pilot holes are in place, simply drive your screws to secure the mount.
The final step is simple. Position your middle support bracket where it will not impede the function of the lift, drill pilot holes, and attach the final support with your screws...
...then take a step back to admire your fully functional transom window lift.
I believe the transom lift hardware is actually one of the more rare items in today's old homes, as they're fairly delicate and many original lifts have been damaged and removed over the years. I've only seen a handful in all of the old homes and buildings we've been through, and most of those are completely painted over and barely or non functional.
I'm very proud to have not only made our transom windows functional, but to have also built such an accurate reproduction of our other transom window that future owners of our home may mistake it for an original elements...at least until they read our blog. ;-)