Or maybe it's re-rope sash, or restring windows, or re-weight with sash cord? No matter, sit back, buckle in, and get ready for a riveting blog post about restoring antique windows! I doesn't get much more exciting. (I'm lying, it can only get more exciting.)

Antique double hung windows are beautiful, there's no doubt about it. I didn't realize this for many years, but after buying our home and falling in love with old homes, the old sash are one of the four truly enchanting elements of architecture I feel set an older home apart from the pack (the other three are their staircases, period doors & door hardware, and moulding/millwork). When I'm drooling over a magazine house, a real estate listing that I can't afford, or a falling down house with "good bones" I just wish I could spend another decade saving, these are some of the primary aspects I immediately look for. And if any of these homes are lacking any or all of these details...they're dead to me.

While I'm an equal opportunity lover of old windows, the majority of my restoration efforts are geared toward the style of windows in our home -- rope and pulley double hung sash. This is primarily because they're the ones with which I'm most familiar and comfortable.

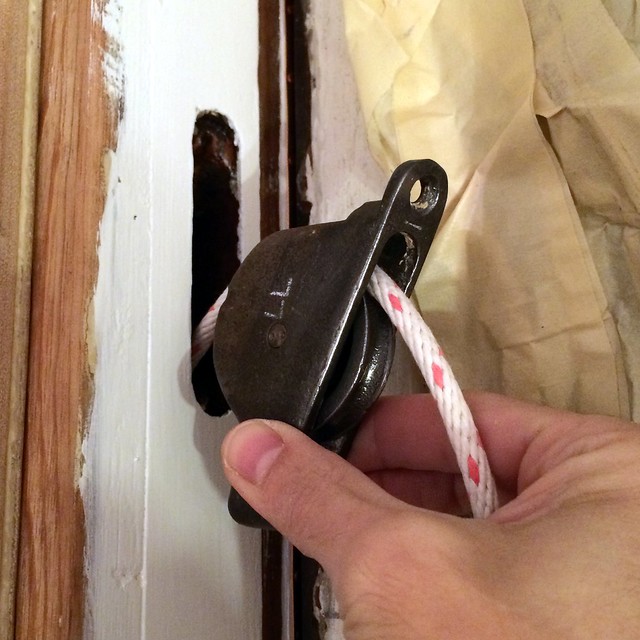
Our style of windows are actually very common in the era of our 1880s home, and in about 50 years in either direction. The style is fairly straight forward and contains two sash, an upper and lower, which are movable and counter balanced by large weights that live in cavities beyond the jambs of the window frame. When the sash are raised or lowered, the sash weights, attached to the sash by cording, travel up and down in the hollow channels, allowing the windows to stay open without any other props or stays. It's a very functional system that works quite well. However, one of the common plights of the rope and pulley double hung sash comes by way of frayed and broken ropes (or sash cord).

After years of use and abuse, these weight cords begin to wear away. They're often painted by careless contractors, snagged by nails or hangers added in incorrect places, rotted by moisture, or just plain pulled on by one too many people. After they've had enough, they give up.

The best news about these weight cords is they're rather easily replaced, but there are a few tricks I've picked up along the way that makes the process much easier.

Replacement Cord Material

The first step in replacing sash cord is to determine the material you'll use in the project. There are actually several different options out there for you, from "in kind" to "long lasting." The truth is, as far as I've been led to believe, each is acceptable and it just comes down to preference.

Typically, you'll consider replacing your rope either with another rope, or replacing it with sash chain.

I actually have a bag of sash chain in our basement as I had planned on using it in the first window I needed to restore, but I ran into a snag. No, not a snag in the project, and aesthetics snag. I saw the chains installed in another home's windows.

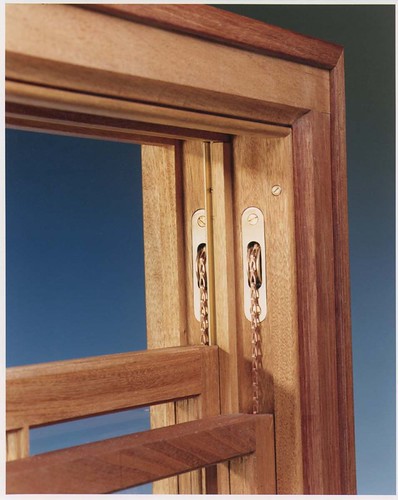
Photo Credit: Wood Window Workshop

I don't know why, but the chains just don't do it for me. When I saw them they looked wrong for our house, and when I opened the window and heard the metal on metal clank of the chain rolling over the pulley, that killed it for me. I thought to myself, "I know the original cord in our windows is, well, original, so why replace it with a different material? It had already lasted nearly 125 years."

So my search began for suitable sash cord to replace our broken and worn cord.

First I found the standard braided laundry line you can buy at most big box home improvement stores. The cord is all white with a nylon/cotton core and is the right size for the sash cord. I thought I had found the perfect replacement, so I went ahead and bought 100' of it and replaced the rope in our bedroom windows.

I was feeling good about my accomplishment, but there was always this little voice in the back of my head saying "that rope wasn't perfect, it didn't look identical to the old stuff. The old stuff had little red dots in it."

I shut that little voice out of my head until one day, when I was looking around online, and came across SRS Hardware, a company dedicated to the historic preservation and recreation of true divided light windows and wood storms. They have a great collection of necessities for people restoring windows, including the elusive Sarco glazing. In their list of products they had EXACTLY what I was looking for...and I mean exact!

They carry a type of sash cord that is made by the same manufacturer of sash cord that was used on our original windows. Same small company, same design, same little red dot. It was a moment of pure, unadulterated excitement when I discovered this source.

It was also a roughly this moment when I once again had it reinforced that I'm an absolutely huge nerd that is able to get tremendous excitement from the most mundane and lame things. Twelve year old me, you grow up to be super lame.

I immediately ordered 100' to use on all of our remaining windows (then I started fighting the internal voice about replacing it on the windows I'd already done).

Upper Sash Restring

With the sash cord in hand I started my restring process with all of the cords, weights, and sash out of the window, and the weather stripping in place. Just look at it, 125 year old compared to new!

If you're following along and doing this project on your own, there are a few minor differences if you haven't completely torn apart your window like I did, but all of the principles still apply.

My first step is to feed the cord trough the pulleys. The upper sash is a little harder than the lower due to the fact the pulley must already be in place since it needs to be there before installing the weather stripping.

However, I only placed the upper sash pulley at this point, leaving the lower sash pulley out for the time being. This allows me to begin by stringing the cord through the first pulley and then grabbing it through the other pulley hole. 

At that point I tape a large drill bit to the end of the sash cord and drop it down inside the cavity until I can grab it through the lower opening.

Now, I haven't mentioned length yet, and that's for good reason. Each window has its own unique measurements, and you'll need to determine correct length as you go. I like to just feed the cord from the rolled up bag before I ever make my first cut.

It's important to remember that the correct function of the sash actually determines the length, and the length of the weight and where the rope attaches to the window plays a role. The rope needs to be long enough to allow the sash to be fully lowered without the weight or knot running into the pulley, and short enough to allow the windows to be fully raised without having the weight hit bottom. You also need to account for the necessary knots you'll need to tie at either ends. This is why I like to figure out length as I go, rather than trying to come up with a formula.

My next step is to tie the new sash cord to the old weight. I grab the weight that I labelled for the upper sash and begin preparing the knot. My goal is to tie a knot that's secure and as much like the original knot as possible. There's a reason why it lasted 125 years. Here's an example of the old knot...

...And here's the completed and new knot, ready for years of service.

Tying the knot is just three easy steps.

Step 1: Run the cord through the top of the weight.

Step 2: Loop the cord around the back of the in-feed piece of cord.

Step 3: Loop the end of the cord back around to the front and through the loop, pulling the knot tight.

With the knot tightly tied, tuck the weight back in its pocket and move onto the next step.

The next step in proper measurement is critical and will make or break your restring. With the weight back in the pocket, grab the upper sash and make pencil mark of where the top of the hole for the rope knot sits on the side of the sash.

Lift the sash up into the window in the location where it will sit when fully closed and use a pencil to mark the jamb where the pencil mark on the sash is. This will tell you where the upper extent of the sash cord knot should sit.

Remove the sash from the window and place the sash back where you were storing it. Then grab the sash cord and pull down until the sash weight lifts up about one inch from the bottom of the weight cavity floor. Full tension from the weight should be on the rope and you should be able to move it freely.

With the weight one inch off the base, use your pencil to mark the rope with two small marks. The first mark is at the line you made on the jamb for the sash knot hole and the second is at the based of the pulley, right where the rope would begin to wrap around the pulley wheel.

These two marks are your primary points of reference for where the rope should end up once fully installed.

Now you can grab your scissors, as it's time to cut. To cut your rope, locate the mark for the sash knot hole and then cut about one foot lower, giving yourself plenty of excess.

Next, tie a very tight knot that is small enough to fit in your sash knot hole, and try to place that knot directly on the middle of the pencil mark. I typically do a simple pretzel knot that I tie as snug as I can. The most important thing is for the knot to be no bigger than the hole allows, i.e. it can't be spilling over or too thick. Test fit your knot, and once you're happy, cut your cord about an inch below the end of your knot.

Attaching the sash cord to the sash is not necessarily a two person job, but two people makes it a lot easier. That being said, I've done this with by myself several times, and I've only almost fallen out of the window once.

The easiest way to do this is to have one person hold the sash while another puts the rope in place.

The original rope installed in our windows was tacked in place by several nails through the sash's rope channel. While this was effective, I want to be able to easily remove the sash in the future when I restore them.

Rather than using nails again, I opt to use a screw, as I can place and remove it when necessary. It feels like I'm cheating a little but, but I really feel like it works quite well. At this point in just using a simple 1-1/4" drywall screw since it's purely temporary.

When I actually put in the sash after restoration, I'll use a #8 stainless slot head screw.

Place the screw right through the middle of the knot and into the sash, but don't sink the screw all of the way. Just place it deep enough to be secure.

Still holding the sash, grab the other rope and place it in the same manner, then slide the upper sash into place.

Take a step back and admire your work. You've just restrung half of your window!

Lower Sash Restring

The lower sash follows a very similar overall process, save for a few small details.

The first change is in how you run the sash cord. Since the pulley doesn't need to be installed for weather stripping, you can leave it out until after you've run the cord, making the whole process of getting your cord in place much simpler. This time, just put the cord through your sash pulley while it's out, then tape a drill bit to the end of the rope and feed it through the opening.

Once the drill bit hits bottom, run the pulley up the cord and put it in place.

Note: If you're doing this whole process but you're not removing your pulleys, you can use a smaller weight (smaller drill bit?) that will fit through the pulley's opening.

Like with the upper sash, it's time to tie on the weights. In our windows the weights for the upper sash are larger and heavier than the lower. It makes sense, since their job is to keep the sash up rather than to simply counter balance as it's raised. So it's important to take note to ensure you're installing the correct weight for the correct sash.

Once I had the sash weight good and secure, I started working on the length of the cord I'd need. Similar to the upper sash, the key here is to get the length of the rope right, but using an opposing approach. With the lower sash you need to be sure that the window can be fully raised without the weight impacting the bottom of the cavity, but it needs to be able to be closed without the knot or weight running into the pulley.

So I grab the lower sash, make note of the knot hole along the side, and hold it in place in the window opening. In this case, like the upper sash, I hold the sash in place near the top of the window in it's fully open position. Once I'm happy with it, I mark the top of the hole on the jamb.

With the jamb marked, I grab the cord and pull down (pulling the weight up) until the weight is just slightly above the base of the window frame. This will be where the weight rests when the window is fully open. I find it's easier to measure the cord length for the lower sash fully open rather than fully closed.

Finally, make a pencil mark on the rope where you marked the jamb for the knot hole location.

In the same manner as with the upper sash, cut the cord about a foot longer than the pencil mark and tie a knot that stops at the line.

Once this was done on both sides, I had my ropes in place and was nearing completion. Letting go of the lower sash ropes should cause the knot to rest against the upper portion of the pulley.

Attaching the ropes to the sash in the same manner as I did on the upper sash and we've for a fully functional window!

It's important to note that I skipped the step of reinstalling the window's parting bead and sash stops as I intend to take the sash out again to strip and reglaze them. I'll tell you one thing for sure, those parting beads sure do offer a tremendous amount of draft reduction. Our windows are super drafty without them.

There you have it, a full (and frightfully boring) step by step guide on replacing your weight and pulley double hung window's sash cords. I was once rather intimidated by this whole project, but now that I've done it on several windows, it's a completely bearable project that I'm excited to undertake on the remaining original windows of our home.

Now that the sash are restrung we have a final few major steps left before these windows can be called fully finished. Lets recap from our window restoration checklist.

  1. Disassembly
  2. Frame Paint Removal
  3. Frame/Component Repair
  4. Weather Stripping
  5. Restring Sash Cord
  6. Storm Window Installation
  7. Sash Removal and Repair (this is a multi-step one on its own)

What do you think? Is this something you're going to put to use in your home? Does it seem manageable to you, or extremely involved and simply too much work?

Comments 49

Comments

threadbndr
1/30/2014 at 2:02 PM

Yeah! This is the part that I most need. My dining room windows have been 'weightless' for several years now. This is 'on the list' for spring. I don't think I'll work on them this weekend as we are supposed to be getting 4 inches of snow here!

Given that you think it's a two person job, I may need to recruit my son to help me manhandle the sashes. I have taken apart the parting beads before so I'm comfortable with that part.

Thanks again for this series. I'm learning a LOT.

Alex
1/30/2014

Great! That's exactly why I wrote this. I know it's not the most gripping blog content, but my hope is that it proves valuable for you and many others. Can't wait to hear how yours turns out. And yes, I think having your son lend a hand while it's not snowing is probably a pretty good plan.

Christine
1/30/2014 at 2:38 PM

Excellent tutorial! And yes, be creative with slim but weighty objects to help feed the cord down into the jamb, such as a length of sash chain taped to the cord and sheet lead wrapped around the cord (because it's flexible). I've used both of those while leaving the pulley in place. Great work!

Alex
1/30/2014

Thanks, Christine! I didn't think of using the sash chain to pull the rope through. I've got the whole bag of it unused. I've got another project where I need to fish some wire in the wall and that may be the perfect solution!

Erin
1/30/2014 at 2:42 PM

man, i wish you had been blogging this about 8 years ago when hubby and I were fixing up a 1932 colonial revival. (we've since relocated to another state and live in a house built in 1969.) we left the old windows in much better shape than we found them, but there was a lot of trial and error involved and i know for a fact we didn't use the proper sash cord.

Alex
1/30/2014

I wish I was blogging about it 8 years ago too! I had the idea to blog back then, but just never got around to it. I still kick myself for not starting this whole thing earlier. Oh well.

April
1/30/2014 at 5:28 PM

Great tutorial! I've been debating replace vs. restore our double hung windows for years, but after reading your blog have decided to go with 'restore.' Thanks for the link to Smith Restoration Sash - is it sad that I was excited to look at everything available?

karen
1/30/2014 at 6:07 PM

I notice that the front façade of your house has 2-over-2 pane windows, while your bathroom window is 6-over-6. While clearly old, do you think it is original to the house or a replacement?

On our Victorian we replaced the "colonial" multi-paned, clearly-not-original windows on the front of the house with 2-over-2 windows, which we speculated were the original style based on other houses in the neighborhood. We retained the old-but-probably-not-original 6-over-6 windows on the rear.

Brendan
1/31/2014 at 4:36 PM

6/6 windows on the rear is a common original configuration. The bigger the price of glass, the more expensive it was. Victorian 2/2 windows were "show-off how rich and sophisticated I am" windows. Cheaper 6/6 windows with smaller glass panes were put on the back of rowhouses where no one could see them. It's really no different from today when a new McMansion puts a brick facade on the front, but vinyl on all the other sides.

Backs of rowhouses were also utilitarin and window glass was more prone to breaking. It's cheaper to replace a small 6/6 pane than a giant 2/2 or 1/1 pane.

Alex
2/3/2014

I think Brendan hit the nail on the head. I'm pretty much certain this window is original, but it's the only original window we have that's 6 over 6. There's another window just below it on the first floor that is 2 over 2, but it's likely due to the desire to present a better appearance on the first floor. First floor mouldings are heavier, etc. It's for this reason we've chosen to add decorative hinges and other elements on the first floor, but more utilitarian items, like simple cast iron hinges, to the second floor.

Robin
1/30/2014 at 7:44 PM

Such a wonderful tutorial. I will rely on it when I tackle my 160 year old windows this summer. Thank you!

Alex
2/3/2014

Great! Let us know how it goes.

1/31/2014 at 10:09 AM

Good touch with the sash cord in keeping with the period of your house. The earliest windows I've seen original chains on were about 1905, though cord was still the most common means of stringing a sash through about 1920 or so. Our windows have original chains that unfortunately are caked in paint. I've got a spool of chain in the basement for when I get around to working on our windows, but I'm going to have to use a darkening solution on it so it will look right with everything else. The "mirror brass" finish that became popular 40 or so years ago does absolutely nothing for me.

Alex
2/3/2014

I know what you mean on the darkening. Nothing sticks out in an old house like something that's shiny and new.

Jan
1/31/2014 at 12:00 PM

"I've only almost fallen out of the window once" is one of the funnier sentences I've read in a blog Alt smile Our house is mid-1960s, so I won't ever have to restring the windows, but we replaced the busted cord in our patio umbrella last summer, and that was enough. Strong words were spoken, bonds of matrimony tested, but it got done. I salute your patience in doing a similar task in many windows!

Alex
2/3/2014

Hah, thanks! Patience is key, especially when you have to deal with having no window during the period of time when this task is underway.

Laura C
1/31/2014 at 1:10 PM

LOL. I can't believe the extent of your dedication to finding replacement parts true to the original. Bravo!

Alex
2/3/2014

Why, thank you, Laura!

Brendan
1/31/2014 at 4:43 PM

I bet that cheap big box laundry line rope you used first would have stretched out eventually to the point your top sash weights dragged bottom and wouldn't close all the way. The Samson spot cord you used claimns their nylon/cotton cord won't stretch. One advantage of sash chains is that they definitely won't stretch.

Alex
2/3/2014

Half of me hopes it does stretch out enough in the other two windows so I have a good excuse to replace it again. We've now transitioned to using this other rope for doing household chores rather than in our windows.

Jan
2/3/2014 at 2:03 AM

All my original windows need new weather stripping and new cords. I have stripped all the trim, sashes, and some of the muntin bars between the panes but I can't get to some of the areas until the sashes are removed completely. There is a company in the area that restores old windows. I might call them and get an estimate and use your procedure as a standard for what I want.

What would you estimate is your cost per window?

Why the red dot on the cord?

How will you paint and not get paint on the cord?

My plan is if the price is right, I'll have them remove the sashes on one day and come back the next to reinstall. Hopefully I would be able to finish sanding, priming, and painting the sashes before they return.

Do you ever use the ability to lower your upper sash?

Alex
2/3/2014

Cost per window in materials depends on a lot. But based on what we've done, spring bronze and sash cord probably work out to about $20 per window. If you have broken panes of glass, the new restoration glass and correct glazing will vary. In our situation we've also done paint stripping and painting, so that's probably another $20 per window. All told, we'll probably spend about $100 per window on materials, including salvaged hardware when appropriate. The major cost is time. I'm probably going to end up putting about 30-40 hours into each window when all is said and done.

The red dot is simply a trademark element for the company that makes the cord. It's their signature design.

Paint is an issue. In our case we painted before putting the sash back in. If we ever have to paint in the future, we'll probably wrap the cord in tape or something like that.

And yes, we open our upper sash often. We have shutters on the lower portion of our windows, so it's nice to keep those closed but open the top of the windows. This will be especially true in our bathroom.

2/3/2014 at 5:25 PM

Thanks for the info. It's looking more and more like I might hire this out just because we are so pressed for time. I wish we could make more warm weather.

Stefani
7/5/2014 at 3:42 PM

Love these window tutorials! I have been doing our 43 windows for the past 10 years. A couple a summer. Other projects get done and I do the windows as we do each room. Stripping and glazing etc each window and casing. It can get pricey fast and I feel awesome knowing i can do it but boy the time!

Richard McCluskey
9/5/2014 at 4:35 PM

So I just finished restoring two double hung windows when I read this about red dot sash cord. That's giving me a powerful itch! I thought about chain or synthetic; there must be something new that lasts longer. But now I know I gotta have that red dot sash cord. But I need some excuse to replace what I just did.

When I replaced some sash cord the windows wouldn't stay open. How could that be? The upper and lower sash had different weights and either I or prior owner mixed them. Either that or they were so sticky before I cleaned and oiled them up, it wasn't noticeable.

Anyway, thanks for the blog.

Dennis Seisun
9/15/2014 at 6:01 PM

Great tutorial. My biggest problem though is trying to replace the pulleys. The sash cord somehow gets off the groove and jammed in the space between the roller and frame. The pulleys in my windows do not have two screws. I've tried prying them out of the opening but no luck. Any thoughts. I'd love to replace the pulleys at the same time as the cord. Thanks in advance.
Dennis

bob maull
4/22/2015 at 11:02 PM

Where do get the sash cord with the red line in it.I live in the Burlington on area.please reply
Thanks bob

Robin
9/13/2015 at 5:27 PM

Thank you so much! I viewed a number of videos on sash replacement and even bought a book on window restoration but your info was far and away the most useful and detailed. It gave me the confidence to take on our badly abused front window. It took a while and required a new bottom rail and glass in the upper sash but once we got that done (by professionals) we were able to successfully replace the sash cords. It actually works now! Thanks!!!
PS I also found it useful to use tape to wrap around the sash cord and string and then feed it thru the pulley. That worked best for me.

10/31/2015 at 7:45 AM

i read your complete blog its very wonderful.You describe in detail about hard restoration.I am justin smith.My company also available all types of window products like sash lcok,pulleys.

3/8/2016 at 7:09 AM

Hello Wendy and Alex,

I was delighted to see that you gave my company a shout out in your re-roping sash entry. I just wanted to let you know that we haved changed our name and have built a new website: http://srshardware.com/

Best regards,

Justin Smith - owner, SRS Hardware (formerly Smith Restoration Sash)

4/6/2016 at 10:37 AM

If you pull the rope so the weight is all the way at the top, then clamp a vice grip down on it it makes attaching rope to sash much less "exciting". Also, my rule of thumb is to attach the rope to weight, pull the weight up to the pulley then with the sash sitting on the sill, cut the rope a little short of the sash cord hole for the upper sash and about 2" longer than the hole for the lower. Works every time, except for arch top windows.

Alex
4/6/2016

Hi Alison! Thanks so much for commenting. I'm a big fan since seeing you on This Old House a few seasons back. Thanks to your episode, I'm going to be building myself a steam box when it comes to restoring and reglazing my sash. Great tips on the clamp to secure the cord. It has been a bit unruly when trying to do it my just holding it in place while balancing the sash.

Renate Bob
9/8/2016 at 2:00 PM

I'm trying to do this on my own ( am an 87 year old widow with sons too far out of town!). I've been able to attach the cord to the weight of the lower sash. ( though I was told by a contractor that this would be too hard as the weight was behind a plaster wall) I'm nervous about getting the right length of sash cord. I appreciate the tutorial, but am not sure if I'll be able to follow the directions.
I live in Jamestown NY and would prefer to have someone help or even do this job. Any advice would be appreciated.

4/11/2016 at 4:08 PM

Hi. Would you be able to give me the name of someone in my area that does this? I live in Wellesley, MA 02482 and have 3 windows that need to be fixed. I would really appreciate any help.

Thank you.

Amelia Bortolotti
4/11/2016 at 4:10 PM

Hi. Would you be able to give me the name of anyone in my area that does this? I have 3 windows that need fixing. I live in Wellesley, MA 02482.
I would greatly appreciate any help at all.

Thank you.

Eileen
4/22/2016 at 11:26 PM

I cant tell you how happy I am to have found your site! I bought a 1920's English cottage style brick bungalow and have spent the last 4 months restoring it. Your window advise will save me a lot of trial & error as I replace the worn sash cords! Thank you SOooooo much!

June
5/19/2016 at 3:14 PM

Where can one buy wood parts to replace rotten sides of sash & cord windows not the beading and not the looser parts which hide the cord mechanism but outwith that
Many thanks

Steve
7/16/2016 at 2:31 PM

Hi Alex,

I've read your wonderful posts on window restoration and weatherstripping.

I was wondering if you chose to do anything to make a better seal at the meeting rail between the upper and lower sashes? Over time the wood shrinks/expands unevenly so there's always a gap there even when the sides of the windows are sealed.

AJ Pasquariello
1/4/2017 at 10:48 AM

I'm a contractor and I have to say I cringed a few times....
1- only use sash cord! I use #8
2- tip- use beaded chain to guide cord over pulley and down
3- use nails, not screws, to affix cord to sash. screws will tear the rope and it will prematurely fail at that point. You want the nail to go in between the threads instead of creating a hole. (also a sewing principle)

Cheers!

Anonymous
11/13/2017 at 12:32 PM

Hello,
Wonderful site!
My windows have a metal hook attached at the bottom of the parting bead. Anyone know what it was for and if I should remove it? I'm working on window number 2 of 13,
Thanks
Ann

BillM
11/15/2017 at 5:47 PM

One note on the cord. While it looks identical to the original stuff, and is indeed made by the same company, Samson Rope, est 1878 by JP Tolman, member of the first graduating class of MIT, the formulation is likely different (and better).

The current samson spot cord contains a nylon core covered by cotton braiding, including the famous red spot. The nylon core makes the cord stronger and less stretchy, but was unlikely to have been included in the original cord since nylon wasn't invented until right around WW II.

I too have been redoing all of my windows with #8 spot cord, but ran a bit short with 2 windows left. Amazon was suddenly out of stock so I went to a very good, very famous old hardware store here in my west coast city, sample in hand.

When they showed me their plain white cotton sash cord, I spat with an indignance that startled me even, "I don't want... that!"

It's now back in stock at amazon and I have another 100 ft hank on the way.

Kim
2/8/2018 at 1:12 PM

I don't know how I got here today, I googled something, and now I'm here because I'm a nerd like you who loves fixing things and learning how things operate and seeing these old windows piqued my interest.

We sold our 1920's Tudor last year and no longer have the old double hung windows (that I loved) in our new home, but before we sold I had to replace a lot of these broken sash cords. It really isn't that difficult to do once you get the hang of it. After a couple windows I mastered it and it went pretty quickly, and I got about 7 windows done in a weekend while my husband was at work. Not bad. It's doable on your own but much easier with a second person to help.

It's also much easier on non-painted windows vs painted since the trim is easier to remove, but luckily for me it was just our bathroom windows that were painted. Also, my windows were slighltly different in that I had an access panel in the window frame that I had to unscrew to get to the window weight. Once I opened it I could access the window weights, albeit in a very narrow space. But there were a few times I had difficulty getting that sash rope to feed through the pulley properly, I should have tried the chain method. The sash cord kept going up the window frame rather than down.

I can see this process being difficult for someone with larger hands, but my hands were tore up a bit and wearing gloves was not feasible for the amount of room I had to work with.

For the visual people out there, There's a YouTube video I followed that demonstrates a method easy to follow in terms of determining your rope length... but the general rule of thumb was this:

Once you've fed your sash cord through the pulley and secured it to the counter weight, Pull the cord down so the weight is all the way at the top as far as it can go. Now you drop the weight about 1/3 of the way down and secure the sash cord so it won't travel any further (I used a large safety pin on the sash cord to prevent it from feeding through the pulley any further).

Now you measure:
measure the distance from that point of the rope (where your safety pin is secured) down to where the knot will go in the window, in other words, you are measuring the top of the window down to that knot hole where the sash cord secures.

Use that measurement and with a magic marker, mark that spot on the sash cord. That mark is going to be just above your knot. Now Add an inch and a half to that measurement and that's where you cut the rope.

Then you make your tight knot, making sure your knot doesn't go beyond the mark you made with the marker.

Cut off any excess fraying from the knot - you don't want any excess rope or potential fraying to extend outward interfering with the window traveling up and down the frame. Ask me how I know.

Now put your rope in the window track, tuck the knot on the hole and secure it with a small brad nail (use a nail with an ample nail head so the rope can't slide and travel off of it). This also makes it easier for the next person who has to remove that nail, it's going to be easier for them to grip.

Put your window back in place and test it before reinstalling any trim pieces.

If replacing a broken sash, may as well replace the other side too because it's probably at the end of its life cycle. If we hadn't sold I would have replaced all of them.

Fun stuff.

I bought cotton window sash cord but I'm curious if nylon cording has a longer life expectancy?

2/11/2018 at 4:28 PM

We create antique style etched glass for windows and doors. Our designs are created directly from old glass, but we reproduce them on tempered glass. Available in a variety of patterns and almost any size you need to fit a door. We can also take the pieces of an old broken window and re-create it exactly on tempered glass.

Cathi
8/14/2018 at 7:36 PM

What an excellent tutorial!!! I've been searching for how to deal with an upper window that had fallen and was jammed 3" from the bottom of the window ledge. All the other YouTube videos and tutorials addressed the lower window, but not an upper window that had fallen. This was just what I was looking for!!! And as a 64-year-old woman with no one to help me, this was a lifesaver! Thank you, thank you, thank you!!!!

Hana
12/8/2019 at 8:00 AM

My ex-boyfriend dumped me 6months ago after I accused him of seeing someone else and insulting him.I want him back in my life but he refuse to have any contact with me.I was so confuse and don't know what to do,so I reach to the internet for help and I saw a testimony of how a spell caster help them to get their ex back so I contact the spell caster and explain my problem to him and he cast a spell for me and assure me of 2days that my ex will return to me and to my greatest surprise the third day my ex came knocking on my door and beg for forgiveness.I am so happy that my love is back again and not only that,we are about to get married.once again thank you Dr akwuke spell you are truly talented and gifted.Email:[email protected] is the only answer.he can be of great help and I will not stop publishing him because he is a wonderful man [email protected]

gil tchulsky
3/14/2020 at 5:01 PM

I need a set of rope, pulleys,alifting handle and a bolt.For a guillotin window.
Thanks!

Max
9/27/2020 at 12:11 PM

Great blog! I am looking to purchase a 1950's home with double hung wooden windows, and they all need new cords, new paint, and storm windows removed and replaced- My question is: how much time is involved with removing and replacing the ropes and weights? I need to write an estimate for my loan. Are you stripping the sash units to bare wood, and what is the turn around time for that process? Any help is appreciated! Thank you.

Felipe
11/8/2020 at 12:12 PM

Just wanted to say thanks for this detailed tutorial! Just replaced the sash cords of an 1890s San Francisco victorian and I'm so happy with the result. I finally don't have to use a piece of wood to keep my windows open Alt smile

Lin Brown
6/18/2021 at 11:14 PM

I really enjoyed your article. There was a lot of insightful information. The reason that I was looking for information about rope windows is that I bought an old home that has the old rope windows. However, there is no hardware, and I cannot find any place on the sides that will come off to access the weight. I don't know how old the house is so I am not sure if these are the original windows. I love the windows and absolutely hate to replace them with vinyl, but that might be only choice. Can you recommend any other way to spot the access if there is one?
Thanks so much!

Since you've not signed in yet, you will need to fill in your name and email below. If you have a Facebook account, save yourself a step and use Connect to login.

Denotes a required field.

Please enter full URL, including http://

You can use Markdown syntax in your comment. And you can also use lots of Emoji!
  • Search

  • Login
  • Follow
  • Advertising

If you're looking for information on advertising and sponsorships, head on over to our sponsorships page. You can purchase site sponsorships in a few easy clicks. 

Toolbox Tuesday
Open Housing
  • Popular Topics
  • Comments
  • Blog Roll
  • We're Featured!

Old Town Home has been featured in the following places and publications:

The Washington Post
 
Washingtonian Magazine
 
Domino
 
Old House Journal
 
 
Apartment Therapy House Tour
 
Washington Post Express Feature
 
Home & Garden Blogs
 
© 2024 OldTownHome.com. - Privacy Policy
Login Below
or
Sign in with Facebook
Connect

Unexpected Error

Your submission caused an unexpected error. You can try your request again, but if you continue to experience problems, please contact the administrator.

Working...

Working...