With two of our big three questions related to our major siding project answered, we were feeling good about the project that had loomed to large over our lives.
- What kind of siding should we use?
- What additional tools will we need?
- How am I going to do the work all the way at the top of the house?
Determining both the siding design and material, as well as the tools that would allow us to actually apply it to the house, felt like massive steps in the right direction. In fact, knocking out the first two items from the list somehow gave us the foolish yet necessary gusto to throw caution to the wind and march ahead, not knowing how or if we'd actually solve item #3...How the F@$& are we going to get all of the way up on the side of the house? A really long ladder? Yeah, that's a recipe for disaster.
Rather than addressing this critical issue, we just sort of decided we'd go ahead and start the bulk of the project, and we'd worry about the remaining question at a later time.
We've already given you a bit of a glimpse into the start of the project. But just to recap, because the true glory of our siding can only be experienced in photos, I'll give ya'll a brief catchup summary.
We thought the siding was rotten.
Turns out we were more than right. Beneath that thin and cracking layer of paint it was damn near destroyed.
We knew the only real option was to remove the old and apply the new, so I started tearing into the house, removing the horrible old compressed board to expose the seedy underbelly of our home's grotesque exterior.
But the problems only mounted as I removed the crusty exterior layer on our home, revealing a layer of asphalt faux brick known as Insulbrick (just learned this in the comments only the other day).
The faux brick was probably applied sometime in the 1930s - 1950s, and had been doing what it was good at, trapping moisture inside the walls, so I was very concerned with what I might find underneath.
In true old house form, I wasn't disappointed (or perhaps I was) when I discovered our home's original pine board sheaths hiding under the asphalt, rotten right through in several locations. At one point I pushed on the wood and some water actually dripped out...and it hadn't rained for at least a week.
Frustrating? Yes.
Disgusting? Check.
Shocking? A little, but surprisingly, not really.
Annoying? Yep.
Fixable? You betcha.
Though I was able to put my finger through the worst sections of sheathing, especially those along the corner board and area where we'd long had water issues, I knew I could do something about it.
The worst section of rot was on the lower level and extended from the ground on up the wall about 10 feet. I knew there was nothing we could do to save the rotted wood, so I grabbed the circular saw, set the depth to be exactly the depth of the sheathing, then cut out the old rotted areas right along one of the framing members of the wall.
If I were doing this over again, I'd probably have used the plunge router and staggered the cuts back a little further and weaved in the patch, but this got the job done. I then nailed in a bunch of new pine boards with the same dimensions of the old to give myself some new sheathing on which I'd be able to nail the new siding.
Another thing I should have done, but failed due to...immaturity...inexperience...perhaps foolishness, was to give myself larger gaps between each board. I made them too tight, which gave me a weird gap at the top. I ended up ripping a board to fill the gap, but it means I didn't leave much expansion/contraction room between each board. Not a big deal given the size of the boards, but it was a learning experience.
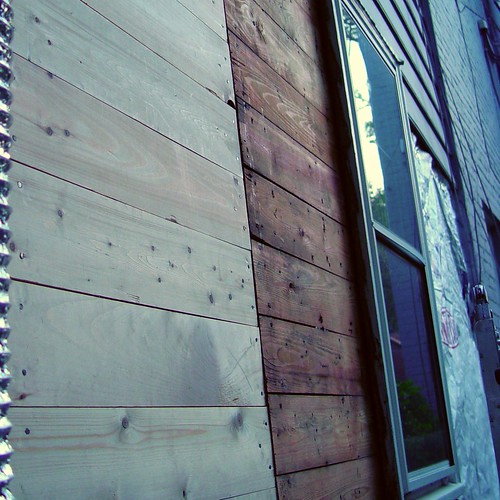
It's amazing how much cooler the old growth pine looks compared to the new.
I went through the same siding removal on the upper back portion of the house. It wasn't difficult given the lower roof to stand on, and it provided a good vantage point for Wendy to periodically get disgusted with our house.
Why are my work clothes so large and ill fitting?
There were a few other areas of rot on the sheathing. I primarily discovered those once I removed the Insulbrick shingles from the back of the house. I still can't get over this disgusting rolled siding option. Really?!?! Who ever thought these looked good?!?!?
Anyhow, the rot was not too terrible. It was primarily just a little surface issue and I didn't need to tear anything off and replace it.
One of the things I realized along the way, and had also been hoping to do for years, was to replace our gutters. As you can see from the photos, I'd already removed our PVC downspout and replaced it with a temporary flexible dryer vent. (Weird that we have a flexible dryer vent on our house today too.)
The white aluminum modern gutters along with a 3" PVC downspout always looked wrong on our house. They clearly weren't original, couldn't handle the volume of water that came off of our roof, and were the general bane of my existence. So we went ahead and added "Research replacement gutters" to our to do list.
Wait a second! And you thought our list was supposed to be getting smaller, but we were adding things to the prerequisite list before we had even completed the initial items, and after we had already started the work. In classic Alex and Wendy style, we were running headlong into a meltdown salad, primary ingredients: scope creep, hot weather, overwhelming work, pain in the wallet, and an unreal expectation on completion date.
Now's a good time to also mention one other item that impacted us at the time. We were still relatively new home owners, had exhausted much of our savings on the downpayment and the work in the kitchen, and were looking for any which way to save cash while still doing the project the right way.
As we prepared for and began working on this project it seemed like Wendy and I were talking about what we could buy and what we'd need to wait on and save for. It made for a frustrating period of home ownership where every new purchase and every day of effort on the house kept pushing both of us a little closer to the brink.
With the exterior of the house exposed, I pushed aside my feelings of frustration and being somewhat to significantly overwhelmed and trudged ahead, one foot in front of the other. We went ahead and applied a Tyvek house wrap covering to protect the house while we did our work. At the very least this would protect the house from more water while we worked on the project.
I also removed the old and insufficient flashing where the wall met the house and replaced it with new and much larger flashing. The photo below actually shows a very thin copper material. This was only temporary until I was able to replace it with a significantly heavier gauge copper that both extended up the wall and down onto the roof significantly further.
Our home's exterior was progressing, if only by tiny baby steps. Our list was growing, by what seemed like leaps and bounds. And our emotional fragility was building, with each an every penny spent. As you can imagine, this was not a recipe for smooth sailing, but we both still felt like we could knock this project out ourselves. This was the time when the going was getting tough, and we were just hoping to be tough enough to be the couple that could keep going. We hunkered down and got ready for the long haul. Our sun porch turned into a staging area and every member of our family, including Mel, was not amused with the clutter.
And our list was longer, not shorter.
- What kind of siding should we use?
- What additional tools will we need?
- How am I going to do the work all the way at the top of the house?
- Research replacement gutters
Have you ever had that renovation moment when you looked at your partner and said "What the hell have we done?" You may not have even had to verbalize this, instead relating your feelings with a knowing glance and internalized shudder.