Historic Old Town Alexandria is choc full of houses, churches, and other interesting historic structures. Hundreds of homes pack the tree lined blocks of our densely populated D.C. urban suburb, each one unique in its own right. For this very reason, walking the streets of Old Town just to admire the stunning homes (that we could never afford) is one of our favorite hobbies. 

Though the houses of old town vary in size, age, construction, and style, they can all be categorized in one manner or another to relate one to the next. Today, in what is sure to become a recurring post feature on our blog, we'd love to share a few of the homes we like to gaze at each time we walk by them. 

In no way are these homes meant as a definitive list of the finest Old Town has to offer, or is it a list based purely on age, size, or history, but rather our subjective list of places we are frequently in awe of. The homes featured here are significant, grand, stunning, particularly old, absolutely tiny, or just plain awesome. We feel each of these homes, given their various characteristics, can be categorized as some of the most spectacular in the area. So without further adieu, this is our first installment of The Great Homes of Old Town Alexandria.

711 Prince Street

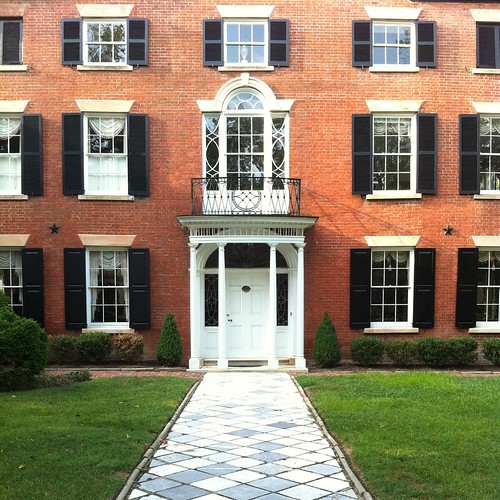
The first home in our list is actually a home that I simply can't get over. Every time I look at it, no matter if it is in the heat of summer, a snow covered winter day, the first buds of spring, or in the middle of a colorful fall morning, this home never ceases to amaze.

Built around 1800 and enlarged several times over the years after being purchased in 1811 by William Fowle, this grand house in the city possesses many of the characteristics more common of a suburban home. The front yard, back yard, driveway, and picket fence is a rarity in Old Town. 


Continue Reading Full Post
Comments 0

I'm not too ashamed to adopt and try my hand the latest moronic Internet meme that comes along. (Not sure what a "meme" is? Check out what wikipedia has to say about it.) And the latest meme is Horsemanning!

I've been known to plank a bit at the office, have created a music video or two, and have even subjected Mel to be a Lolcat and "stuff on my cat" participant, but my obsession goes back to before last Friday and even way before Chocolate Rain was even a brown cloudy day. Does anyone remember Mikey from "Hello my future girlfriend?" I do.

Today, thanks to my coworker Mok-Yi, I learned of the this meme called horemanning that I simply couldn't pass up an opportunity to participate in.


Continue Reading Full Post
Comments 2

Today's post is in honor of our youngest and newest crew member Lulu, who celebrated her second birthday on July 20. Here at Old Town Home, a birthday is as good an excuse as any to take a respite from house projects, celebrate life, and to experience an extra indulgence or two.

Maybe I'm just relieved that she reached this important milestone in great health. After all, by Oliver's second birthday last August, had been diagnosed with cancer and was undergoing chemo. And sadly we knew he wouldn't reach his third birthday. 

Oliver's second birthday was bittersweet in our household, but Lulu's came with a sense of hope and happiness for the future. Given everything we've been through in the last year with losing a beloved member of our crew, we weren't going to let our baby girl's big day slip by unnoticed. 

So what did we do to celebrate? 

  • "Jewelry" of course, by means of an adorable new aqua collar with a fun ice cream cone pattern. What girl doesn't love jewelry on her birthday?
  • A new favorite toy. Lulu's toy of choice are "skinneeez" - the stuffed animals that come without stuffing. A new fox joins her stuffingless menagerie.
  • Carrot sticks! Weird, I know. But above all other treats, our little ori-pei (shar pei & pug mix) loves to snack on baby carrots.
  • A trip to an ice cream social. Yep, seriously. We're "those" kind of people that takes their dog out for ice cream, and yes, they make ice cream for dogs.

More on the ice cream social part. A coworker of mine is the one who told me that one of our favorite stores in Old Town, The Dog Park, was having an ice cream social for dogs this past weekend. The timing was perfect as a last birthday hurrah, and we jumped at the opportunity to pick up a free doggie ice cream for Lulu and take a stroll on such a beautiful day. 

There were several flavors to choose from, but we landed on peanut butter, one of Lu's favorites. She can be a little finicky with treats, and weren't sure if she'd go for it, but it turned out to be a wise choice. Our little girl lapped up the frozen concoction with enthusiasm. Clearly we need to work with her on her table manners, as she had it all over her nose and mouth. But could her smile be any bigger? 

While we were there, she also took part in a treat tasting hosted by the Arlington, Virginia based company Max & Ruffy's. While we chatted with co-owner Kelly Raiser, Lulu gladly sampled their natural organic treats. As a final birthday treat, we took home a box of the Mother Quinoa's Pumpkin Patch flavor.


Continue Reading Full Post
Comments 2

Last week we finally got to the step in our front door restoration project where we needed to reinstall the molding around each panel of the door. While we could have completed this task with a hammer, nailset, and finish nails, the whole process was greatly simplified with the use of our Porter Cable brad nailer.

After we purchased our pancake compressor a while back we were humming right along using the air nailer on lots of molding and woodworking projects around the house. However, we kept running into situations that required a smaller gauge and shorter nail than our standard nailer could accommodate.

We noticed that even the smallest nails on the larger finish nail gun had a tendency to split the edged of shoe molding or crown molding, and drive too deep in the small and softer pieces we were working with. We needed a nailer that could handle the smaller detail elements of work, a smaller sized nail to prevent it from splitting the wood, and much shorter nails for the various projects we were working on.

I was very happy with the Porter Cable finish nailer we already owned, so I started shopping based on this previous experience. I settled on one of the very basic Porter Cable 18ga. brad nailers. I've been more than satisfied with it's performance over the years, working flawlessly since day one.

We've used this brad nailer on every project that involves molding and have yet to have a piece of wood split due to one of these brads. It worked perfectly last week on the door molding, which actually had several pieces that were already slightly split, but this nailer didn't make a single one worse. I also know we will use this nailer on future furniture and molding projects where we need very small profile nail heads with a secure hold in minimal material. This nail gun will almost always be just what the woodworking doctor ordered.


Continue Reading Full Post
Comments 0

Wendy and I had a tremendously busy but very fun and extremely productive weekend. Looking back on the two and a half glorious days away from work, we squeezed in hanging out with friends, dinners out, chores, events, and a good amount of work on the front door. 

One of the major items we wanted to tackle over our Saturday and Sunday break was the punch list of remaining items on the front door. I'm happy to report that we were able to knock several of the items out and are rolling on our way to painting the door. Let's take a look at our list.

  1. Sand extension piece smooth
  2. Install molding
  3. Fill nail holes
  4. Fill old holes and gaps
  5. Fill old hinge locations on door jamb
  6. Sand door jamb
  7. Prime door jamb
  8. Paint door jamb
  9. Install weather stripping
  10. Transfer peephole
  11. Transfer knocker
  12. Transfer rim lock
  13. Buy and install deadbolt
  14. Complete/fix mail slot Grrrr... Purchase new mail slot
  15. Final sanding
  16. Prime door
  17. Paint (possibly multiple coats with wet sanding for high gloss)
  18. Darken screws in hinges

Phew! That's a lot of tedious steps!

First up, sanding the wood glue and extension smooth. The extra wood and wood glue left a ridge and some inconsistencies. I used our belt sander to remove the glue and create a uniform surface from the old door to the new piece. The belt sander made quick work of the task and left just a little cleaning up with the orbital sander as a necessary step later in the process. 

Next we moved onto reinstalling the molding that lives around each panel on the door. In a previous post I covered how we labelled the molding pieces as we removed them from the door to make reinstallation much easier. Boy was that a great plan! It was a simple as firing up the nail gun, shuffling through the pieces, and setting them in their correct locations on the door.


Continue Reading Full Post
Comments 13
  • Search

  • Login
  • Follow
  • Advertising

If you're looking for information on advertising and sponsorships, head on over to our sponsorships page. You can purchase site sponsorships in a few easy clicks. 

Toolbox Tuesday
Open Housing
  • We're Featured!

Old Town Home has been featured in the following places and publications:

The Washington Post
 
Washingtonian Magazine
 
Domino
 
Old House Journal
 
 
Apartment Therapy House Tour
 
Washington Post Express Feature
 
Home & Garden Blogs
 
© 2025 OldTownHome.com. - Privacy Policy
Login Below
or
Sign in with Facebook
Connect

Unexpected Error

Your submission caused an unexpected error. You can try your request again, but if you continue to experience problems, please contact the administrator.

Working...

Working...