Wednesday, September 28, 2011
Earlier this week I posted about the work we did over the weekend to install the glass in our salvaged French doors. These doors will be the new entry to our house, so I spent a significant amount of time making sure that I did an adequate job on the glazing so that it could look good and last for many years to come. I figured I might do a small glazing tutorial at some point since I've done it a bit here and there, and a few comments on my prior post expressed interest in just such a tutorial. So I figure it's as good a time as any, so here goes.
Pros out there, please be kind, I'm a tried and true amateur at this.
But I did put together a little video at the bottom of this post that outlines most of the process.
In any historic home renovation it is important to make sure you get the windows right. An old home's windows are its eyes on the world, and nothing makes an inappropriate update jump out at you like bad windows. If you didn't know prior to this post, I'm a huge window snob. Yep, this is another "Alex on his soap box" post, it's just disguised as a tutorial. It's my opinion that removing old windows and replacing them with modern windows in an historic home should be a crime. Simulated divided lite windows are the vinyl siding of the 21st century, and any promise of a new window that is more cost effective, energy efficient, and green than a properly maintained wood sash with a storm window is just pure BS.
Ok, I've stepped down from my bully pulpit, sorry if I've offended those of you with replacement windows or vinyl siding. It's okay, I don't dislike you, I just think less of you... I kid, I kid. All joking aside, the key to an energy efficient old window or door with glass lites is the proper maintenance of the unit. That includes the periodic maintenance of the glazing (every 75 years or so if done right), and the possible need to replace a pane or two when an errant batted ball or tossed snowball flies through one (I'm looking at you, Connor). It's for this reason that I hope my tutorial may be particularly useful to anyone who has known the pains of dealing with these panes, and would like to make sure the job is done right for the longest lasting results.
The first step in any project is to ensure you have all of the tools and supplies you need and that your work is fully prepped.
Tools
The tools for this job are pretty simple. You'll need a standard putty knife, a 2-In-1 Glazing Tool , two new razorblades, some paper towels, and some standard glass cleaner.
Supplies
The supplies you will need may vary slightly based on the job, but overall should be pretty standard.
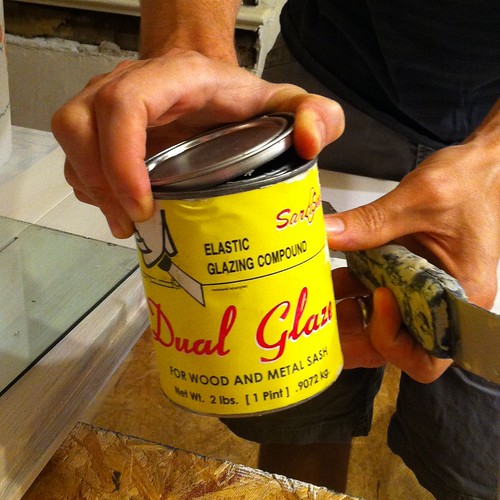
The primary item you'll need is the glazing putty or glazing compound. Stay away from the stuff in tubes, anything silicone based, or anything that promises a fast drying time (especially same day). All of this stuff should be considered garbage. It will either fail shortly after install, will crack prematurely, or worse (in the case of the silicone), it may actually fracture your glass.
Instead, opt for some standard glazing compound in a pint, quart, or gallon can.
 Continue Reading Full Post