Really, that's it, that could be my post for the day, nuff said. I mean, it's so cool that I'm actually using the Internet to sing my praises about how great the Internet is... how meta? 

The fact is, a lot of what we've accomplished on our renovation would have been very difficult or completely impossible without the Internet and all of the completely awesome technology that has come along with it. Pretty shocking given the fact that our house is 125 years old and we are trying our hardest to keep the historic aspects of it as intact as possible.

It's a nearly infinite source of information, documentation, collaboration, and interaction. There's no way I would have found all of the matching antique hardware without the various websites and market places. Figuring out the proper isolation membrane, type of paint, approach to plastering, etc would have been exponentially more difficult without the past experiences (sometimes painful) of others completely outlined on website in the most apparent locations or deepest corners of the web. It's my hope that some of our experiences will similarly be referenced and shared among hundreds or even thousands of people that we will never speak to or meet. That is just how cool the Internet really is!

Though the Internet has been around since the 1960s, the Internet as we know it (the World Wide Web) has been widely used since just 1994. As someone who has been actively working on software and web development since 1994, both as a hobby and as a career, I am still amazed on a daily basis by what technology can and does do. I obviously can't cover this topic in much detail in a single blog post, so I'm just going to focus on one a few small aspects of how technology has impacted our home renovation.

If you're a regular reader, you know to the extent that I go a bit overkill with technology around our house. Whether I'm building a custom server rack, or wiring the house with thousands of feet of Cat-6 network cable and speaker wire, I'm well aware of just how overboard I'm going, BUT I LOVE IT!


Continue Reading Full Post
Comments 3

As you may be aware, we've been hard at work on our vestibule update for some time now. Stripping, salvaging, sanding, plastering, trimming, caulking, painting, glazing, restoring, and everything else-ing. We've put tons of time into all of the little details to make sure the project looks great, is historically appropriate, and remains functional and effective. We've reached a point in our front vestibule renovation project we are looking at other houses around Old Town for the best way to proceed.

Wendy and I have long debated the best approach for displaying our house numbers. In our old configuration, the house numbers were small brass numbers nailed to the front door. With our new configuration, we want to make the numbers easier to see, more effective, and more appealing than the old manner of display.

As we see it, we have four primary options for house number location and display. 

  1. Numbers on a plate or plaque directly on the house.
  2. Numbers on the door.
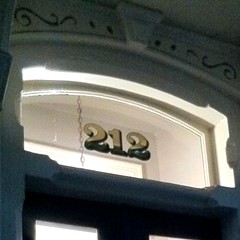
  3. Numbers in the transom.
  4. Other (like painted on the sidewalk, graffiti on the stairs, or some other random display that may work in theory but would never work in reality).

There are so many different ways of displaying house numbers on row houses like ours, and we see them all over Old Town. So to get our inspirational juices flowing, we took a little walk and snapped a few photos of some of the options we tend to see. 

The first option of a number or plate directly on the house is one of the most prevalent. The numbers can be all in one plaque, affixed individually, mix and match, or any combination of approach. Here's an example of a house using this method that has a similar door/vestibule setup as we do.

The second option of numbers placed on the door is quite effective, but really only works well if you have a solid front door. Since our doors are French doors, this approach to house numbers doesn't really work for us unless we put the numbers down very low or up very high. (Notice, it looks like someone put the '8' on upside down in the photo. Such a subtle mistake.)


Continue Reading Full Post
Comments 13

Last Saturday night was one of my favorite nights of the year -- time for our annual Halloween costume party! This year marked the ninth consecutive year of festive fetes, and even though life has been crazy lately with work, house projects, and the blog, I was sooo excited to make this year memorable for our guests. After all, Halloween is my favorite holiday, hands down.

This year's menu featured a lot of tried and true favorites, but I also introduced a few new recipes to keep it interesting. Here's a breakdown:

Beverages

Dessert

Typically the day before we throw a party, I like to set up both the bar and the dining room. I pre-set my glassware (gotta love inexpensive IKEA stemware) as well as my serving dishes and utensils...


Continue Reading Full Post
Comments 0

When you're a renovator, and especially a renovator in old homes, sooner or later you will come to a point where you need to fill a void where regular old wood filler just won't cut it. Whether you encounter a gap that is just a little too wide, need to fix something that has had the corner broken off of it, run into an old door knob hole or lock mortise that needs to go away, or find an old hinge mortise location that must disappear, there comes a point where regular old wood filler would just sag, crack, or shrink and fall out. The areas where a good quality two part wood epoxy is necessary are just too numerous to list.

In our projects the need for a good quality wood filler came up early and has continued to come up quite often over the years. I found a great product for this many years ago and have stuck with it through thick and thin as my epoxy wood filler of choice. I've filled doors, windows, molding, furniture, siding, dings, cuts, gouges, dings, and just about anything larger than a simple finish nail hole.


Though it says it doesn't shrink, it's been known to lie.

"What is this miracle product" you ask? Well, I'll tell you, it's Abatron WoodEpox. While it may not quite be a miracle, it sure isn't your run of the mill wood putty. In all of my uses for it, WoodEpox has thoroughly served my needs on any project I've used it on. 

I first learned of this wood epoxy from Abatron's advertisement in Old House Journal magazine back in 2003. The project window they were restoring looked to be in similar shape (from a rot perspective) to one of ours, so I figured it was worth a shot. This was long before I even realized the benefits of a two part epoxy and that not all wood fillers were created equal. If you're reading this and you don't yet know the difference, it's time to learn.


Continue Reading Full Post
Comments 15
  • Search

  • Login
  • Follow
  • Advertising

If you're looking for information on advertising and sponsorships, head on over to our sponsorships page. You can purchase site sponsorships in a few easy clicks. 

Toolbox Tuesday
Open Housing
  • We're Featured!

Old Town Home has been featured in the following places and publications:

The Washington Post
 
Washingtonian Magazine
 
Domino
 
Old House Journal
 
 
Apartment Therapy House Tour
 
Washington Post Express Feature
 
Home & Garden Blogs
 
© 2025 OldTownHome.com. - Privacy Policy

Unexpected Error

Your submission caused an unexpected error. You can try your request again, but if you continue to experience problems, please contact the administrator.

Working...

Working...