Wednesday, February 29, 2012
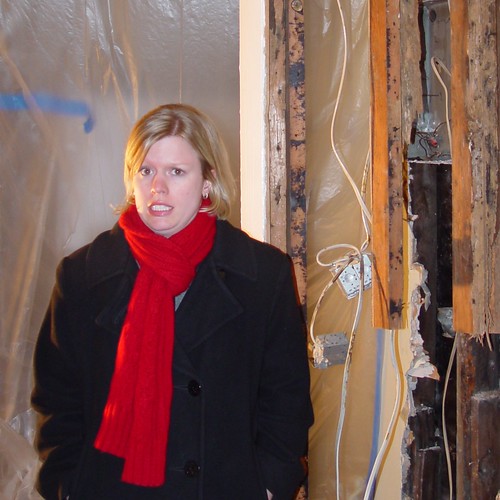
"The entire second floor rear section of your house is being held up by two 2x4s...and it's going to cost $30k to fix it."
This is an example of something you don't ever want to hear from a home inspector when referring to the property you and your significant other have poured your heart, soul, and your financial past, present and future into. But back in the winter of 2004, that was exactly what we were told. I can't even begin to explain the sinking feeling that struck us to our core when we heard that.
What started as a suspect drip of liquid coming from a heat register in our sun porch had quickly revealed itself as massive water, termite and structural damage to the rear of our 1880s Victorian. As we detailed earlier this week, we had just finished a great looking budget renovation to our kitchen and were starting to gain some DIY confidence when this disaster struck.
In a matter of what felt like minutes, our kitchen had gone from dated 1980s bachelor pad...
...to light and bright thanks to a budget reno...
...to our worst nightmare.
After hiring a reputable home inspector to diagnose the situation, as well as a reputable contractor to install an LVL structural beam and concrete footers to support the whole thing (since this 1890s addition was built right on dirt and had no foundation), we had exhausted what little savings we had and were therefore left alone to put the pieces back together.
But let's be honest, even if we had the money in the bank, I'm sure Alex would have wanted to do it all ourselves.
 Continue Reading Full Post
Tuesday, February 28, 2012
We've had quite a few new visitors on our blog today by way of the Apartment Therapy Homies page. As a result, we want to officially welcome all of our new guests to the site. We are Wendy & Alex, two long time DIYers who happen to have a love of old homes, an appreciation for a job done right, and some crazy ideas of what we can handle ourselves.
If this is your first time on the site, it might be good to start on the Our Home page to get an idea of where we live and our house, or perhaps the Projects page to see some of the things we've accomplished and lived to tell about.
We post every day Monday through Friday. That can be a little overwhelming to search through, so we created this Calendar page that lists each post by day. Click on any day with a title to see a brief description of the corresponding post.
Lately we've been writing about the budget upgrades and eventual complete disaster that was our kitchen, as well as the work we just completed on our vestibule project.
And we also have our recurring themes like: Toolbox Tuesday, where we talk about must have tools that we use in our renovations; Open Housing, where we go through area historic open houses and then assess how likely we would be to trade our house for it outright; and, occasional items like the Old Town Llamas...I think you'll just have to click on that one.
We have a lot of fun on our blog, and we hope you will too. We're very excited to be on the DIY list in the Homies among so many other awesome blogs, and we hope you'll have a look around and enjoy your visit. And if you really like what you see, and you want to see a whole lot more fresh DIY ideas and items from our life, be sure to vote for us as a Best DIY Blog on the Apartment Therapy site. Have a good night and stop back tomorrow for some fresh DIY content.
Continue Reading Full Post
Tuesday, February 28, 2012
A few weeks ago we covered the behind the scenes and how to of our guest blog post at Brooklyn Limestone. We accomplished an awful lot in a very little amount of time when turning our basement stairwell into a double duty space to serve as our coat closet, and many of the critical tasks we undertook were helped by owning the right tools for the job. As you undoubtedly already know, the right tools make all the difference in a job well done.
One of the aspects of the project that was a little touch and go was whether or not we were going to replace our existing light fixture. And by touch and go, I mean, Wendy didn't want to do it, but I really did. In order to make that bit of the project a reality, I had to make sure I could get it done quickly and easily. There was no time available to futz around installing the light. I had to get in, knock it out and call it done before Wendy got home from work, otherwise it was a no go.
I decided we needed a 4" recessed fixture a few feet further down the stair ceiling than what was currently there, so all I had to do was to make a perfectly sized hole for the new fixture. Easy, right?
As easy as this may sound, I've been around the block enough to know that marking and cutting a hole in plaster or drywall is rarely as easy as one would expect it to be. A circle is tough to draw without something to guide you. You can try to make a template, but the line can often run askew, too large, too small, or any number of other issues. If you can get circle properly marked, scoring the curved line with a utility knife is often an exercise in futility. And if you're trying to make a hole in plaster, and you don't score all the way through the plaster, you'll just end up with a giant mess with lots of cracks and a jagged hole.
I can visualize the standard guy in an infomercial struggling on a ladder and slowly drawing a circle then rocketing off the ladder and leaving a pencil mark down the whole wall, looking at the camera all dejected, and shrugging his shoulders.
 Continue Reading Full Post
Monday, February 27, 2012
Several weeks ago we started talking about our efforts in establishing a budget friendly and very quick renovation of our kitchen. A refreshed kitchen was a move in necessity, and between our cabinet painting, hardware updates, spray paint counter top treatment, and inexpensive under cabinet lighting, we had established a pretty solid renovation for only a few hundred dollars. It was good enough to give us a kitchen to move into, but didn’t break the bank.
The first year in our house we were slowly getting our arms around everything. Our renovation projects, though minor and inexpensive due to our broke-ness, were starting to come along. We had a few issues here and there that we were able to resolve on our own or with some outside assistance, like the replacement of our leaky skylight, and things were going pretty good. Wendy decided to continue the inexpensive kitchen update we had started when we bought our home by extending the work to the sun porch area just beyond the kitchen.
The tile that adorned the floor was a very 1970’s pattern and color combination and we wanted it gone. Unfortunately we didn’t have the knowhow or the budget to replace it with another tile.
After much deliberation Wendy decided she was going to paint the tile white. The tile had a slight texture to the decoration, so a consistent white tile with the irregular surface would be pretty cool looking, and it would work well in a pinch. So Wendy chose a cold January day just about one year after we moved in to paint the floor.
Her project was going well and she was making quick work of it. We were both happy to be rid of the ugly floor, and we were ready to make better use of the space. We were still very gung-ho on our home and projects and hadn’t hit a major speed bump since we moved in, but little it we know it, we were due.
 Continue Reading Full Post
Friday, February 24, 2012
One thing's for sure here at Old Town Home -- we're dedicated to the detail work that often goes unnoticed. In my personal opinion, the detail work often makes the project a true success. Though the detail items that exist may not be so important for the casual observer, a missing or incorrect detail item may be the thing that actually ruins the end result.
Yesterday we wrapped up our vestibule project with a summary blog post that did a quick run down of the major elements of our project, but many of the tiny details we painstakingly implemented were omitted for the sake of time. One such detail is actually a tip I picked up several years ago when we first started installing salvaged hardware on our linen closet door.
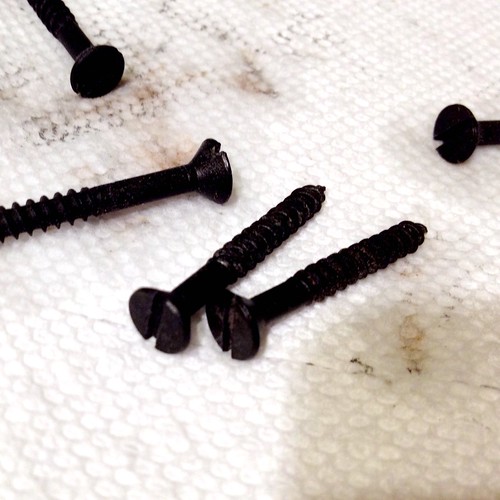
Prior to living in our house I sort of felt that a screw was a screw, was a screw. Slot head or Philips, black, silver, or blue, they were all the same to me. But once I started to get into home restoration I began to notice the subtle but significant differences between the various types and styles of screws, and where it was or wasn't appropriate to use each one.
When it comes to salvaged hardware, the age and materials of the hardware dictate that it is important to use slot head black screws for almost all of our projects. My search for these elusive hardware supplies led me to the discovery that they weren't readily available for purchase. Left with no viable purchase options, I searched the internet and stumbled on a random message board post talking about a substance that darkens the steel barrel of the gun to restore its finish. With that I learned about this extremely simple process to essentially antique a steel (but not stainless) screw. Just look at this photo and you'll see how badly the wrong color screws stand out and ruin an otherwise nice looking project.
 Continue Reading Full Post