It's no secret. I'm in love with the Napa Valley. In fact, I'm sure many of you are sick and tired of us talking about how great it is, how I can't imagine a better way to spend a birthday than with a quick trip there, that the food and wine are beyond belief, and the scenery is breathtaking. We've gone so far as to write up a three-part itinerary for anyone thinking of visiting, and I've made it a personal destination for seven years running. 

Although it's hard for me to believe there's anyone out there that wouldn't love it too, in the last week one of our crew members here at Old Town Home has made it known she wasn't happy we made a quick departure for the west coast. Do you have any guesses who that might be? Here's a hint.

Yep, that's right. This innocent face has been in a little bit of a snit since we've been back. 


Continue Reading Full Post
Comments 16

We're going to make a slight change this week and move our regular "Toolbox Tuesday" to "Toolbox Thursday." Why? Because we're excited about our latest blog feature that we announced just last week.

In our new section called "Ask Old Town Home" you have the opportunity to ask and have your questions answered to the best of our ability. After we announced the "Ask" feature last week, we got a couple of really good questions that we're working on answering. Today's topic comes courtesy of another local Alexandria blogger, Katie of DIYDelRay.com. Katie asks:

A couple of years ago, we had to get a new a/c. The old one was located in our small backyard with a low deck surrounding it. The new a/c didn't fit in this spot (the new energy-efficient models are HUGE!), so we had to put it in a different spot in the backyard (the entire yard is about 16x16 feet). Now we have a 28x28x10-inch hole in our deck. It's not a huge hole, but it's big enough that someone could easily trip and get hurt. What to do with the hole? My only thought is to build a custom-sized planter to go inside and then fill will dirt and plants, flush with the top of the deck. Any thoughts on this? Advice for getting started? THANKS!

Thanks for your question, Katie. I actually have a few ideas about what you could do to remedy this situation. First and foremost, I think you need to address the hazard this spot presents to adults and children alike. As you pointed out, the hole is large enough to cause injury to someone. Therefore, I'm going to recommend options that will eliminate the likelihood that your guests will be asking you for an ace bandage. Here's another look at the gaping hole that was left by the old AC unit.


Continue Reading Full Post
Comments 6

Our sun porch, a modestly sized room on the back of our house, has seen a lot of change since we moved into our home nine years ago. Upon our arrival the room boasted hideous tile floors, was the site of the structural damage disaster, and it's seen three different paint colors just since we took ownership. But in spite of elevating the decor substantially in the space, I was ready for a change. Well, truth be told, I think I really f&@#ed it up.

Does anyone remember our list of New Year Resolutions that we put out there for all to see (and hold us to)? One of the items on this list for 2012 is "redecorate the sun porch to remove the tired floral window treatments, and to better incorporate the wine fridge into the furniture layout." I'm happy to report that I've made a lot of changes, but not happy when I say that I hate the space more now than when I started.

Let's start with how it looked in the beginning. Here's a look at the 8'x10' space when we first bought our house. The tile was ugly and cracked, the walls were a dingy grayish white, and the room had zero personality. 

Approximately a year after we moved in, we had done a bit to spruce it up, but not a significant amount. We were focused on other parts of the house at the time, so we applied a coat of soft yellow paint to match the kitchen, threw some existing odds and ends in the space to furnish the room, and called it "good enough."

Following the discovery of massive leak/termite/structural damage in this room (more on that disastrous experience here), we took out the offending wall, opened up the doorway between the kitchen and sun porch, installed a new beam to support the floor above, and finally had a more open flow between the two rooms. In addition to the removal of the doorway, the next phase of the room featured new custom window treatments and floor paint to hide the ugly brown tile. We were still using furniture odds and ends that were childhood pieces or outdoor furniture from our apartment. The look was greatly improved, but we still had progress to make.  

The next stage of improving this space didn't require a lot of time or money, but seemed to make the biggest impact. With the addition of a sisal rug on clearance from Home Goods, bringing in a larger lamp that we already owned, and adding a few IKEA purchases (the new wicker planter and storage cubes that Mel is lounging on in this photo), we were really happy with the space. 


Continue Reading Full Post
Comments 59

We all love the drama of the big reveal. It's the light at the end of the tunnel, the fruits of your hours, days, weeks, and months of labor, and the goal you've been striving for since the idea of your project first popped into your head. Everyone gafaws at the before and after photos that show the tremendous progress and upgrades made to a room, and I doubt there's many people who wouldn't rather enjoy the end result of a job well done than the dirt and grime that often comes in the midst of a significant bit of DIY construction. All that being said, you can't get to the finish line of your race without taking everything one step at a time.

Yes, the individual and often "insignificant" steps of a project, no matter how mundane or simple, are what ultimately make a project. Many times these steps require a fair amount of detail, patience, and thought to be successful, even if they will ultimately be hidden within walls, beneath the floor, or in the case of the item I've been working on of late, within the ceiling.

A while back I touched on some of the prep work we've been doing in the attic to get the HVAC duct work functioning to the best of its ability. I was back at it this week, but I've been working on some duct work that will ultimately serve a much different purpose. 

The bathroom exhaust fan is a critical component of any functional bathroom. It helps to reduce the humidity and odor that can occur in a bathroom, keeping the place in good shape regardless of how heavily the room gets used. In our master bathroom we're planning to use a super quiet inline exhaust fan. This means the fan will not be seen when you look up in the bathroom, but it will be located in the attic, never heard, and will be fed by a few duct boots positioned strategically, one above the shower door, and one above the toilet.

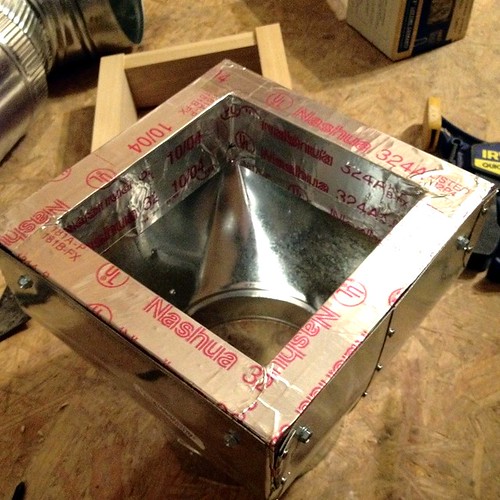
To mimic the other vent/register covers in the house, we'll be using 8" x 8" Reggio Register decorative vent covers. The exterior of these covers are 8" x 8" but the interiors are 6" x 6". Unfortunately, I was unable to locate any good 6" x 6" duct boots that would allow me to mount the decorative vent covers to them. However, I was able to find an 8" x 8" duct boot that I figured I could make work.

One of the things I hate about duct boots like this that they are not a rigid square, they are just flexible metal. My plan to make this work would not only allow us to mount the vent cover to the duct, bit it would provide a rigid edge to the duct boot, give the drywall an area to screw to, and ultimately provide a solid backing that the vent cover itself could screw to. 


Continue Reading Full Post
Comments 3

Two weeks ago Wendy and I participated in our (nervously anticipated) DIY Q&A workshop at Red Barn Mercantile. We had a wonderful time and are so happy that Red Barn's owner, Amy, invited us to participate.

To be perfectly honest, we were both a little nervous going into it. This was the first time either of us have done anything like it outside of work-related public speaking, so we didn't want to be boring, obnoxious, or clueless, nor did we want to publicly humiliate ourselves. To our pleasant surprise, we felt like we were able to give some decent answers to the DIY questions from the group.

The thing is, Wendy and I have opposite presentation styles, so it made prep a little hard. She's a preparer and rehearse-er, where I'm a wing-er and prayer-er. But in the end, much like in life and our renovation, our opposite styles, strengths, and approaches helped to give the people who attended a (hopefully) entertaining and enjoyable evening. Let's be honest, it didn't hurt that there was wine and delicious cupcakes to be had.

And there were also plenty of great products around the store that could distract from any lack of knowledge we may have had.


Continue Reading Full Post
Comments 4
  • Search

  • Login
  • Follow
  • Advertising

If you're looking for information on advertising and sponsorships, head on over to our sponsorships page. You can purchase site sponsorships in a few easy clicks. 

Toolbox Tuesday
Open Housing
  • We're Featured!

Old Town Home has been featured in the following places and publications:

The Washington Post
 
Washingtonian Magazine
 
Domino
 
Old House Journal
 
 
Apartment Therapy House Tour
 
Washington Post Express Feature
 
Home & Garden Blogs
 
© 2026 OldTownHome.com. - Privacy Policy

Unexpected Error

Your submission caused an unexpected error. You can try your request again, but if you continue to experience problems, please contact the administrator.

Working...

Working...