It's been a hot minute since our last window restoration update, but we're rounding the last corner and are on the home stretch to a fully restored and functional antique window sash!
All of the prior posts are summarized and linked at the bottom of this post, so if you need to get caught up (because in true Old Town Home fashion, this is a super ridiculous long running thing) you're all set.
Our last post on this subject covered the various options we had, and the one we chose, to source and cut some antique wavy glass as replacement for our broken panes. With our glass selected and sized for fit, we were just about ready to start glazing!
Now I don't know if you've ever done any window work, or if you generally get excited at the prospect of applying glazing putty...but you should, you most definitely should! Applying glazing putty is a wonderfully soothing and fulfilling prospect that provides an immediate sense of gratification and discernible progress. As a DIYer, there are few things that make my heart grow three sizes like that of a sense of gratification and progress.
But before we could begin our glazing process, there's a little glazing product selection and prep that we're going to cover today (the actual glazing post will be up next).
You have a ton of options when selecting glazing putty. From DAP '33' to "Glazing in a caulk tube," there are a lot of products out there that you'll want to stay away from. (Here's a hint, don't use glazing in a caulk tube...no matter what the person who swears by it says.) Many of these products are difficult to work with, prone to failure, or generally don't work the way old windows need them to work.
When I'm glazing I like to use one of the products from Sarco Sash glazing putty. There are two types to choose from, either the "Dual Glaze" or the "Type M" putties.
Both putties are soybean and linseed oil based elastic putties that improve on the difficult to use calcium carbonate putties of the olden days. You can still find these old linseed based calcium carbonate putties on the market, but they don't offer the elasticity that works much better in the expansion/contraction process of wood windows.
The Dual Glaze type is a slower setting glazing putty that can be used in wood or metal sash, and can also be applied to sash that remains in it's opening. Think of it as more of an all weather glazing putty for when you need to fix a broken pane in place. Duel Glaze can take weeks to skin before painting. It's a very user friendly putty, but you certainly have to be patient with the cure.
The Type M product is a faster setting and far less oily version of the putty. It's meant for glazing in the shop/workspace where you can let your sash set up and skin before painting and reinstall. It's pretty easy to work with and I really don't notice a difference in user friendliness between the Dual Glaze and Type M. The real advantage is that the sash are ready for paint just three days after applying the putty.
For our first window I used the Dual Glaze on the lower sash and the Type M on the upper sash. This way I'll be able to compare over time once it's reinstalled. But for all future sash, I'm definitely going to be using the Type M.
Keeping Glazing Putty Fresh
Okay! With the glazing putty of choice selected, there's something I like to do to keep my putties fresh. Since glazing putty isn't cheap, and there will be lulls between when we use them, there's a little trick to make your putty live a much longer life in its bucket. These Sarco glazing putties will live indefinitely in their bucket as long as you keep air away from them. Air will allow them to skin and cure, so even if you have them in a bucket with the lid on, the small bit of air in contact with them will eventually ruin your bucket. I've had it happen, and you don't realize your putty is ruined until you go to use it...which is sure to ruin your day.
To solve this problem I protect it all with water and I create three buckets. These buckets are for use "Now," "Later," and "WAY Later."
To do this I grab a few additional smaller container buckets with lids, then grab several handfuls of putty and form them into both small and large balls. The idea here is separate out the putty among these several containers. From a 1 gallon bucket of putty I'll split about 1/3 to 1/2 out into balls in these other buckets. The balls should be somewhere between the size of eggs and baseballs.
Once the balls are all split into the buckets I flatten out the main gallon container by pushing the putty down. This gives a good surface on the top that is devoid os major cracks and crevices. Next I add enough water to the bucket to give me about 1" of water sitting on top of the glazing putty. This water barrier will keep the air away from the putty and will keep the putty fresh in the bucket until the next time I need to use it.
I can put the lid back on the bucket and then put it on my shelf and leave it undisturbed until I need it again. When that time comes all I need to do is open the bucket and pour the water off of the surface, then grab my next handful.
For the smaller buckets with the balls of putty I can do pretty much the same. I just fill the buckets with water until all of the balls are completely covered. With these buckets of smaller balls of material the advantage is that I can just grab individual balls of putty as I need to use them. All you need to do it blot them dry with a paper towel and you're ready to glaze.
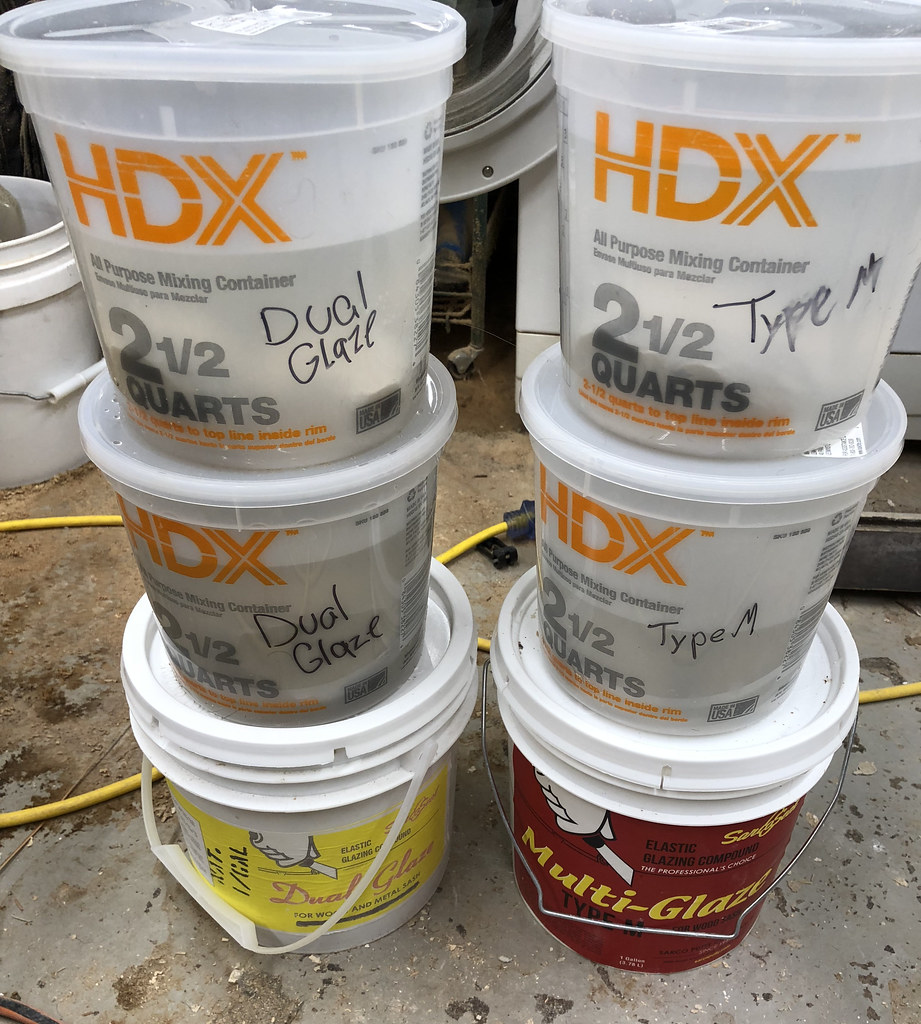
Since I have both Dual Glaze and Type M putty, I made sure to clearly label my buckets with marker. This will surely make it easier when I need to go grab my bucket off of the shelf.
This is the most effective way that I've found to keep our glazing putty fresh and ready for the next sash. Since the putty is oil based the water doesn't hurt it in storage and simply keeps the air away from the surface, keeping it fresh and pliable.
As I mentioned, we'll give more detail on the actual glazing process in our next post. I'll be sure to cover the tools and techniques that have worked well for us. Most importantly, it should be right around the corner, not weeks away. Getting the glazing putty figured out is just the first major step in doing glazing the right way.
Have any horror stories of your own working with glazing in a caulk tube or something similar? Would love to hear.
If you'd like to go back through our window restoration series, here's our complete list of posts.
- Window Sash Restoration Part 1 - Real Progress on Our Window Restoration Project
- Window Sash Restoration Part 2 - Protecting the Sash with BLOPentine
- Window Sash Restoration Part 3 - Keep Cast Iron Rust Free With a Linseed Oil Bath
- Window Sash Restoration Part 4 - Bronze Meeting Rail Weather Stripping
- Window Sash Restoration Part 5 - Sourcing and Cutting New or Salvaged Wavy Glass