Tuesday, November 20, 2018
Have you ever had a project you've badly wanted to work on, but you never thought it would actually happen?
As long as we've owned our homes we've always had a project list a mile long. Some of those projects are things we are going to work on in the near term, and some of those projects are things we dream about eventually tackling, but have no real concept if we'll actually get to that point. But if there's one thing you need to know about Wendy and me, when we set our minds to something, we don't like to stop driving toward that goal until we can make it happen.
Over the course of the summer, and now into this fall and winter, we've been planning and working on one of those projects we've always really wanted to take on, but weren't sure would ever happen. That project? A complete overhaul of our row house's dark, musty, dirty, crowded, and inefficient basement. You remember this gross space, right? The room in our house that could most easily pass for that of a hoarder's hideaway.
Back when we purchased our home we didn't have any sort of budget to put into the unfinished basement. The walls were covered in failing waterproofing paint, portions of exposed mortar were crumbling, and the ceiling height of the basement ranged from 6'11" at its tallest point in the center, to 6'3" at its shortest at the back wall.
In order to get ourselves set up and working, we quickly built some shelves out of plywood and two by fours, and a workbench out of the same. Ever since, our basement has played triple duty as a storage area, laundry area, and our workshop. This triple play was less than ideal, essentially making the space fight over all three, doing none of the three particularly well. Not to mention that due to the shared space with the workshop, the storage and laundry areas were perpetually covered in a layer of saw dust. Needless to say, it was less than ideal.
Over this summer we needed to address some of the issues that have been impacting our basement, which included installing a French drain and sump pump to resolve periodic water infiltration following heavy rains, and correcting the out of level floor by working with a contractor to remove the old slab and pour the new.
While we're at it, we're also removing the old and horribly inefficient forced air furnace. We're replacing it with a high efficiency boiler that will heat the first floor of our house with below floor radiant heat, and the second floor with a hydronic coil on our attic heat pump. We're looking forward to having a more efficient heating system, and the bonus is that switching over to radiant heat will free up a lot of space in the basement because the bulky ductwork is no longer needed. This is another project I've wanted to take on for about 10 years or so, and we're finally doing it!
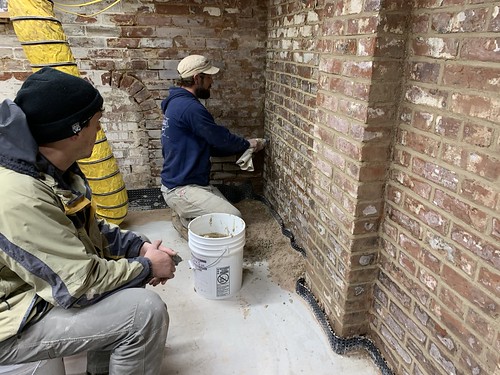
If you've been following us on Instagram, you've seen a few of our in progress shots that involve the restoration and repointing of the 130+ year old beautiful masonry walls. This is a tall task that involves stripping old Drylok waterproofing paint, removing some cement mortar from an old (and bad) repointing job, removing what appears to be plaster from other attempts at repointing, and generally trying to clean up all of the masonry.
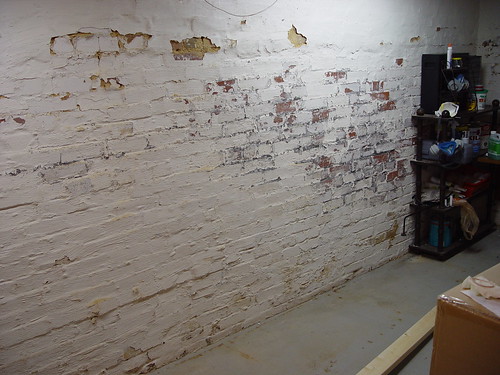
Basement wall in 2003
This whole project has been a tremendously time consuming and exhausting undertaking. This, coupled with other projects and a very busy work schedule, have kept us pretty quiet on the blog the last several months. We're also working with a few contractors on this project, which is a bit outside of our norm. But if we want to get this done in a semi-reasonable amount of time, we've had to figure out what we should hire out vs. what we should take on ourselves. It wasn't an easy decision by any means, but working with a few good contractors that we know and trust certainly makes things much easier.
So, what's the plan? We're turning the basement into two truly separate areas. One third of the space will be a laundry and storage area for bulk grocery and cleaning supplies, a few of Wendy's real estate staging items and signs, and other household items that we want to keep clean. It will be separate from the workshop, away from the dust and grime that is unavoidable when working on projects. The other two thirds of the basement will be a real, actual workshop. The workshop space will be about 20'x14' and will house several moveable cabinet and workbench components that I plan on building over the next several months.
The whole project is major and will take a good while to complete. Our goal is to keep you all updated as portions of the project progress. So, are you ready for the fun? While it's not your typical fancy Pinterest-worthy before and after kitchen or bath makeover, we can't wait for this project to come together. After all, this is a project we weren't sure would ever actually happen, so seeing it in the middle of the chaos is truly exciting!
