Back in January we shared the first steps we were taking to properly restore our original plaster walls. Today we have part one (of a two part) update on our progress.
Before we get started, this is one of a series of blog posts about Master of Plaster's Lime Restoration Plaster. Be sure to check out the rest in the series for our progress and more of our thoughts on the product.
In true Alex form, this project has stretched on and on, taking far longer than any reasonable project timeline should. I spent the lull between activity doing what I do best, obsessing about the work we were doing and how to make the end result the best it could be while essentially paralyzing myself from making headway. But as we're finally nearing the conclusion, I'm extremely excited to share some major advances in taking our walls from damaged and dingy...
...to crisp and limie.
This whole endeavor started last year when we realized many of the walls in our historic weekend home were actually drywall applied over top of original rough finish plaster.
The project we're talking about involves the living room, but this same drywall over plaster debacle exists in the kitchen, dining room, master bathroom, and the back rooms of the house. This must all be resolved.
We decided to take on this rather significant endeavor because;
- We both love the look and slight irregularity of traditional plaster,
- We noticed how the 1/2" drywall layer took depth away from original moldings,
- We could see how sloppily finished the bottom of the drywall was once we removed the baseboard radiators,
- And we wanted to restore these original plaster walls as an historic element of the house if at all possible.
In the past, when tackling similar skim coating and plaster repair projects, I've used copious amounts of joint compound and hours of sanding to achieve the "plaster look," but always knew there had to be a more traditional and historically appropriate choice. After all, plaster doesn't require sanding the way gypsum based joint compound does.
One of the major issues with our existing wall is the fact that it never had a finish coat of plaster applied. It has always been covered with wallpaper, so once we removed what remained of the wallpaper, we were left with a very irregular surface. Before we could apply the first coat of Master of Plaster, I wanted to smooth many of the major problem areas and make everything a little smoother. For this process we'll ultimately do a three coat plaster approach.
The coats are;
- Base coat with fiberglass mesh embedded
- Base coat to completely cover mesh and give us flat surface
- Finish coat to give a smooth and ready for paint surface
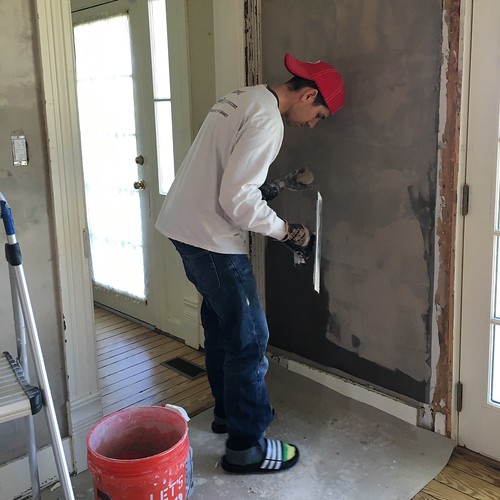
Based on this we wouldn't have enough Master of Plaster to do the whole room with two base coats, so we had to make a little change with the first coat. To accomplish this I decided to use StructoLite, a modern mix type base coat plaster. Within this first coat I would embed my fiberglass mesh (window screen) to bridge any cracks and gaps that had formed over the years.
StructoLite is much different than working with joint compound. It's a base coat plaster and is very coarse. It's also recommended by Master of Plaster to fill significant gaps and voids before applying the lime plaster. When you apply StructoLite to the wall the trowel feels like it sort of floats across the surface in the gritty and rough way.
One thing to note about Master of Plaster is that it sticks to anything equally well. However, StructoLite does not. It sticks to plaster without issue, but it has an issue with drywall. This has to do with the drywall paper sucking the water out of the plaster too quickly as it cures. This can cause cracking. Since we have a few large drywall patches where the plaster has been removed over the years, like above the French doors or front door, we had to prepare the area to accept a base coat of StructoLite.
This is why we picked up a gallon of Plaster Weld.
This Pepto Bismol looking stuff gets applied to the paper of regular old drywall and allows plaster to bind to the drywall without the paper of the drywall sucking up all of the water and causing cracking. It's similar to the stuff that comes pre-coated when you buy Blueboard drywall.
It gets applied to the drywall with a standard paint roller and must be allowed to dry before applying the plaster. But once it dries, you should apply the plaster within the next nine or 10 days or it can begin to lose its effectiveness.
Once the PlasterWeld was applied and allowed to dry, we could move forward with the base coat around the whole room.
In the corners I wrapped the mesh about two inches onto the next wall to hopefully prevent future corner cracks, a typically very vulnerable location for plaster.
As always, I'd apply the plaster, hang my mesh, then make a drawing of a cat to make sure the screen would stay in place until I could really embed it on the wall.
If the plaster was setting up a little too quickly and I had ridges I wanted to remove, I'd just give it a quick spritz with the spray bottle and trowel back over it.
I methodically worked my way around the room until the whole place was covered in gray.
The end result of this first coat of plaster was an even and consistent looking room that no longer had streaks of blue and fractured old plaster.
Wendy said she really liked this base coat of plaster because it gave her a sense of what the room would look like if we ended up painting the room gray.
Now that our base coat was applied and curing, we could begin focusing on applying the base and finish coats of Master of Plaster to complete our room's plaster restoration. I'm going to split that out into the part 2 continuation blog post since it will have a whole lot of information.
Have you ever worked with StructoLite when it comes to plaster restoration? Would love to hear your opinion on working with it and how it felt applying it to the wall. Stay tuned for Part 2 in our series coming soon when I'll share how much I'm absolutely enjoying my time working with the Master of Plaster system. But the bottom line is we're finally making some noticeable progress. It's easy to lose sight of this progress given how long this project has stretched on and on, but when looking back at our first weekend in the house, it's pretty amazing how far we've come.
Once the plaster work is complete, we're moving on to installing baseboard and crown molding -- a true sign we're nearing the finish line.