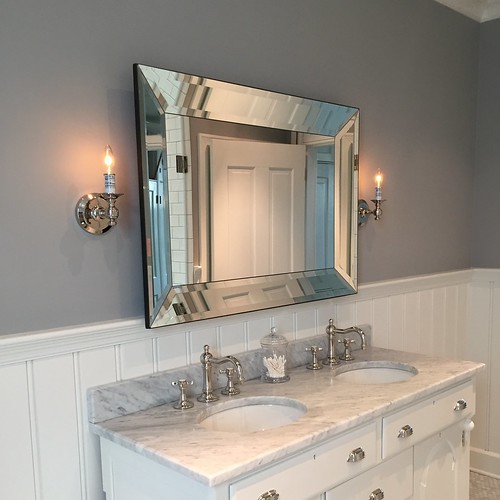
Hanging a mirror. A simple task that can drive even the most seasoned DIYers to wildly slinging uncontrolled obscenities.
I don't know what it is, but when it comes to hanging heavy mirrors in a centered and level manner, I often find myself melting down, frustrated, sweating profusely, usually on the wall on which I'm trying to hang the mirror. To this day Wendy tells stories of the saga she endured while attempting to hang the (now removed) living room mirror, and it usually starts with "Alex doesn't normally lose his cool, but when he does, oh boy, it's a sight to see."
That whole endeavor ended with so much sweat on the wall that we ended up having to repaint a portion due to my "head grease."
As entertaining as it may be for my better half to see me spewing venom at inanimate objects, especially those that so cruelly show my contoured and angered face looking right back at me, taunting me with my own personal torture, I always think the same thing when fighting with these giant glass objects. "There has to be a better way."
We've long had an overall concept for our bathroom that included a double vanity, two custom cabinets, and a large and beautiful mirror, seen here on this sophisticated rendering, completed on a bar's napkin over margaritas several years back.
Quite some time ago we shared Wendy's selection process and ultimate joy when the mirror she ordered for our bathroom arrived in the mail. It's funny to me that something could bring her such complete and total euphoria, yet raise my dread in mounting the items in a secure manner to significant levels.
Given that this new mirror was going to be hanging above the vanity in our master bathroom, and that the mirror would need to overlap the rather significant lip of the beadboard cap molding, we'd need to get creative with our approach.
To add insult to injury, our mounting location could only hit two off center studs, and duct work running in the wall would prevent any sort of anchor behind the right side of the mirror.
So I needed to get creative if not for the sake of the mirror, for the sake of the walls and my own fragile mirror hanging psyche.
This time, rather than hanging a mirror with a few anchors and screws, I decided to alter my approach and use a fairly substantial cleat system from the Sign Bracket Store.
My idea here was simple. With the cleat I'd be able to secure the portions of the cleat into the studs to ensure proper support even though that support would be substantially off center from where the mirror wants to hang.
I'd also be able to completely pre-measure the cleat, mirror hangers, and expected position of the mirror to pre-mount all of the hanging hardware on the wall.
Once we had all of that info in hand we were able to pre hang the lower portion of the cleat where it needed to go, and then begin mocking up a mounting solution with a piece of oak attached right to the upper cleat.
The oak strip would have two large screws perfectly placed to allow the mirror to hang in a nice and level manner.
I made lots of pencil marks on the wall since we hadn't painted at that point, and was able to figure out the exact center measurements for the ideal mounting location of the mirror. It was truly an exercise in complete and unadulterated anal retentive perfectionist compulsion.
The best part of this whole plan was the mounting offset that the cleat and oak strip allowed made the mirror perfectly clear the lip of the beadboard and sit just in front of the bullnose ledge, leaving us with a nice 3D look to the mirror, making it look even more substantial.
Since we used the cleat to mount the mirror, we can easily remove it if we ever need to make any adjustments, and the profile of the hanger itself stayed nice and low. Had we just used a mounting board, there's a pretty good chance we would have been able to see the edges of the board from the sides of the mirror.
The best news of all, I was able to completely hang the mirror without even putting a drop of sweat on the wall. I might even go as far as to say that it was an enjoyable experience, and one that has made me a better person. Who knows, maybe I've turned over a new leaf and won't be swearing at our home accessories. Unlikely, but I can dream.
The end results of our whole mirror project are pretty great, and we're both thrilled with how it turned out. Wendy and I both prefer the visual interest the bevelled glass and geometric shapes bring to the room, and it works so much better than a single flat mirror in a framed opening would have worked.
And if I had it to do all over again, or need something similar in the future, I'll certainly be using a cleat to hang my heavy and unruly items on the walls of our home.
Do you have any harrowing tales of mirror hanging? Any tips or tricks to share with how you always get that perfectly level picture hanging on the wall in that perfect place? We'd love to hear your secrets (or even your admissions if you're a chronic wall hanging swearer too).

![]()
![]()