While there's a huge list of projects we're excited to tackle at our new house, it was clear to me what needed to go near the top of our priority project list. 

With its floral decor from ceiling to floor, the one project I couldn't wait to start was our downstairs bathroom. In fact, we had owned the house less than a day before our sleeves were rolled rolled up and we were ripping off that wallpaper.

This bathroom, accessed through the "office" space, is the one bathroom on the first floor. While it's a full bathroom complete with a very small stand up shower, primarily it will serve as a powder room for our home. 

The floral wallpaper, corresponding floral border around the ceiling and window, matching floral valance, and other tired decorative accents were not something I wanted to live with while we focused our attention in other places in the house. And while we have already started on some major work in our living room, given the fact this bathroom will be a highly trafficked room, and it happens to also be the first room we see when we enter the home through the side porch, we felt it necessary to put it on the "quick fix" list. 

Thanks to my mom's eagerness to launch into this project at 4:30am on day one, she and I had the wallpaper down that first weekend and we could already see progress towards refreshing the space. (More details on stripping the wallpaper are detailed in this post.)

At some point far into the future, we have plans to fully renovate this bathroom (possibly even changing the footprint) so we can address things like the toilet that flushes and sounds like a jet engine, or the tired, cracked tile...

...but in the meantime we're looking to refresh the tiny room without spending a lot of time or money.

So we started by taking out as many of these decorative elements as possible. In addition to the wallpaper, we started by pulling out the bent and rickety metal mini-blinds, brass towel bars, and the baseboard radiator covers for a thorough scrubbing before they'd get a fresh coat of paint. They looked like they had been growing fur in an attempt to claim the crown of the house's fluffiest pet.

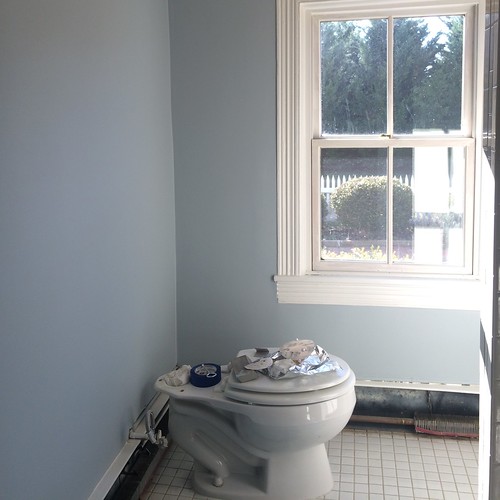
We took out the toilet tank so we could address where the wall behind it had been damaged by a leak, and we also took down this sexy seashell flush mount fixture. I have plans for this little guy.

On the plus side, this room still has an old door (possibly relocated from another part of the house) along with an old rim lock that's just begging to be restored. 

Alex carefully removed the hardware, exposing decades worth of dirt and grime. Gross. 

I then got started on filling the dozens of nail and screw holes in and around the room, especially in the window's molding. This seems to be a trend in this house as there are hundreds of unfilled nail holes that we'll eventually address.

As we previously shared, the wallpaper didn't come down without a fight, and left us with badly damaged drywall that meant we needed to rehab the walls and ceiling before we could get started painting. Over several weekends, Alex worked his skim coating magic and gave us a surface suitable for painting. 

It's a tedious and time consuming process, but it was a necessary evil in this case. We'll surely be using a steamer on future wallpaper removal efforts.

It took three skim coats to get the walls in shape, with a good sanding between each coat. 

Before the final coat, Alex asked me do a once over of the walls and ceiling, circling any imperfections in pencil. This identifies small areas that need a final really thin coat of joint compound and a final sanding before we're ready to open up the can of primer and dust off our rollers and brushes.

After the skim coating was complete, Alex ran a bead of caulk around the corners of the room, along the tile, and anywhere that there are cracks and imperfections. This is a bit of a shortcut he's started using to created crack free corners. It's a little bit of a cheat, but it works really well with small gaps.

The caulk definitely creates a crisp line and will make the paint look so much better.

While he worked on prepping for paint, I started on the design direction for the space. I decided my jumping off point in the room would be the shower curtain. It's been over a decade since I've had a bathroom with a shower curtain, and I was really excited to start the selection process. I combed discount stores like HomeGoods, TJMaxx, Marshalls, and Target, and ultimately landed on a pale blue, gray, and white paisley option from HomeGoods for $15 that would work with the existing white floor tile, beige wall and shower tile, and a calm subtle nautical scheme I was going for.

After purchasing the curtain, I selected the paint color for the walls and ceiling. I learned long ago that it's always easier to select a paint color to match fabric/decor rather than finding fabric/decor to match a paint color. I ultimately decided on Benjamin Moore's Silver Crest, my go-to ceiling paint hue that we already had on hand, along with Benjamin Moore's Wales Gray just a couple shades down on the same paint strip for the walls.

The ceiling and wall painting went off without a hitch. Alex cut in while I rolled, and did my best to keep paint out of my hair and off the "good side" of my baseball hat. You can see just how tight this room is on the vanity side.

After a coat of primer and two coats of paint on both the ceiling and walls, we could already start to see the room looking more like our style. Lulu agreed.

Then it came time for a big decision. What color did we want to paint the trim? Normally I'm not paralyzed by paint selection, but this is the start to not only the trim color but also the brand and sheen of paint we'll use throughout the entire house. While Benjamin Moore is our favorite brand of paint, we've also had good luck with Sherwin Williams paint as well (although my biggest complaint is that I don't think the color on the chip looks like the wall color after it goes up). Putting our reservations aside, we decided to go the SW route because it's substantially less expensive and they offer more generous discounts and sales. So after much hemming and hawing and bouncing ideas off of friends, we bit the bullet and bought a gallon of Sherwin Williams "Alabaster" in semi gloss.

It was evening when I started painting the trim, and it was difficult to get a true sense of the paint color in the artificial light. I soldiered on, despite feeling a bit uncertain of my decision. The next morning I rushed downstairs like a kid on Christmas morning, excited to see the room with its fresh, crisp white trim. Instead my excitement turned to disgust. Not only is the color a bit too creamy/off white, but the sheen looks terrible. Instead of a smooth, glossy finish, what we have is a chalky consistency. WTF?? Alex confirmed that it wasn't me just being totally Type A, and agreed with my assessment. 

I ran through a quick list of how I could have gone wrong. I double checked the paint can. Nope, I hadn't purchased eggshell paint by mistake. I had thoroughly stirred/shaken the paint before I started. We had primed the existing trim. But it looks like total crap. I'm so frustrated that not only did we waste $40+ dollars on a gallon of paint that we're not going to use, but I spent considerable time applying two coats of paint to all of the trim in the bathroom. I raged about it for a good two days, and then decided to circle back to this later. I don't want to hold up this project being angry and having paralysis in choosing a new color. So instead we'll save the trim repainting for another day, and in the meantime will get to the fun stuff. Accessorizing.

Here's an in-progress look at where we'll leave off for today.

It obviously needs many things, but the bathroom walls and ceiling are painted. The shower curtain is hung. The trim is improved but still needs attention. Yet the room is devoid of accessories, a mirror, lighting, and some caulk near the top of the baseboard radiator. But even in a space that's only about halfway through a quick makeover, I can't help but be thrilled that we moved this room to the top of the priority list.  

Did you tackle any quick, albeit temporary fix projects when you moved into your house? It pained Alex to put time and effort into a room he would rather "blow up," but I knew we'd probably be working on this for years if he had his way. After our efforts were underway and he was no longer annoyed at skim coating, I'm happy to report that he agrees this quick fix is a good idea. 

Comments 30

Comments

Cristina Fernandez Rugo
1/28/2015 at 9:50 AM
Love your window and the trim work around them!
Wendy
1/28/2015

Thanks, Cristina! We're so happy most of the home's original molding remains. It was one of the things that we fell in love with.Alt smile

Kristin Frykman
1/28/2015 at 10:25 AM

Love the wall and ceiling colors, and what a find that shower curtain is! In terms of trim paint on a home with character, I can't say enough good things about Benjamin Moore's beautiful trim color White Dove. I have it all through my house and love it. It reads white, but is so much more complex, and skews neither yellow or blue. It is gorgeous. Have fun with your new project!!

Wendy
1/28/2015

Thank you so much, Kristin! I'll definitely have to check out White Dove as an option. I'm looking for that right color that doesn't skew yellow or blue as you mentioned!

Kirstin
2/4/2015 at 7:37 PM

I've been using BM white dove color matched in SW ProClassic semigloss and had good luck. I've used it on kitchen cabinets, built in shelving, and trim/doors so far. I've also had it color matched to Valspar Reserve in satin and painted my kitchen walls and ceiling. It reads white, though is very slightly warmer than white appliances when side-by-side. It's a lovely white in my 1920s home.

Ursula Ellis
1/28/2015 at 11:01 AM

I really enjoy your blog and have been especially interested to learn what you're planning for the new house. The change in the bathroom is amazing. It looks terrific. I did (or rather attempted) the same kind of temporary fix in our master bath. And so many things went wrong. I have to redo so much, and I'm putting it off because I don't want to do it again and again and again.

Wendy
1/28/2015

Thank you, Ursula!Alt smile I'm so sorry to hear your master bath quick fix didn't go exactly as planned. You can do it -- good luck!

Erin
1/28/2015 at 3:07 PM

Really love reading about the updates you are making to your second home. Makes me want a second home someday as well! We moved into our first home last year on Superbowl Sunday, and after everything had been moved in, my husband went to a friends house to watch the game since we didn't have any cable. I stayed home to do a little unpacking and ended up taking down old sliding glass shower doors and putting up a curtain because I couldn't stand the doors. My husband still jokes when he's heading somewhere for the night that he's afraid of what he'll find when he gets home. Sometimes things just can't wait!

Wendy
1/29/2015

That's too funny, and reminds me of a good friend of ours. Whenever her husband goes away for business, there's always a surprise waiting for him when he gets home!Alt smile You're so right -- some things just can't wait!!

momof3
1/28/2015 at 4:07 PM

Love this color and shower curtain!

Wendy
1/29/2015

Thank you! The curtain was a lucky find and very thick fabric for the price.

Harry
1/28/2015 at 4:41 PM

Totally with you about the quick fixes. My housemate is a person with more plans than time (or maybe energy?) so I've learned to go with a "quick" fix I can live with and do it ~now~. If roommie wants to do the more thorough job later, great. If not, I have the improvement I need without waiting.

And that bathroom really needed the improving.

Wendy
1/29/2015

Sounds like you have a great system in place, Harry. (And one not much different from my own!)Alt smile

Little Red
1/28/2015 at 7:29 PM

Much improved already.

I do have a question though. Looking at the close-up shots of the door and window trim, I got the desperate urge to strip them down to the wood and then paint them again. Is that ridiculous?

Alex
1/28/2015

Not ridiculous at all. We started down that long road with our first house. Now 12 years later, we have one room's baseboards and one old door left to strip and then we're D.O.N.E. While we love the results, we swore we'd never do it again. We're calling it character this time around...unless you want to come over with your paint stripping tools? ;)

Little Red
1/29/2015 at 9:10 PM

That bad?! I think I just won't look at those photos too closely next time. Alt smile

Gwen
1/29/2015 at 8:44 AM

Wow. I feel your paint pain. We've ended up with BM Snowfall White in the Advance line in Satin. But I've had bad experiences with their latex Eco spec paint on trim, or maybe it was the primer, but in one room it is peeling off and never fully cured.

Wendy
1/29/2015

Ugh, that's terrible! Did/do you have to strip the peeling paint where it failed? While ours looks and feels bad, I hope a coat or two of the "right" paint should take care of the issue...fingers crossed.

Peggy
1/29/2015 at 11:57 AM

Wendy, please don't be so hard on yourself, but I do prefer Benjamin Moore paints. I use White Dove quite often and I love their primer. Could you tell me which caulk Alex used? Thanks.

Does Mel mind being left alone so much?

Wendy
2/4/2015

Thanks for the color tip, Peggy! We exclusively use Big Stretch caulk. It's more expensive, but definitely worth it! http://www.oldtownhome.com/2011/6/14/Toolbox-Tuesday-Do-Your-Best-Then-Caulk-the-Rest/

Mel doesn't seem to mind at all. In fact, we think he appreciates the occasional break from Lulu.Alt smile

Jean-Christian Pitre
1/29/2015 at 1:14 PM
I still can't comment on your site, so I'm leaving it here: I actually quite like the pain white floor tiles (they're just "there" without making too much of a statement, and white matches everything). I really like the wall colour, too. I can't wait to see more of your projects this year!
Amy
1/29/2015 at 4:17 PM

Curious about the type of SW paint you used... I've used their HGTV line and have been pretty disappointed. Just wondering if you used the HGTV or one of their more expensive lines. Thanks and good luck!

Kathy S
1/29/2015 at 11:24 PM

Why don't you add texture to the walls? Is it an East-coast thing?

Wendy
2/4/2015

Hi Kathy. Do you mean like a textured stucco? I'm not sure if it's an East-coast thing -- it's just our personal preference to have smooth walls and ceilings.

1/30/2015 at 7:26 AM

Your bathroom refresh looks great! I especially love the color on the walls.

We're in the middle of a similar project: sprucing up our bathroom without spending too much time or money. We've started stripping the dated pink & gray 1980s wallpaper. Eventually the whole bathrooms needs an overhaul, but in the meantime, we're planning to paint the walls so that at least it's not quite so terrible, especially since this is our one and only bathroom in the house!

Loved reading your post!

Wendy
2/4/2015

Thanks, Jamie! Good luck with your bathroom!

Em
1/30/2015 at 11:30 AM

Great job! Will you guy be posting a floor plan of this house so that we can see how these rooms all fit together? I'm having a had time visualizing where the half wall is and where this bathroom is.

Wendy
2/4/2015

Hi Em - Thanks for the suggestion. I hope to have a floor plan at some point. I'll try to include some additional photos in future posts so the layout is more apparent.

Ofelia from Mexico City
2/4/2015 at 1:40 PM

I always got surprised for a little (lot) coat of paint can do, like a new room! Beautiful color, by the way.

brittany
4/20/2018 at 10:23 AM

Love the post I did my bathroom after year of it being plain. I added a removable wallpaper to it for like 3 bucks a yard it was really cheap and came out perfect. I got the paper from www.interiorink.com.

Since you've not signed in yet, you will need to fill in your name and email below. If you have a Facebook account, save yourself a step and use Connect to login.

Denotes a required field.

Please enter full URL, including http://

You can use Markdown syntax in your comment. And you can also use lots of Emoji!
  • Search

  • Login
  • Follow
  • Advertising

If you're looking for information on advertising and sponsorships, head on over to our sponsorships page. You can purchase site sponsorships in a few easy clicks. 

Toolbox Tuesday
Open Housing
  • Popular Topics
  • Comments
  • Blog Roll
  • We're Featured!

Old Town Home has been featured in the following places and publications:

The Washington Post
 
Washingtonian Magazine
 
Domino
 
Old House Journal
 
 
Apartment Therapy House Tour
 
Washington Post Express Feature
 
Home & Garden Blogs
 
© 2024 OldTownHome.com. - Privacy Policy

Unexpected Error

Your submission caused an unexpected error. You can try your request again, but if you continue to experience problems, please contact the administrator.

Working...

Working...