Thank you for the overwhelming response last week on our point versus flat marble flooring layout debate.
We had an overwhelming response to our simple A or B question. And though the responses ranged from thought provoking, to those based on opinion and personal experience, to the layout most likely to make your butt look wider, the thing is, the resulting tally of votes between point and flat were very surprising.
I figured everyone would pretty much say they preferred one to the other, and the victor would be a landslide win. But what I learned is that there is no "correct" way, and it all comes down to personal opinion. I also learned that sitting on the location of the toilet might be the best way to get a sense of how it will look when installed.
Many pointed out the virtues of point over flat, while others showed where flat would be superior. And quite a few pointed out how much harder it would be to install the pointed layout method at the door threshold due to the tedious cuts necessary...a very valid point. (See what I did right there?)
One thing for sure, we needed a larger view than two single sheets laying on the ground. So we broke open several boxes and started to lay them all our in a larger area.
After a mild debate and comparison we've made our decision. I must say, I'm a little disappointed that our internal debate wasn't more heated. But it ultimately comes down to the fact that Wendy was "okay either way." Talk about pressure!
Without further ado, I bring your our final decisions!
That's right, we're going to be making the install a little bit harder by forcing ourselves to make some delicate cuts at the door, but it all came down to what we felt looked best for the room. Once we laid out a whole lot of sheets, rather than just staring at one or two, we really got a feel for how it would work in the room and the points just felt better.
Once we were happy with our point layout decision, our process actually snowballed and we ended up dry fitting the marble for the entire room. This is actually a very critical step when you're working with tile that many people tend to skip when using mosaic mats. I'm not quite sure why, but quite a few people I've seen working with the 12" by 12" sheets of little just start slapping them down without much planning. But planning is key to a good install.
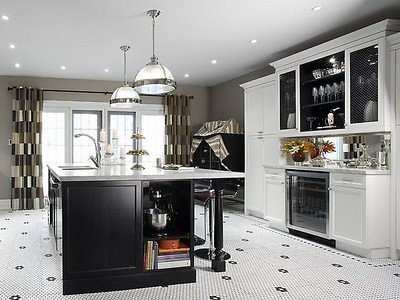
I remember watching an episode of Candice Olson's show, Divine Design, several years ago where they laid a porcelain hex floor in a kitchen. While Chico did a wonderful job on the lighting, the tile sheets were not spaced correctly and you could clearly see the joints between nearly every sheet. One line ran right into the next, and it just looked like one foot sheets of one inch tile thrown down, rather than individual one inch tiles throughout the room. I was shocked and appalled.

Photo Credit: Divine Design, Candice Olson
When you're laying mosaic tile you know there will be the periodic areas where things don't line up perfectly. Whether you're dealing with an odd sheet, a crooked tile, or any number of inconsistencies. But with a little planning, you can effectively disguise these inconsistencies to make it look a bit more like a sea of tile laid by hand.
The best way we've found to disguise these joints is to stagger the sheets much like you'd stagger bricks in a running bond pattern. Just offset one row of sheets about one half sheet above the previous row. By doing this it will help to break up any possible lines that might occur from a shifted sheet.
The goal here is to trick the eye from seeing anything that's not quite perfect into believing it's a localized issue with just a few tiles, rather than something that's a pattern that repeats through the whole room.
There's one other thing I've thought about with these mosaic sheets that I'm going to just throw out there, even though we're not doing this at all. I feel like the sheets shouldn't be 12" by 12", but should instead be 6" by 12" sheets. As rectangles you could layout your entire pattern in a fan starting from the corner of the room. Some sheets would be horizontal while others vertical. Ultimately they would all stack together in a manner that covers the whole room while disguising any seams from the sheets. It would definitely make for a more time consuming process to complete the job, but I think the end result might be a lot nicer.
Once we had our whole room covered Wendy started a labeling process that would allow us to keep the sheets in order.
Using painters tape she labeled each sheet based on their row number and their order from our starting wall. This will eventually allow us to stack all of the sheets on one side of the room but keep them in the correct order based on any cuts we have to make or staggered starts we want to accommodate. Without this process it can get extremely overwhelming. Well, even more overwhelming than it normally tends to be.
Overall it took us about four to five hours to dry fit the entire bathroom. But in the process we were able to determine if we had enough tile (that's the most important part), make most of our rough cuts, and figure out if there were any color issues with the sheets that would need to be moved, hidden or replaced.
We also had a frequent visitor during this stage of the work. It seems the cool tile was just what our little four legged friend was in search of. I think she's going to love it once it's all installed.
At a certain point we actually had to formulate a complex barricade plan to keep her out of the room. As you can see, we spared no expense in creating this ridiculous feat of engineering that she had no possible way of overcoming...
She was sad because she was "blocked out." We are sad because we have a terlet sitting in our bedroom along with a ton of other crap for the bathroom. Ugh.
We kept working on the labeling and ended up finishing everything up and getting a pretty good view of what we'd need to do in the room as far as laying the tile is concerned.
Our final cuts on the wet saw will need to be made once the sheets are actually going down, since they'll surely shift some from their dry fit locations. But we're in good shape for the massive undertaking that is the process of laying all of this tile within the room.
The tile itself has issues here and there. Twisted pieces, inconsistent lines here and there, and some color variation within certain boxes that made it look like it was from a different batch. But overall, we're happy. I think some of these inconsistencies will make it look a bit older and more authentic. The last thing we want is a perfectly laid room because we know there's nothing perfect in our house.
For those of you asking where we sourced the tile, we've been waiting until we had a good look at the whole lot before we passed it along. We didn't want to give you all information on what we had purchased until we saw the whole thing. Now that we've seen it all, we're ready to share. We purchased it through a company in Anaheim, California called Oracle Tile & Stone. We actually found them by ordering a sample from Amazon quite some time ago. The price for our tile order was $9.22/sqft including shipping after a 10% off coupon we received with the sample order.
The grout lines on our sheets are 1/16" and smaller and as I've said, there are some inconsistencies. Overall, we're very happy with the look, but the same we ordered did have larger grout lines and looked a little different (which is expected with a natural stone). We are happy with the smaller grout lines, but we'll need to make sure we use an un-sanded grout.
We're both very excited to get this down on the floor in a permanent way and get ourselves a partially functional bathroom. We have quite a long way to go, but it's really feeling like a room is supposed to feel. What do you think about our decision of going with the point? Is our choice on point, or has it fallen flat in your eyes?

![]()
![]()