We've all likely seen it in magazines, or heard of it being done from a friend or antiques dealer, or witnessed it in a friend or family members renovated bathroom, and it seems like a pretty straight forward and simple idea. The concept is one that can both save a few bucks, add a little character to a room. What am I talking about? I'm talking about taking an old low dresser, side board, or buffet and transforming it into a bathroom sink or vanity.

Really, the idea seems like it should be so easy. Just take an old vanity, cut a few holes in the top, drop a sink or two in, call it a day. Better yet, don't even bother with the old top, take it off and grab a piece of remnant marble or granite, pop in a sink, and you've got yourself a one of a kind vanity.

I have to admit, at first my mind went to the good old "Yeah, that'll be no problem." But then reality set in and I realized that pretty much anything involving retrofitting an existing piece of furniture to be something else, let alone one where you must ensure plumbing has a place to run, is an entirely new set of challenges. Sure, the Pinterest boards are alive with the look of effortless simplicity. "Here, here's a stunning before and after!" We all collectively ooh and ahh at the magnificence of the piece, like a couple of grandmas at a fireworks display.

Slap that little Pinterest price tag ribbon on the piece to add a little salt to the wound. "Wow, would you look at what someone was able to accomplish for just $150.00! Take that, $3,299 Restoration Hardware mass produced double vanity, I'm all in, and I'll raise you a bundle of character you can't possibly be dealt in your hand." Ignore the man behind the curtain and the fact the $150 tag is only talking about the faucet hardware.

Gone are the nitty gritty details, the hole necessary in the cabinet interiors that look like they were chewed by beavers, the sweat and tears no doubt shed while trying to wrestle this piece of furniture from intended purpose into the submission induced new life it's surely meant to lead.

The sad fact is that the majority of these such re-purposes, or "up cycles" as it is often called, end in wasted effort, broken dreams, or in the worst case scenarios, a pile of useless kindling created from the lethal combination if craftiness, power tools, and the haze of an Internet inspired dream.

Don't worry, we've all been there, we've all done that, we should all attend support group meetings, and we should all sing songs of unrealized DIY dreams around amateur fire pits (also from "Pinsperstions") fueled by failed project scrap and poorly conceptualized glitter use.

Well, we want to change the score. Like a couple of scrawny kids on the playground who haven't learned their lesson from the school yard bullies, we refuse to hand over our hard earned lunch money to the likes of mass production pieces and instead and bought ourselves a "vintage" solid wood buffet that will (hopefully) one day become our bathroom vanity.

Rather than just present you with the ugly before and the (hopefully) beautiful after, we're going to show you the step by step journey we're taking to (hopefully) transform our purchase from a mid-century walnut buffet into a double sink marble top vanity with realistic costs for doing such a project in our area.

Jeesh, there sure are a lot of (hopefully)s in those last few paragraphs. But those are there because we don't know how it will actually turn our yet. We only just started the project, and we don't have all the answers. We're going to try our best, absolutely, but a little voice in my head keeps saying "I wouldn't be surprised if we're fire pitting this bad boy by spring." (Not really, but you get the idea.)

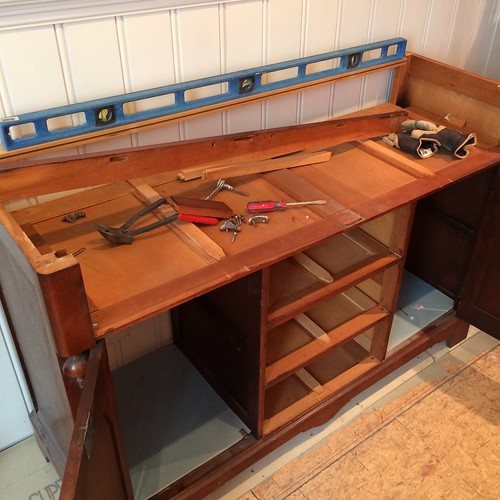
After purchasing the buffet, we shared its general look and our plan with you several months ago. Now that we've allowed the buffet to acclimate to our home (and a bunch of other bullcrap excuses for why a project took far too long to begin), we're tackling the first major aspects of this effort, disassembly.

Unlike the joys of renovation demolition, where you have no real care for the damage you do on the items you're throwing out, initial disassembly of a re-purposed piece must be done with purpose and care. In our case, our first goal of removing the top of the buffet so it could ultimately be replaced with a new piece of Carrera marble was not a simple case of a pry bar and elbow grease.

Instead, we had to remove the drawers, shelves, and reinforcing backing piece (you know, the thing that comes with all the Ikea stuff that you're supposed to hammer on with the included nails but never actually do because you're too lazy, always bend the nails, and don't want to make so much noise). After carefully removing all of the nails and setting then aside, the backer piece of compressed board came right off.

With the backing removed, we finally had access to all of the screws used to secure the buffet top to the base. After removing the screws, we received our first major stroke of luck, the top hadn't been glued to the base, so it removed very easily.

As is customary in projects like these, any bit of luck is typically followed by a torrent, or at least a trickle, of misfortune. In our case, it came in the form of structure, or more specifically, the lack of structure.

Any piece of furniture that hopes to one day support a piece of stone as its surface must possess a solid and sturdy base, capable of supporting the stone on all edges and through potential points of weakness. Our buffet was only ever meant to hold a wood top, so the structure needed simply wasn't included in the original construction.

To add insult to injury, the pieces of wood already there had began sagging over the years, almost ensuring a day one crack if we were to ever set a piece of stone in place.

To remedy this issue, we had to perform some additional surgery, removing various pieces of the vanity's support pieces in an effort to ultimately sure up the structure of the vanity's top to support our choice of stone.

At this point in the project we've paused and I've begun obsessing about how best to tackle this item. We don't have the sinks that will ultimately grace this piece of furniture, and that's throwing a wrench into my plans. Without the sinks and their actual dimensions we can't calculate exactly where we can put support elements and where we need to leave room for the bowls. Our plan is to use two undermount sinks for this project. To us, these sinks look better, but they definitely add difficulty over using vessel sinks.

So we're sink shopping and support structure planning, all while hoping beyond all hope that this project actually works out. But this is the Internet, and the Internet loves a good crash and burn as much as a success story, perhaps even more, so we hope you'll follow along to see how this aspect of our overall bathroom project works out. As of now, your guess is as good as ours.

Oh, and let's not forget about the debate that's been ongoing for quite some time about "The Balls." More specifically, should they stay or should they go, now? If they stay there could be trouble (with Wendy). But if they go there could be double (with a torn up vanity). So the answer we need to know...should they stay or should they go?

Have you ever done one of these retrofits? Have any tips or helpful hints that might make our lives easier? I'd love to hear your re-purpose war stories. And what are your thoughts on "The Balls?"

Comments 21

Comments

2/19/2014 at 11:11 PM

I love the shape and detail on this dresser! Interested in seeing how you address the structure aspect. I think the balls should stay. I think they add character. If you took them off, would you try to replace them with something? I think it would look too awkward not to.

Koen @ TownHouseHome
2/19/2014 at 11:12 PM

That's a daring project, I'm really looking forward to seeing how it'll turn out in the end. I take it the two top shelves will have to go to make room for the sinks? Nice call for the undermount sinks btw, with a stone tablet they look so much better than the ones on top.

My two cents on the balls: they should stay. I find them to give some cachet to the dresser. Also, if you'd take them off, you'll have to do something with the area where they were, which I'm not sure would be an improvement.

Good luck with the build!

2/19/2014 at 11:21 PM

Are you sure you want to do vessel sinks? Most vessel sinks tend to look like someone left a mixing bowl on the bathroom counter. I'll bet you could find a couple of lovely smaller porcelain undermount sinks at the ReStore ... I see them at the one in Richmond all the time. With undermounts, you could do a lovely shaped backsplash in marble, too. (Leave the balls alone. They're just fine the way they are.)

Alex
2/19/2014

No no! We definitely DON'T want to do vessel sinks. Undermount is our only way to go, but we need to find one that's small enough to fit.

2/19/2014 at 11:23 PM

My parents did a retrofit on a dresser/buffet (can't remember which) and ultimately added a piece of wood-toned laminate on the top and bowl sinks. I prefer the look of the marble but not having to support the marble was a big time savings. You guys never go for time savings though (which I love!).

2/19/2014 at 11:23 PM

The dilemma of the balls reminds me of the great nipple debate, which was actually the first post I ever read at Old Town Home. I would vote to keep them, mostly because you are using an old piece because of the character that it has over a new mass-produced cabinet, so you don't want to get rid of all the character.

Also, I have full confidence in the two of you that you will be able to pull off this transformation. I do not have any advice for you. My sister did something similar, but they used the wood top and a vessel sink. I will be watching your project because I would eventually like to do this in the bathroom upstairs that we are currently renting. The plan is to someday turn this back to a single family home.

2/19/2014 at 11:24 PM

Don't be a ball buster. I vote to keep the balls!!!!

Janice
2/19/2014 at 11:25 PM

I have no words of wisdom on how to accomplish this grand endeavor. But I definitely have an opinion on the great ball debate. The balls must stay! They're what make the piece special.

bfish
2/19/2014 at 11:26 PM

Differing viewpoint from other commenters -- I'm with Wendy on "neutering" the dresser (i.e. removing the balls). The buffet will look much cleaner and more classic without them. IIRC, you guys are going to paint the piece and I trust that you can sand, fix, and paint the buffet so no shadow of the balls remains. Now I am in favor of keeping the carved wooden drawer pulls (on drawers from top that are removed in most pics above) -- I love that style.

Our only vanity re-do so far was to take an old 1920s dining room table (walnut I think, and very beat up) and use one of the halves for the top. We had to do a lot of disassembling first just to take it apart, as it had a heavy-duty mechanism for attaching a table leaf (am not describing it well but it was a pain). We were able to keep the carved apron under the table and use like pieces from other parts of the table to form a "frame" around the top. It spans the entire width of the half bath so it's touching walls on three sides. The underside is open as this project is in our outdoor playhouse and we don't need enclosed storage space like one would want indoors. Also due to light use we're okay with using the wood top rather than something more durable.

And I'll say it -- I HATE vessel sinks; always have. Hope this style will die out soon. They never look right in old houses; maybe in a contemporary bath but I would probably still want to change to undermount.

Tom and Jada
2/19/2014 at 11:27 PM

Given the curved edges on the piece, it would probably look better to use a pair of oval shaped undermount sinks versus a square or rectangular shape. The good news is, the oval sinks are plentiful and easy to find, but the hard part is finding two in the exact size that you need.

Community Forklift used to have a pile of round undermount sinks that were dirt cheap. Not sure if they're still there, but it might be worth a look.

Oh, and we think the finials should stay Alt smile They are part of the history of the piece and have been with it from the start.

Emma
2/19/2014 at 11:27 PM

I'm not sure what dimensions your soon to be sink top has, but this one is pretty small at 13x10:http://www.bellacor.com/productdetail/nantucket-sinks-um-13x10-w-mini-oval-undermount-vanity-bowl-white-566906.htm

They have a slightly larger one as well.

mooninfog
2/20/2014 at 9:25 AM

The problem with small sinks is, they're small.

What happens when you want to wash out a sweater by hand, or give the pigeon a bath, or experiment with, well, whatever? Yes you could go to the kitchen to do all this, but it just makes your bathroom less functional.

In short, you might consider a single large-ish undermount sink rather than two dinky ones.

2/21/2014 at 3:50 PM

When I looked at the pictures of these bathrooms I was ashamed because my bathroom is very simple and not that beautiful as the ones you showed. I always wanted to have a bathroom in classic style. It reminds me of old times.

2/21/2014 at 6:03 PM

You are really detail oriented! This is the one I did http://pats-addition.blogspot.com/2013/08/renovation-bathroom-vanity-ii.html
Works for me.

JC
2/22/2014 at 12:08 PM

I love the look of the half finials, but if you do decide to remove them, it's possible that they are just glued with hide glue. If that's the case, try to sneak-in hot water in the joint, and heat the piece with a heat gun. Work a thin drywall taping blade under it, and it should come free fairly easily. Excess glue can be washed off with hot water.

Laura w
2/25/2014 at 11:27 AM

I refinished a broken, water damaged dresser into a vanity for my half bath. The most difficult part was getting the plumbing to fit properly. I just stripped the veneer off the wood top and stained the wood underneath. I fixed the top drawer fronts and screwed them into place so it looks like they're functional. The lower two drawers are functional with a notch cut out of one of them to accommodate the pipes. I painted the base since it was so damaged, staining would have been pointless.

Kendi
2/25/2014 at 4:41 PM

Hi guys! I never comment but I am an avid reader...nice to "meet" you! ;) This is totally random and unrelated to this post, but I am watching House Hunters International and when I saw the woman I was like "she kinda looks like Wendy from OTH" (not totally, but kinda). Then the narrator came on and it turns out her name is Wendy... THEN she mentions that she is moving from Alexandria, Virginia and I was like...ok..that's crazy!!!! Did you pose as someone else's wife for an episode??! Haha. Just had to share...like I said...randomAlt smile

Gaidig
3/2/2014 at 11:02 PM

The "balls" really look like the upside down version of finials on my four-post bed that first belonged to my great-grand parents. Details like this are the sorts of things that will make it look of an era with your house.

Scoropan Paul
3/17/2014 at 6:22 AM

Very good. I love the ideea. I think I will try to do this with my bathroom.

3/24/2014 at 7:33 PM

So inspiring, love the recombination, less waste and more room for creativity.

james boyer
3/30/2014 at 4:14 AM

Having done this, At an Antique auction,we acquired a beautiful french side board that came with a marble top and a 8 inch marble back splash, pick your sinks have a plumber install them after your stone guy has cut the openings for the under mount sinks and I believe our plumbing bill was about $350.00 maybe $400.00 which I considered a bargain for all the plumbing work that had to be done including the new faucets with soap dispenser. The less you have to re-engineer the better off you will be. I would not recommend someone doing this with out the furniture having a original factory installed stone or marble top as you waste considerable money and time. doing it your way It took us ten days from start to finish an are total bill was around a grand. Good Luck! jim b.

Since you've not signed in yet, you will need to fill in your name and email below. If you have a Facebook account, save yourself a step and use Connect to login.

Denotes a required field.

Please enter full URL, including http://

You can use Markdown syntax in your comment. And you can also use lots of Emoji!
  • Search

  • Login
  • Follow
  • Advertising

If you're looking for information on advertising and sponsorships, head on over to our sponsorships page. You can purchase site sponsorships in a few easy clicks. 

Toolbox Tuesday
Open Housing
  • We're Featured!

Old Town Home has been featured in the following places and publications:

The Washington Post
 
Washingtonian Magazine
 
Domino
 
Old House Journal
 
 
Apartment Therapy House Tour
 
Washington Post Express Feature
 
Home & Garden Blogs
 
© 2024 OldTownHome.com. - Privacy Policy

Unexpected Error

Your submission caused an unexpected error. You can try your request again, but if you continue to experience problems, please contact the administrator.

Working...

Working...