Like a bad 1980's daytime drama, we left off in our tale of antique oak dresser compromise with a major cliffhanger, only it didn't involve murder, amnesia, and a twisted love triangle. Instead, just a simple identity crisis.
After initially convincing my better half of the option to keep the natural unpainted wood grain from being covered up once and for all in a flat gray hue, or even in a design consisting of alternating parallel colors intersecting with one another in a repeating fashion, we proceeded with sanding the whole piece in prep for something...else.
But two questions remained. What, exactly, was the "something else," and would the dresser actually even make it to its potentially alternate "something else" destination after having been originally slated for the DIY paint factory? Or, would Wendy, surely cheerlead by Mel (he hates antiques, you know), decide painting the piece is where it's at, my desires be damned?
And now, the conclusion of "A Dresser Full of Compromise..." (Queue cheesy violin and piano music like Days of Our Lives.)
There comes a time in the life of almost any piece of furniture where it goes through some major life altering aspect of its own. Whether it's being set out on the curb for the next taker, sold at a yard sale, picked up on Craig's List, or offered up at a high end antique house, everything typically has a history, a past life, and a potential for the future. In almost every situation, the continued life of a piece of furniture, no matter if it's old or new, is determined almost entirely by the next owner.
In the case of our hand-me-down antique, we're opting to make it a somewhat permanent resident in our renovated home. Once this piece is in the closet, it's likely in the closet for good. We'll actually place it before putting on the door jambs, and though the door jambs will be removable, we're surely going to let this dresser convey when if we leave our home. With this in mind, and in the hopes our renovation will stand the test of time, we also want this dresser to do the same.
After our back and forth, ongoing debates, and persistent attempts by each to convince the other of their ideas, one of us may have even said "Oh well, that's nice, we're painting it." Hint: It wasn't me. It's the sort of suspense you'd expect from a daytime drama. Trust me, I'd know. I somehow got addicted to watching Days (thanks to Wendy) while in college and would even try to schedule classes around our 1:00 airing. True story.
So what was our ultimate decision? Aniline dye!
Back in 2012, as we approached our Christmas home tour, we refinished a chair belonging to Wendy's Great-Great-Grandmother that had sat in our basement for nearly a decade. In doing so, we dyed the wood using water soluble aniline dye, and it turned out beautifully.
Today, the results of the chair were part of the fuel necessary for me to stoke the fires of the "don't paint" debate. Wendy could practically see how it would turn out, as we had an example piece to refer to. And the real bonus for this approach? We had everything we needed on hand. No need to order anything, no need to delay, no need to spend extra money. Win. Win. Win. Wendy reluctantly agreed, but only after I agreed to let her pick the hardware for the piece. Done.
We mixed up some of the dye in an empty jelly jar and got to work.
Aniline dye goes on in a variety of ways, from spraying to ragging to brushing, and each has their own pros and cons. I think spraying in thin coats is probably the way to go if you're dyeing something really nice and want event and consistent color, but cleanup is harder, set up more time consuming, you use more dye, and you have to be ready for the overspray. For our purposes, we opted to go for application via 2" and 3" foam brushes.
When applying the dye you want to put it on evenly and then lay it off to achieve a streak free surface that doesn't have any hard start/stop marks, like this photo before I went over the whole thing to smooth it out.
This is pretty easy on flat surfaces, but when you get to vertical areas, especially when using a foam brush, it's far easier to get some bad drips due to how the brush absorbs and releases the dye.
We've found that we like applying dye in a two person team. One person applies dye while the other follows and smooths what's been put on. The second person also works to make sure any drips are immediately laid off to prevent obvious color streaks. Remember, aniline dyes build up one coat to the next, they aren't like wood stain, so a drip now will likely be a streak always.
After applying the dye to all of the drawers and dresser body, we were excited by the dark dark look of it. This was precisely what both of us wanted. Something that didn't scream "I'm oak, look at my deep grain and soft orange-yellow-red color!"
We left it to dry and had to wait 24 hours before either applying a second coat or beginning the finish coats. One thing to note about water based dye, as it dries it becomes almost ashy, and even greys a bit. Don't worry, that will all be taken care of with the finish coats.
While the dresser dried, another aspect of our ongoing debates, and the focus of the second major aspect of our compromises crept into our lame little story.
THE HARDWARE!!!! Dun dun duuuuuhhhhh.
Neither of us like the handles that came with the dresser. Not only were they not original, they were ugly, cheap, damaged, and...well, ugly. We were able to save the keyhole covers, and we planned to reuse those, but oh, the handles, oh, the horror. If anyone needed a case of John Black "smell the fart acting" induced amnesia, it was those drawer fronts so they could forget the hideous handles that someone had forced upon them.
As we began our debate on what to replace the handles with, we realized that a careless previous owner had sloppily opted to add additional holes to accommodate these wider handles vs pull knobs. This left us with three holes in each handle location.
While I wanted to use the cut piece of dresser top to cut down little filler pegs that I would glue and hammer into the drawer holes and sand, leaving a gently worn look, Wendy said "are you effing kidding me? This is going in the closet. How long so you think we need to spend on this? No, we're getting handles that will cover the middle hole and will use the side holes."
She had a point.
Wendy began the handle search online while I looked on in vain. I wanted something old looking, something possibly salvaged, something unique, something you don't normally see (something that would probably delay our project by weeks). Whereas, Wendy wanted something done, and inexpensive, and done.
What Wendy found were some simple silver bin pulls for a mere $2.00 each that would both fit the existing hole pattern while also covering up the center hole. No wood filler or whittling filler wood dowels necessary. She placed her order, and I placed my compromise. We weren't painting the dresser, so I was okay with the handles, though not my first choice.
When the handles arrived we realized two issues that needed to be resolved. The first, the handles had posts that needed to be sunk into the drawer holes, and these posts were larger than the drawer holes, so they'd need to be drilled. Not too bad. The second issue, the careless handle driller from the dresser's previous life had not taken their time in drilling the holes, so the existing holes were crooked, off center, vertically wrong, you name it. It needed to be fixed or these new handles would look horrible. A little harder.
To remedy this issue with the holes I made up a little jig based on the correct handle hole location.
I also grabbed a proper sized drill bit and went to town on re-drilling the drawer fronts.
It was a case of measure, clamp, drill, and repeat. You can see just how far off some of the holes were. If we had used our handles in these holes the end result would have looked terrible.
After about 20 minutes I had all of the drawer fronts ready to go to accept their new handles.
While the handles weren't necessarily 100% what I had envisioned, this was all about compromise and getting the project done.
Once all of the handles were ready to go we got ready to apply our finish. I gave the whole dresser a once over with 400 grit sandpaper to knock down any fuzz the dye had raised on the surface of the dresser...
...and then launched into applying the shellac (I was lame and didn't make my own shellac from flakes).
Shellac is amazing stuff. As soon as you brush it on the whole look of pretty much any piece is instantly transformed.
The key is to apply many thin coats in a very smooth and consistent manner. It's also important to sand between coats, but be careful sanding after just the first coat or two or you will burn right through the shellac and sand your finish.
When I sand, I like to sand by hand and use either a 400 or 800 grit paper. It's a very fine grit to just get a nice smooth surface. Sanding shellac produces a greyish residue on the shellac, but that's okay.
Just wipe off what will come off and apply your next coat after an hour.
Once our final coat is applied, I let the dresser drawers sit for at least 24, and more like 48 hours. We applied six coats total to get the really glossy and smooth surface we were after, so those all had to cure or we'd surely start leaving fingerprints in the finish or ending with with drawers sticking to the body.
Our work was largely complete, we just had to attach the handles (which actually required us to go purchase a bunch of washers and 8/32 screws in 3/4" since the supplies screws were too long), and place the drawers in the body.
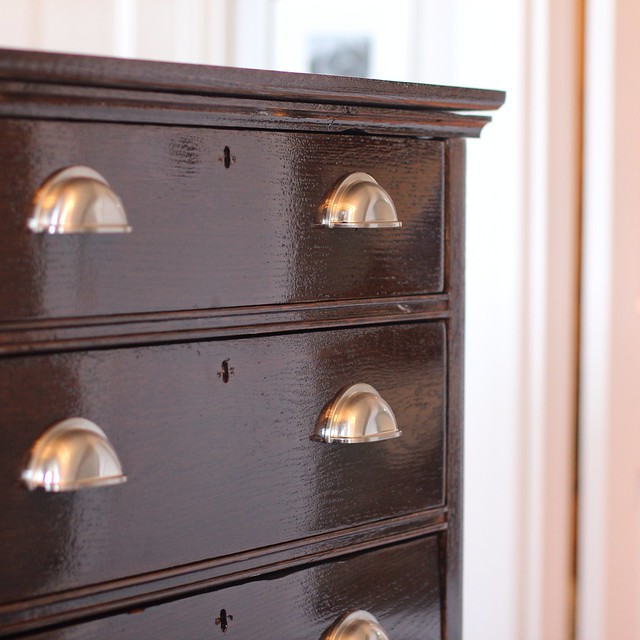
The dresser we ended up with is exactly what we wanted.
Our dresser had been refinished without paint and without any designs. Just a classic dark oak dresser finished in a shiny shellac.
The irregularities in the wood grain, color, and overall finish give the piece interest that would have surely been lacking if it had been painted.
I keep harping on the paint vs. natural/stained look not because I don't believe in painting wood furniture (I surely do, we're still going to paint our maple vanity), but more to show that an unpainted finish is not necessarily more difficult than paint. I think a lot of people go the route of paint simply because of the perceived difficulty in achieving a nice refinished look. Proper prep, in both paint and stain, is the key to a good result, and once you've prepped your surface, it really takes just as long to either paint or stain/dye your wood furniture.
This is also a great example of a time when a spousal compromise is possible, and can achieve something that's particularly nice, not just an amalgamation of multiple styles.
In all, we're absolutely thrilled with our project. To be totally smug, it turned out way better than I think either of us expected. Sure there were a few issues with dripping dye, and difficulties with the handles and holes we had to deal with, but those can be overlooked since we were able to work through them as they arose.
We still need to apply the little keyhole covers and also place it in the finished closet before we'll really get a good view of the final result, but I'm excited by the fact that I'll have somewhere to actually put my socks, underwear, and t-shirts that doesn't involve throwing them on my closet floor. But the best part, this whole thing probably cost us about $35 in hardware, brushes, and shellac when you consider everything we were either given by my parents or had on hand.
What do you think? How did our efforts in compromise turn out? Do you like the end result, or do you think we should still go ahead and apply a chevron faux finish sponge paint ombre treatment? Like bad soap star hair dos from the 1980s, our money is on the "trendy" paint treatments going out of style.