Alright! We were rolling right along with our four part prerequisite list for the siding project we had undertaken with little to no (okay, absolutely no) previous experience installing siding. Sure we may have had a few snags and delays along the way, but we were rolling along, and that's all that really mattered.
- What kind of siding should we use?
- What additional tools will we need?
- How am I going to do the work all the way at the top of the house?
- Research replacement gutters
The single item remaining on our list was to research and determine a suitable new gutter solution.
Before we delve into this item on the list, let's take a step back to discuss how this critical element to our project was actually the catalyst for the entire siding endeavor, yet somehow we had left off even considering the gutter replacement until we had actually started the project.
Our home's roof configuration consists of a roughly 15' wide and 65' long slightly pitched to the rear layout that reduces to about 10' wide by the time it reaches the single rear gutter length. What this means is that all of the rainwater that falls on our home funnels to one short length of gutter at the back of our house.
To complicate matters, when we first moved into the house in 2003, our gutter and our neighbor's gutter were combined in the middle, and all of the water from our roof and from our neighbor's roof of equal size came barreling down the roof towards the undersized 20' length of modern white aluminum gutter.
To make matters even worse, the gutters terminated not into a normal straight aluminum downspout, but rather into a tight 'S' of 3" PVC elbows and 20' length of 3" PVC. Less than ideal? That's an understatement.
Add to this wonderful debacle that the gutters lacked gutter screens at several locations, having been blown off and not replaced over the years. These gutters screens were rather critical given the two large trees hanging over the front of the roof. As one might expect, each fall the trees would begin dropping their leaves and debris on the roof, which was ultimately washed into the gutter in heavy rains, clogging the inappropriate PVC 'S' above the downspout. This resulted in carnage, misery, and disastrous waterfalls of ice down the back of our house, which ultimately resulted in Wendy, sitting and rocking in the fetal position at the thought of massive repair work both inside and outside of our house.
Our home's previous owner "resolved" this clogged and leaking gutter situation by placing a large plastic bucket where the water was falling, along with a 10 pound weight in it to hold it in place.
No, this didn't do anything to fix the leak. But apparently this was enough to keep the water from annoying the owner by tapping against the window as it dripped off the gutter. Yeah...that's an awesome solution.
See...less than ideal.
Have I painted a vidid enough picture of what this configuration resulted in? Oh, okay, here's the actual end result.
Through a rather fortunate twist of fate, the previous owner of our neighboring house, who had been initially opposed to the separation and replacement of the gutters, had a change of heart and had the gutters separated and a new gutter installed on the his house. While this took care of half the water coming off the roof, we still had our own half of the roof and the shoddy downspout construction and constant clogging to worry about. By the time we were ripping up the back of our house, the upper gutters had already been split.
When we began looking into a new downspout, my search led me to a larger volume gutter primarily because the old one would overflow even when not clogged. This search, and my research into old home gutters, ultimately led me to the desire to replace our modern gutter with a larger and even oversized historically accurate half round gutter.
If you're unfamiliar, half round gutters were a common gutter style on old homes. Their profile was simple, classic, and most importantly, easy to form using tools of the 19th and early 20th century.
More recently, die based metal forming tools allowed for fabricating of the newer style, or K style, of gutter that's intended to look more like crown molding than a water removal system, but I prefer the look of the old half round gutter on historic homes.
My extensive search led me to a copper gutter supplier I had seen on This Old House and in various old home publications. The company's name is Classic Gutter Systems, and they're out of Kalamazoo, Michigan. You really can't find a company name more properly suited to what I was looking to do.
Classic Gutter Systems offers a series of products that are historically accurate and DIYish friendly for the purchase and install of gutters that look and function great for historic properties. (They also have K style gutters, so as not to completely limit their market.)
After extensive research, deliberation, measuring, arguing, and concern over our ability to execute this project on our own, we decided to pull the trigger and order our replacement gutters.
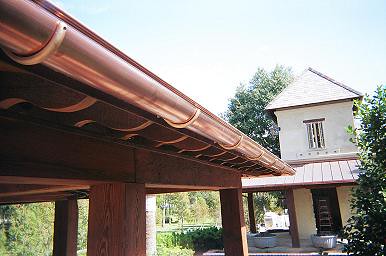
We decided on a 6" style of half round copper gutters for both the upper and lower roof, as well as 4" copper downspouts and a few 40 degree angle pieces to replace the tragic 'S' that was constantly clogging. Oh, and also some gutter screens to keep the leaves and sticks from finding their way into our downspouts. The style we decided on looks very similar to this configuration.

Photo Credit: Cannon Copper
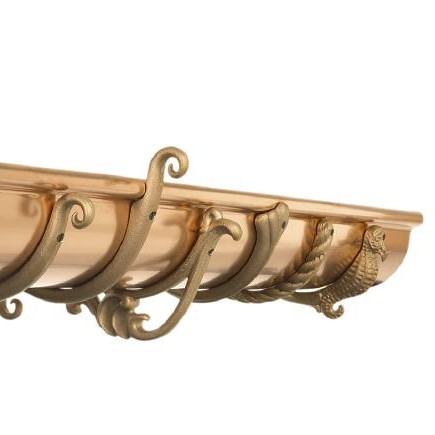
We also opted for a decidedly no-frills look on the hangers, end caps, and mounting straps. They have some pretty ornate designs, even including cast and sculpted gutter hangers in the shape of sea horses.
All told, the supplies for our historically accurate gutter project ran us about $1,000 including shipping. They were able to ship lengths of 10' in a structured boxes to protect the precious yet soft copper, and they all arrived in a freight carrier about two weeks after I placed the order. The cost of copper has gone up substantially since our order, so it'd be a bit more now, but I feel pretty good about the price we received at the time of our order.
And with that, our prerequisite checklist for our summer long siding project was complete.
- What kind of siding should we use?
- What additional tools will we need?
- How am I going to do the work all the way at the top of the house?
- Research (and buy) replacement gutters
We had a backyard full of siding, a sun porch full of our tools and supplies, our scaffolding installed on the house, our gutters waiting patiently for install, and our plan for tackling the whole project. We were ready to get a move on, ready to tackle this project that we were mildly to very worried about doing right. You can see the box of copper gutters at the bottom middle of this photo.
What do you think about the gutters? Were we right to take the extra time and money to ensure an historically accurate look, or do you think we should have just gone with the big box K style gutters? What about material type? We love the look of the copper, but now, after having had it stolen from the side of our house, we're rethinking if we should have used something less valuable, like the white aluminum.

![]()
![]()