So here we are, nearing summer nearly eight years after I unceremoniously removed our aluminum triple track windows, seven years after I expected to have new windows built, and over a year since I declared my own personal ultimatum for building said windows, a deadline that I ultimately blew in a major way. But hey, we've got a pile of western red cedar 4/4 boards boards in the basement just begging to be turned into a bunch of storm windows. I can't deny them their destiny.
The next step in our process was to draw up some good plans and get to building these long overdue windows. I went through several drafts of "plans," each one a slight evolution on the prior, and before I cut the first piece of wood I put together a concept drawing of what the various size and shapes of the windows will be.
As I mentioned in the last post on the subject, I want to treat this as a frame that will be mounted in place, and then create a series of glass or screen panels that can be changed out as the seasons dictate. The drawing I made reflects this approach. Although I would have liked to have a bit more material at all of the critical points of the window to support the panels, I didn't want to overdo it and make the storms so large that their profile would obscure the view from inside of the house. Once I had all of the significant measurements according to my plans, and all of the height and width measurements of the first window, I got to work building the frame.
The first step was to rip the lengths of cedar to the sizes I needed. The cedar I ordered came in 4" and 6" widths. I carefully calculated the best way to rip the boards to minimize waste given their size, and the size of the pieces I'd need for the project.
With the top and sides cut, I moved on to the middle dividing rail and the bottom rail of the window. Though I planned to rabbet most of these boards to accept the panels, these two pieces were a little different. Since the bottoms of both panels will rest on these elements and I wanted to ensure water would not end up pouring into the air gap between the storm and window. I needed to figure out a way to make sure the water would run away from the house and window if it ended up coming in sideways (like during a driving rain storm). To accomplish this rather than cut the pieces square, I placed a slight angle on the cut. This way if any water decides to run into that part of the wood, it will fall away almost as quickly rather than running into the house. At least that's the plan.
After the five pieces that will make up the frame were ripped to their proper size, I set up the dado blade along with a sacrificial fence to rabbet the interior parts to eventually accept the panels. This was a simple and shallow dado, but it left enough material to really support each panel on three sides in each opening.
I debated for quite some time on how I wanted to ultimately assemble this frame. On one hand, I could use pocket holes and screws at each joint. This was the quickest and easiest solution, but definitely not the best. Pocket holes would require me to fill them after the fact and also wouldn't allow for much room for expansion and contraction of the wood, possibly leading to excess warping and finished product failure. This is a perfect example of using pocket holes for unconventional purposes isn't always the best answer.
Instead I decided I wanted to take a little extra time and do true mortise and tenon joints at each meeting point on the outer frame. I figured out where each tenon would fit and got to work on my bench top mortiser.
A little while later I cut the tenons using the dado blade on the table saw and was on my way to assembly.
The areas of the rails that included that slight angle required me to use my chisel to ease the edge of the mortise to accept the angle cut into the rails.
Things were fitting nice and tight and I was able to see the whole thing starting to come together.
But before I got ahead of myself I tried to dry fit the frame in the master bedroom opening and take a few measurements for the panels.
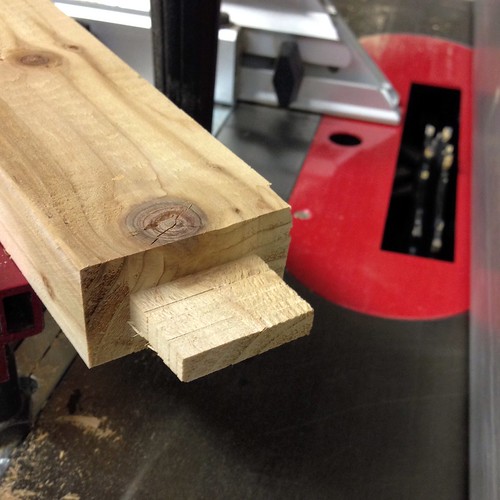
Did I ever mention our house is old? Yeah, it's true, about 125 years actually. And with those years come some settlement and sagging (thanks, gravity). And with that settlement and sagging comes some windows that are completely out of square. The end result? My dry fit was close, but needed a little adjustment. So a little trim here, a little shave tere, and we were back in business with a good fit. I primarily ended up trimming the boards with the dado blade to make slightly longer tenons and then just chopped the ends a little. Here's one of those tenons before I trimmed it down to the right size.
With the first frame done I decided it was a good time to take stock of what had gone well, and what could be improved upon for the next window. I mean, I do have about 10 of these things to build in total.
Good:
- Construction seemed solid
- Sizes seem to work
- Mortise and tenon wasn't horribly difficult
- Cedar was working out and smelling great while being cut
Bad:
- Remember to reset the angle on the saw *before* cutting
- Determine the location of the meeting rail once the frame is actually in its opening (don't just guess and check)
- Remember to take the clean, folded laundry out of the basement *before* cutting a lot of cedar or your laundry will smell like a Guinea pig's cage
With everything set for size, I laid the whole assembly flat and clamped the first frame together. I still need to sand everything down to make it nice and smooth, but we're well on the way to one of 10 windows complete. Oh joy.
Although this project is embarrassingly years behind schedule, I'm really happy to finally be knocking out some progress. After all, if we go through another winter without storm windows, I think I may be sleeping on the couch permanently.
Am I getting ahead of myself with my enthusiasm, or are you starting to see how this project will come together? Do you have any experience building storm windows? Maybe you're in the midst of a woodworking project? I'd love to hear what you're up to.