Do you remember last week when I said I was excited for the potential of the upcoming weekend? Well, I went and jinxed myself with that one. The weekend was good for the most part, but I came down with some sort of a super bug sinus cold at some point on Saturday and I've been as sick as a dog all week. While I had planned to add Tuesday and Friday to my Monday off, enabling me to knock out a whole bunch of chores around the house so we could go marching into spring with the lengthy backlog of our DIY tasks knocked off of our list, that's not how this weekend really ended up going. You know what they say, "The best laid plans of mice and men oft go astray." 

So I've been hobbling around our house in a zip up fleece while toting a consistently depleted box of tissues or half used roll of TP. I'll walk from one room to another, notice a little project that needs to be done, glare at it longingly trying to muster the energy to put together a plan of execution, only to find myself on the couch watching TV or in bed taking a nap, in a fog of congestion. 

Rather than fill your reading with unpleasantries of how my snoring is undoubtedly torturing Wendy and Lulu all night, I'll shift gears a little and show you something that we can officially check off of our list as "complete and finished!" 

Do you recall Wendy's Great-Great-Grandmother's (that we originally thought was Wendy's Great-Grandfather's) chair that we refinished last year? After allowing this poor chair to sit in basement after basement for 40 or more years, eight of them in our basement, we finally got a move on and did something about it. For those who were not following along before, here's a quick recap starting with a decidedly "before" photo.

We took the sad chair completely apart and sanded it back down to its bare wood.

After sanding, we carefully reassembled its various pieces, adding much needed structure and stability in the way of glue.

Once assembled, we tried our hand at staining the chair, or rather dyeing it using aniline dye

We followed that up with several coats of shellac. We were quite thrilled with the results, especially given the shape the chair was in when we took ownership.

Finally, I used our new pneumatic staple gun to add a jute-like webbing for the seat...

...followed by a burlap covering, hopefully giving this great chair another lease on life that can be appreciated for many generations to come. 

But that's not where this story ends. Though we had taken the chair as far as our skills were able to go, we still had the issue of final upholstery of the piece. Wendy had selected a wonderful gray fabric from West Elm and ordered a couple yards just for this project.

As much as we would both love to be amazing upholsterers and seamstresses (yes, this is a dream of mine yet to be fulfilled, honestly), we don't own a sewing machine, were horrible at it when we had one, and I don't even think we were able to sew a single thing properly. We're deficient in the area of sewing, it's a sad truth, but becoming adequate is on my list of life goals.

Until that day comes we have a list of other seamstresses and upholsters that we've used in the past. In the case of our chair we opted to enlist the help of a local company, Mt. Vernon Upholstery. They actually upholstered our mid century couch in our living room. They did a wonderful job and we were so happy with the outcome that we entrusted Wendy's heirloom chair to them for the final touches. I dropped the chair off at the shop several weeks ago and hoped for the best. We weren't sure of exactly what we wanted so we left it in their capable hands. 

Here's a photo of their shop. In my opinion this is the type of look you typically want to see in an upholsterer. Reminds me of the window shop I worked in when I was younger. Utilitarian, not fussy, they're there to do a job and do it well.

Last week we received word that he had completed the work on the chair and I headed out to pick it up. What I arrived home with was a complete and finished piece that we often thought we might never actually see.

I was a bit disappointed to see the upholsterer covered the burlap I had spent so long on with the fabric we had provided (sigh). He also added a double piping around the perimeter of the area below the cushion to ensure a clean and finished edge since you'll be able to see it below the pillow. Though my wonderful burlap had been covered, I understand why, because it looks so much better this way.

In addition, they used standard furniture fabric (not sure what the technical name is) for the underside of the chair, covering the bottom of the webbing I had labored over for hours. Again, I understand why this is in place, but now I just have to imagine the work I put into the seat now that I can no longer see it with my own eyes.

I actually talked to the owner for a few minutes when I picked up the chair and asked him about the job I had done on the webbing and burlap. I was wondering if I had done it correctly, but he was surprised that I had done it myself and said that it seemed very secure and like it will last for a while. He said the best thing I had done was properly weave the webbing and also that I had used staples that were evenly placed and sturdy enough to hold. I asked him about stretching or fraying of the ends of the straps over time and if we had to worry. His opinion was the webbing I had used won't come apart like jute would have, since it's covered in a sort of rubber. I felt quite good about my decisions after speaking with him.

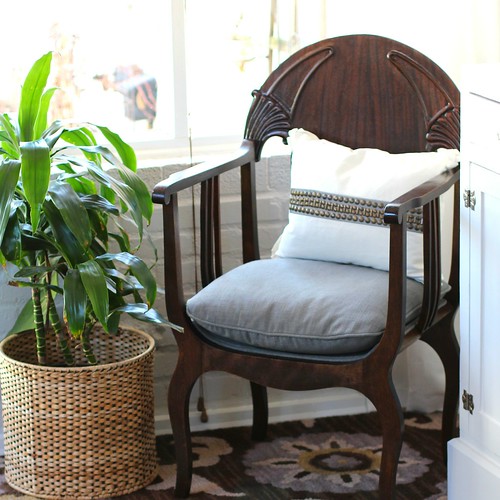
The final touch, the cushion for the seat, isn't entirely what we were expecting, but we're happy with it nonetheless. 

I think we had expected the cushion to have more structure than it does. This cushion is more of a simple pillow than a seat cushion. We were thinking it would be more like a chair seat with a true top, bottom, and sides. When we first placed it in its spot, I think we were somewhat thrown by the fluffed up height of the pillow. 

But now that Mel has made it his new favorite napping spot, and several humans have done their job weighing it down, we really like the way it's looking. 

We're very happy to have our chair back in its rightful home in the corner of our newly finished sun porch. We think it really fits in wonderfully with the room and gives Mel yet another spot where he can relax and enjoy the day. 

Oh, I guess it also gives some extra seating for our guests, but that's surely secondary to its primary function as "cat throne."

Sure, we love projects that are finished in a blink of an eye as much as the next person, but sometimes you need to slow down to do things the right way. In this case, I feel like we've ended up with a pretty great finished product. What do you think of our end result? 

Have you ever tackled a furniture restoration or upholstery job of your own? Would you do it again? We'd love to hear about your experiences.

Comments 25

Comments

0
2/22/2013 at 9:54 AM
Love that last picture of Mel on the chair!
Alex
2/22/2013
Thanks "0", he's a good looking kid.
2/22/2013 at 10:01 AM
It looks really good! Definitely has a professional look to it.

I am actually in the process of reupholstering two wingback chairs, and by "in the process" you understand I mean that I started it in December, got 90% finished with one chair, and hid the other in the basement, right?

Honestly - if I werent so dang stubborn I would have given up by now! Haha I do like the look of the almost finished one, but it is definitely a difficult project.
Alex
2/22/2013
Thanks for the kind words, we're glad you like it.

I have nearly the same situation with our storm windows. I have a few that are nearly complete in the basement, and they're just taunting me to do the rest of them. One day...
Teri Lynn
2/22/2013 at 10:04 AM
Loved your article in Old House Journal, what a nice surprise when I opened the latest issue last night. I was like, I know those people!
Alex
2/22/2013
Thank you so much! We really like how it the article turned out. We've heard from several people with the same reaction and it makes us so happy.
Kathlene
2/22/2013 at 10:23 AM
Gorgeous, and enjoyed every frame of the process. thank you!
Alex
2/22/2013
Thanks, Kathlene. We're glad you enjoyed it.
2/22/2013 at 10:51 AM
Wonderfully executed. Looks perfect!
Alex
2/22/2013
Thanks, John. When I was in their shop I was scanning around and looking for things that I needed to buy for my "shop."
Cheryl
2/22/2013 at 10:58 AM
The knife edge cushion will better conform to the curved edges of the chair - a boxed cushion would not have looked right.

I reupholstered the cushions for a wooden chair once that required 12 covered buttons. After covering one button I gave up and paid an upholstery shop to cover them for me! Everything else was easy and the 8" long needle needed to attach the buttons was quite fun to use.

As far as sewing skills - home decor projects are some of the best to learn on as they are mostly straight sewing. A basic machine that runs well is your best friend - more bells & whistles just mean more can go wrong! Biggest beginner problems are with tension & bobbins jamming so sometimes a class (especially using your own machine) is helpful. You've already proven that you can plan out a project & measure carefully so there is no reason you can't master sewing home decor items.
Alex
2/22/2013
Thanks for confirming the choice. I do think you are correct, and this is precisely why we left it in the capable hands of the upholsterer.

I do think we (or at least I) will learn to sew at some point here. There are just too many occasions where I'd like to do an alteration or custom item that I'd rather not pay someone else to do, or wait for someone else to do. Hopefully soon.
Jan
2/22/2013 at 1:39 PM
Neti pot! You can't use it if your nose is stuffed, but it's great for derailing incipient colds.

Love the chair, and I agree with Cheryl that a boxed cushion wouldn't have worked with the seat shape. Also agree with her advice on learning to sew (it's really not too hard! Lots of YouTube videos for help once you get the basics down). As a freelance seamstress, I have 3 sewing machines, but my 60+ year old Singer can't be beat for beautiful straight stitching and the ability to handle heavy fabric. I've never reupholstered a chair, but have made slipcovers and seat cushions with piped edges. It's all geometry ;-)
Alex
2/22/2013
I remember the first time I saw a commercial for the neti pot and I almost fell out of my chair laughing. I think I'm a little too stuffed for it at the moment, but might need to give it a shot. I do know that I am only supposed to use the water from the drug store, and that if you use tap water you can get that brain parasite. True story, saw it on the news last year.

Perhaps I'll need to add "go to sewing class" to my "things to accomplish in 2013" list? How nice would it be if I could make Wendy a nice pillow or cushion as a give?
sue
2/22/2013 at 2:46 PM
My daughter, who has sinus issues, uses a neti pot and vouches that it is a help before and during colds. I haven't gotten the nerve yet to use it, silly, I know; especially since I bought it for her and instructed her on its benefits. Do as I say... She boils taps water, lets it cool and takes care of the parasite issue that way, ughh.
I think it is quite stylish that Mel matches the fabric of the chair. Are you partial to that color and choose Mel for that reason or have you warmed up to that color because of Mel? Cats are great for staging, I am partial to the tuxedo or all black cat look myself.
Wendy
2/25/2013
It's funny you mention that Mel matches the chair. We used to joke that we chose the color palette for our home based on Mel and Oliver's coloring. And I suppose now that Mel is getting more gray, he matches the sun porch. :-)
2/23/2013 at 1:39 PM
This looks amazing! I'm so impressed by you guys! I would also love to learn to upholster. This post has motivated me to look around for some sort of upholstering class/seminar. Shouldn't be too hard to find, right? Ha. I fantasize about thrifting and antiquing, and actually being able to take home the chair that needs to be recovered because I possess those skills... One day!
2/23/2013 at 1:40 PM
Also, I love the post title. Clever!
Wendy
2/25/2013
I'm with you Amanda. There are so many great piece of old furniture, that if we had the space and the upholstery skills, they'd come home with us!
JC
2/23/2013 at 2:11 PM
Wow, that looks awesome. I like the grey fabric, too. Not too modern, not too traditional. I'm also not too surprised with how the upholsterer chose to finish the chair, since this is such an unusual shape, the options are fairly limited.

And Mel looks totally cute and comfy on there! :D
Wendy
2/25/2013
Thanks, JC! Yep, I wanted to find a fabric that had interesting texture, but was simple enough to not compete with the pattered rug. It feels really durable, and will hopefully stand up to cat drool over time. :-)
2/24/2013 at 9:57 PM
I reupholstered a thrift store chair. I doubt I'll do it again. It was scary.

Love how the chair turned out!!
Wendy
2/25/2013
LOL! "Scary" is what I imagine a upholstery job to be like in our house too. Some times it's best to outsource, and this happens to be one of our areas of no expertise!
2/26/2013 at 1:51 PM
OMG, what a great makeover! The chair looks so comfy now. (I think the kitty thinks so too. : )

Sammy ~ Renew Redo
bfish
3/1/2013 at 6:12 PM
Can't ever have too many pictures of Mel!!

I sense your initial disappointment with the cushion and believe my reaction would have been similar. If the pillow had top, bottom, and sides with welting on the seams, all eased in shape to fit the slightly curved bottom of the chair, it would clearly look custom. As is the cushion looks like it could be COTS (IT talk for you Alex).

Oh well, when the gray trend* plays out you may bring some other colors into the room, providing an opportunity for another shot at the cushion.

*I know you all claim not to be trendy but is it not true that gray is everywhere you look? This is noted with the utmost respect; I do admire your taste and style.
Since you've not signed in yet, you will need to fill in your name and email below. If you have a Facebook account, save yourself a step and use Connect to login.

Denotes a required field.

Please enter full URL, including http://

You can use Markdown syntax in your comment. And you can also use lots of Emoji!
  • Search

  • Login
  • Follow
  • Advertising

If you're looking for information on advertising and sponsorships, head on over to our sponsorships page. You can purchase site sponsorships in a few easy clicks. 

Toolbox Tuesday
Open Housing
  • We're Featured!

Old Town Home has been featured in the following places and publications:

The Washington Post
 
Washingtonian Magazine
 
Domino
 
Old House Journal
 
 
Apartment Therapy House Tour
 
Washington Post Express Feature
 
Home & Garden Blogs
 
© 2024 OldTownHome.com. - Privacy Policy

Unexpected Error

Your submission caused an unexpected error. You can try your request again, but if you continue to experience problems, please contact the administrator.

Working...

Working...