Of the many questions we typically receive regarding our home renovation efforts, one of the most commonly asked revolves around paint stripping. From those curious about the general efforts, to the people who are interested in the nitty gritty details of the approach we take (and perceived benefits), they're a series of questions we've been fielding for years, but whose answers have changed frequently over that time as we tire of our techniques in search of something better, faster, and less painstaking. 

Most recently, while beginning our bathroom window restoration, we undertook the stripping of the final set of original window casings in our home. This is the culmination of an 11 year journey that started with the best intentions and a completely false assumption that a little chemical stripper applied to the mouldings would literally make the paint fall from the wood, running in terror from our house never to be seen again. To my utter amazement, shocked disappointment, and crushed spirit, I was completely incorrect in my notions. Paint stripping turned out to be long, arduous, tedious, and back aching work that took time, patience, and experience to get down to a science.

This project started out with six pieces of window casings in our 4" beaded moulding variety (each side consisted of two pieces, most likely because this was a second floor rear facing window and they wanted to just use scraps). Additionally we had the window stool and three pieces of sash stop to strip while we were at it. Looking at it all laid out on the table I knew what was to come, and it was a daunting chore.

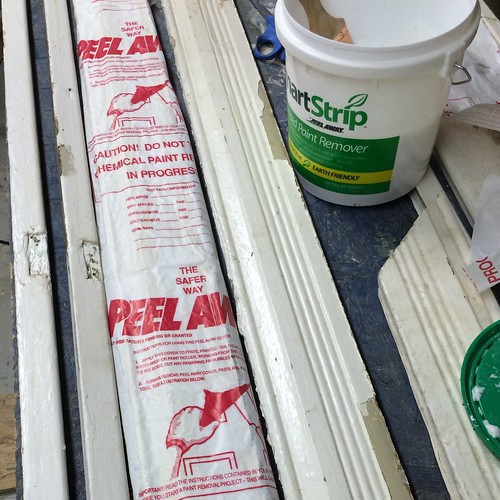
I jumped right in using the SmartStrip product I've mentioned a few times before. Prior to recent time I was a tried and true Peel Away 1 or 7 guy. I've used the Citrus product, Soy, harsh chemicals, heat guns, infrared, a crock pot and dish soap (mostly for metal hardware), etc, but when it comes to these extremely intricate window and door casings, I like to start with SmartStrip these days.

It's not cheap, but I like that it's non-caustic, low odor, doesn't burn when you inevitably get it on your hands, and seems far less harsh on the surfaces that you're stripping. It also maintains all of the properties I tend to like about Peel Away 1 and 7.

It is almost like a fluffy liquid, and unlike the Peel Away 1, does not alkalize the wood and needs no neutralization once complete. I apply it with a garbage paint brush and try to apply it to the items rather liberally.

Since this stripper works for as long as it stays wet, it's important to apply a covering so it doesn't dry out prematurely. While Peel Away paper is what we typically use (we have 10 leftover bundles from past projects), wax paper is equally as effective and far cheaper. SmartStrip doesn't come with paper the way Peel Away 1 did, so be sure to pick up a roll of wax paper at the grocery store if you're going to be using this stuff.

I like to pre cut the paper to the size of the moulding I'm stripping so I can apply it right to the work without messing around. When I drape the paper over the wood I try to apply it from the middle out, pressing the paper into the stripper while attempting to eliminate any and all air bubbles.

Once everything is looking like a mummified set of window moulding, completely covered in stripper and paper, I'm able to take a step back and let the paint stripper work for about 18-24 hours. This obviously isn't for the project that's pressed for time, but this gap in time does tend to cut the project up a bit.

In our case, we're dealing with a dozen or more layers of paint and shellac. Some is thick, some oil, some sloppy, some latex. What I find is that the first attempt at removal tends to completely strip the top several layers of paint, most likely the most recent latex layers, but leaves the older and much harder paint completely intact below.

The key here is to remove what can be removed easily, but there's no need to remove more than that.

Rather than try to get more off than wants to come off, I repeat the initial steps and apply a second coat of paint stripper and paper.

After another 18-24 hours I hit the wood with the paint removal tools for a second time. Typically, this second application is the key to success, easily taking all of the flat surfaces down to bare wood.

The removed paint has turned to a brownish sludge that Wendy tends to associated with diarrhea, but I like to think of it more as triumph in sludge form (makes me less disgusted).

I use a tremendous amount of paper towels at this point, and a combination of water and vinegar. Wiping and re-wiping over and over I eventually get the wood to a point where the melted triumph paint sludge has been cleared from the wood, leaving only the most difficult and stubborn paint.

At this point I grab my set of paint removal "dental tools" and the tried and true heat gun. I also don my respirator mask and ready myself for many hours in a back aching pose hovering above the remaining paint, wishing I could instead conjure a Harry Potter spell for paint removal. The spell never arrives, and instead, I end up looking super nerdy for several hours.

Using the heat gun I'm able to soften the paint in the deep grooves of the various beads in the moulding, removing it a little at a time, about one inch per minute. I'm definitely not setting any land speed paint removal records, and I'd actually venture to guess that each layer of the paint actually dried in less time than it takes to remove it, but this moulding looks good when you can see it's details again, dammit!

After hours of efforts I grab my steel wool pads and start to hit the beads. The smoothness that comes with a little elbow grease and a whole lot of time investment is a beautiful thing.

I know this house will likely never see another owner like me. I'm a zealot and a hard head bordering on the moronic, but when I set my mind to something you'd better believe I'm going to see it through. Such is the case with these mouldings. Completely stripped, full of their dings, holes, cuts, and other imperfections...

They can almost tell a story. From the nail holes near corners indicating makeshift window dressings or temporary christmas lighting, to the marred backs damaged by water infiltrations over the years, this moulding has been in place for 125 years, and there's no way I'd rip it out for something new.

These window and door casings are the thing of beauty once re-installed. They are clean, crisp, unique, and downright gorgeous (in a "my child is the most beautiful child in the world" sort of way).

All of this time and effort is spent with the full knowledge that we'll be painting right over top of these once they're back in place, and I'm 100% okay with that. I don't particularly enjoy stripping paint, but now that I've gotten pretty decent at it, I know it will be great when it's done, and that's enough to keep me going. 

I did have to modify some of it slightly to accommodate the wall depth. I have to be honest, there's nothing I like doing less than cutting into this old moulding.

Given the moulding is removed from a solid installation, reinstall is pretty straight forward. To install I use my brad nailer and shoot only what we need. I don't like filling it full of holes like some finish people tend to do.

What? You don't think it looks amazing and lovely? Just you wait, a few days, or maybe weeks, possibly months, and an outside chance of years...and I might just have a beautiful finished product to share with you. Until then, paint stripping on this window trim is done!

After all my years of paint stripping in this house I'll tell you one thing for sure. If we're ever looking to buy another old house and I look at the mouldings and suggest to Wendy that we should strip them, she has every right to cut my tongue right out of my mouth where I stand. I mean, I'm obviously not making any reasonable sense, so I shouldn't ever be allowed to speak again.

How do you feel about paint stripping? Are you intrigued by it? Perhaps, enthusiastic? Or are you more in the "over it" camp where I've now permanently setup residence? 

What's that you say? I have at least one or two more doors to strip? Oh brother.

Comments 21

Comments

Sam
12/23/2013 at 1:34 PM

I really admire your attention to detail and dedication to restoring the original features. My house is a similar age and has very few features left. I'm absolutely aching to strip the cornicing and remove the failed wallpaper but unfortunately it's a rented house. I've made a few "overboard" repairs so far but do constantly have to reign in my desire to goal whole hog and tear out all the landlord crap!

I guess what I'm saying is; don't worry, you're not alone in pig-headed dedication to something 99% of people aren't going to notice.

Alex
12/27/2013

That would be pure torture. I have enough trouble going through open houses where I see things that need to be done, let alone living in a space where I'd have to constantly hold myself back.

12/23/2013 at 3:59 PM

You are a patient man. I looked at the miles of moulding in my house and thought, "Self, wouldn't this look great stripped down & stained?" And then I got out the white paint and put another coat on them all.

I did, however, hand strip my ENTIRE portico down to the bare wood before repainting it. It was worth the effort. The front doors, however, I took to a Dip N Strip place. $300 and they were done in a day. I'll probably (eventually) have them strip all the doors in the house.

Alex
12/27/2013

Our moulding is tiny compared to yours, and I'm willing to bet it would be like assembling a puzzle if you ever took it off the wall. I'd be doing the same thing as you, strip only what you must. $300 and done in a day vs $120 in stripper and done in a week using your own time is definitely worth the price paid, that's for sure!

JC
12/23/2013 at 4:04 PM

I have done my share of paint stripping. I hate it too. The only good part of it is seeing the results from all the effort once the project is done. I can only ever remember stripping something that would get repainted ONCE. It was the two windows (now used as doors) on my kitchen storage cabinet. I think the old lead paint is the WORST. I wanted them stripped because I wasn't convinced that my new acrylic (flat) paint would stick to it, and I wanted bare wood on the interior.

I think the absolute worst stripping job I've had to do was (believe it or not) a painted zinc clock dial. The paint on there (what was left of it) was impervious to the stripper. I had never seen anything like it before. It must have been baked on.

The thought of stripping house mouldings gives me nightmares. When I bought this place, I knew I'd just be repairing, patching, and painting over the existing layers. To me, it's just not worth it, and the lumpy paint adds charm.

Alex
12/27/2013

Hats off to you. Stripping something as delicate as a clock dial, or any ornamental metalwork is quite intimidating, to say the least.

The idea of stripping moudling didn't bother me before, but I've definitely changed my tune on that.

12/24/2013 at 12:16 PM

Your house is lucky to have you. What a lovely Christmas present you have given to it this year.Alt smile Happy Holidays!

Alex
12/27/2013

I hadn't thought of it like that, but you're right!

Christine
12/25/2013 at 9:17 AM

As a historic building conservator, I applaud you for all the professional-level work you are putting into your home. I truly enjoy reading your blog!

I do a ton of paint stripping, and though it is a down right terrible job at times, the results are always worth it. Great work!

Alex
12/27/2013

You have no idea how much I appreciate your comment. It really means a lot. You've hit the nail on the head for what we're trying to achieve.

12/27/2013 at 8:30 AM

Boy, does this look familiar! I think we've tried everything out there for removing paint and I think I've settled on a heat gun and a scraper. There's a tool out there called the Silent Paint Remover that is similar to a heat gun, but I feel that the design of a heat gun gives you better control. I just finished stripping about nine layers of paint from one of our original built-in medicine cabinets. Took me about ten hours of work.

I don't know why people would just slop on layers of paint without doing any surface prep or anything. We've got a lot of places where people painted over deep chips, runs, dust bunnies, you name it - and no prep work was done. Just slop.

Alex
12/27/2013

I've got the Silent Pain Remover but lent it out to a neighbor recently. I just don't find myself using it unless I'm stripping something large and flat. The heat gun works far better for the detail items I'm typically doing.

James
12/27/2013 at 8:44 PM

Alex,

Long time reader but finally took the plunge and bought an "old home" (1916 Craftsman Bungalow)in August. After promptly replacing the heat and air conditioning, rebuilding the garage doors (including the headers and studs) and replacing the back door after a burglary. Now it's time to start on "fun" projects.

I just spent 7 hours stripping the upstairs bathroom door and only finished 3/4 of one side. On the surfaces I've stripped 15 or so layers of paint off I can't get to the bare wood. There is a hazy/chalk layer that slightly rubs off when you draw your finger over it. I'd like to remove it but the heat gun has no effect on it. I haven't tried Peel Away but it seems like a waste for just a single layer of paint... Any thoughts on what it might be or how to remove it?

Thanks for the window series; I've got 43 that need various repairs. That's going to be the next task after repairing the bathroom door so it'll actually close.

Jim

Brendan
1/7/2014 at 9:18 PM

On occasion on old doors exposed to damp conditions you'll find a base coat of paint that had plaster added to it. This coat is often thicker than normal and rock hard. Remove it like grout by softening with a heat gun and mechanically scraping. No chemical is going to get it off.

A chalky layer might also be calcimine paint which around 1900 was made out of ground chalk and glue binders; great for ceilings as long as you wanted white. But calcimine paint is notorious for not being paintable. Later coats of paint just peel right away after a year or two. If it is calcimine you need elbow grease, a scraper, lots of soapy water and TSP.

Alex
1/7/2014

Very cool info, Brendan. I hadn't heard about that paint. We have a green layer of paint as our base coat on everything and it's a little stubborn, but nothing like the plaster paint you're mentioning.

James, based on what Brendan said, it sounds like some good old fashioned elbow grease and some scrapers might be in order. Good luck and let us know how it goes.

James
1/8/2014 at 9:41 PM

Alex - After a coat of Peel Away 7, and waiting the required 24 hours, I was able to get some of the "plaster paint" off and then reapplied. Waited another 24 hours and then with heavy scraping and some 000 steel wool I was able to get all of it.

Also, I've begun to use the steel wool to "wash" the wood after I've used the scraper to remove the paint and Peel Away. Seems to do a better job of getting all the "gunk" to release and then wipes right up with paper towels. It's still not clean, or easy, but does seem to work.

Thankfully, I've determined that the woodwork that faces into the hallway was all varnished originally so a single coat of Peel Away takes it all the way down to the wood! The paint on the bathroom side however is going to be a labor of love...

Brendan - looks like you are correct in this case. What I can only imagine was the first or second paint job was a light bluish color that is solid. This is different than what was on the door... Oh the joys!

Maggie
12/28/2013 at 8:31 PM

Your dedication to perfection is admirable!!!

max1023
12/31/2013 at 11:08 PM

that is pretty similar to the method I employed for my wood trim. Thankfully ours isn't so detailed or loaded with paint where I feel it necessary to strip all of the woodwork even if its going to be painted. We're working in a guest BR right know with 3 5 panel doors, 2 windows, 8" baseboard and 4.5" crown molding. We also intend on shellacing everything its stripped. We use the heat gun first and follow up with the smart strip. Followed by denatured alcohol (for the old shellac) and brass wool. I understand using the smart strip if you intend on leaving the wood natural but if you're painting over it why not use peel away since its cheaper, faster, and (from what i've read) more effective?

Alex
1/7/2014

I'm finding that I tend to like working with the SmartStrip better, and it's only a few dollars more expensive than the Peel Away 1. The Peel Away 1 has had a tendency to "bleed" a brown ooze from the stripped wood even through the paint. I've just not had this experience with the SmartStrip. Also, some voice in my head just keeps saying "If you use Peel Away 1 it can never be stripped natural again." It's ridiculous, but it's just house my brain works.

3/22/2014 at 12:30 AM

I actually don't mind stripping paint. Thus far I've stripped the flooring on the entire third floor of our house, 1/3 of the façade (someone painted over brownstone!), and I'm almost done stripping the bedroom walls. Peel Away 1 and Peel Away 6 (now gone) are my favorites. I bought a bucket of Smart Strip. Tried it on masonry, but it didn't work so well. Going to try it on a mantel next. I do miss Peel Away 6 though…

mau
5/14/2015 at 1:01 AM

I have a question for you - you're talking about stripping paint in a very old house. Did you test for lead? I'm wanting to strip paint in my newly purchased 115 year old house but I tested the bottom layers of paint on the trim and doors (where the paint is absolutely slopped on there are so many layers) and they are indeed lead based. After reading about the necessary precautions for dealing with lead paint, it almost doesn't seem worth it. What are your thoughts?

Since you've not signed in yet, you will need to fill in your name and email below. If you have a Facebook account, save yourself a step and use Connect to login.

Denotes a required field.

Please enter full URL, including http://

You can use Markdown syntax in your comment. And you can also use lots of Emoji!
  • Search

  • Login
  • Follow
  • Advertising

If you're looking for information on advertising and sponsorships, head on over to our sponsorships page. You can purchase site sponsorships in a few easy clicks. 

Toolbox Tuesday
Open Housing
  • We're Featured!

Old Town Home has been featured in the following places and publications:

The Washington Post
 
Washingtonian Magazine
 
Domino
 
Old House Journal
 
 
Apartment Therapy House Tour
 
Washington Post Express Feature
 
Home & Garden Blogs
 
© 2024 OldTownHome.com. - Privacy Policy

Unexpected Error

Your submission caused an unexpected error. You can try your request again, but if you continue to experience problems, please contact the administrator.

Working...

Working...