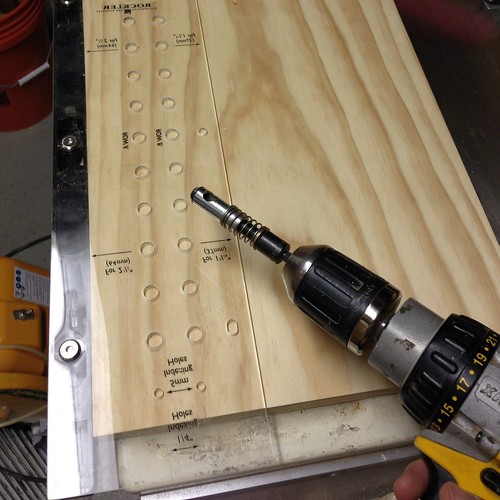
I mentioned a specific tool in yesterday's post about our grand closet reveal that I've also mentioned a few times before on various other projects. In fact, this particular tool has been so useful that it's been a key element in the success of our office desk, kitchen shoe storage, and bedroom closet projects. Though it's been extremely useful on those projects, they surely aren't the last places where I'll be using it. The tool? My shelf support jig with self centering and depth limited drill bits.
This simple but effective jig is one that I hemmed and hawed about buying for the longest time but finally decided to go for it in a fit of impulsion one evening. Using my "one new tool for every project" justification I knew we needed adjustable shelves for our office desk, so I picked up this simple little wonder several years ago. I knew I wanted to do adjustable shelves in the right hand office desk cabinet, but I didn't have any good tools to drill the holes or make supports. Though there are several different types of shelf supports you can buy, my favorite and the cleanest looking style (in my opinion) are the peg style metal shelf supports. The only problem, in order for this type of a shelf support to work you need completely consistent and predictable hole locations.
There's no better way to get consistent and predictable in the woodworking world than through the use of a jig. Though I may have been able to build my own using plywood and a lot of time, I picked the jig up from the online woodworking superstore, Rockler, and boy am I glad I did. The jig is clear plastic with clearly marked measurements and two rows of perfectly consistent hole locations, and the price was extremely reasonable at under $30 for the kit.
The jig is constructed as two primary pieces, the clear plastic area for drilling the supports, and a detachable side piece. The side piece to the jig that acts as a boundary for the against the edge of the wood you're drilling, so you don't even have to clamp it in place if you have a good and predictable edge to rest it against. The other thing that's cool about this side support is that is acts as a small container that holds the drill bits. This way you're never hunting around for the bits when you need them.
Beyond the drilling holes throughout the field of the jig, there's a smaller hole at the top and bottom of each row of holes that allows you to place a drill bit or shelf support through the hole and into the wood you're drilling. This hole enables you to properly space the jig if you need to drill more holes than the jig can accommodate in a single pass, or to set the initial holes based on the top of the piece, as I did in the photo above.
As well made and useful as the jig itself is, the true usefulness of the jig comes from the two self centering and depth limiting drill bits I purchased along with it. These two bits, sized at 1/4" and 9/32", allow me to drill a perfectly centered hole in each support location each and ever time. There's a small collar on the base of the bit that fits in the jig's holes perfectly, ensuring the center of the drill bit is dead center in the jig.
Best of all, the depth of the drilled hole is limited by a spring loaded stop that prevents the bit from over drilling its necessary depth. The metal shelf supports require a 3/8" deep hole, so these bits drill to about 7/16", allowing for a little variability.
The 1/4" bit is perfect for placement of the metal shelf pins alone, as I did with the kitchen shoe storage. But the 9/32" bit is necessary when using the metal collars that the shelf pins can sit within, as I did with the closets and office desk.
The key to drilling the holes absolutely perfectly is simple, you need to keep your drill completely perpendicular to what you're drilling. If you do this you'll get a perfect hole every time.
The end result in either a small shoe storage item, or in the very large shoe storage wall I created for Wendy (do you see a trend?) are perfectly aligned and evenly spaced holes exactly where you need them to act as shelf supports. The following photo is of the side support for the shelf area in my closet, also done with this wonderful jig.
All that's left to do is to pick up a few bags of shelf supports and the optional collars in the finish that works best for your project, and you've got yourself a sturdy, functional, versatile, and great looking method for shelving.
There you have it, my keys to an easy and fast adjustable shelf install. We'll be using this jig in several places during upcoming projects, so be sure to watch for it along the way.
Do you have a preferred method of shelf supports? I know there are a ton of options out there, including other similar jigs. Let us know what you think and if you've used something that you particularly like.
Did you enjoy reading this post? Want to learn more about our first-hand experiences with other tools, devices or items used throughout our renovation? If so, check out our complete list of product reviews in our Toolbox Tuesday section.
Note: We weren't compensated for this review. We simply want to share good products when we see them, and hope that learning from our mistakes can help save you time, money and frustration.

![]()
![]()